Kiosk / POS Setup
Turn any tablet or touchscreen into a self-service ordering terminal. Customers browse, basket, and pay by QR — no staff needed at checkout.
Overview
The Trapyfy Kiosk system turns any tablet or touchscreen into a self-service ordering terminal. Customers browse your product catalogue, add items to their basket, and pay by scanning a QR code on their mobile device — using card, Apple Pay, Google Pay, or crypto. No staff interaction needed at checkout.
The kiosk is ideal for trade shows, events, pop-up shops, and retail locations. Once an order is paid, it appears instantly in your merchant backend for staff to prepare and hand over.
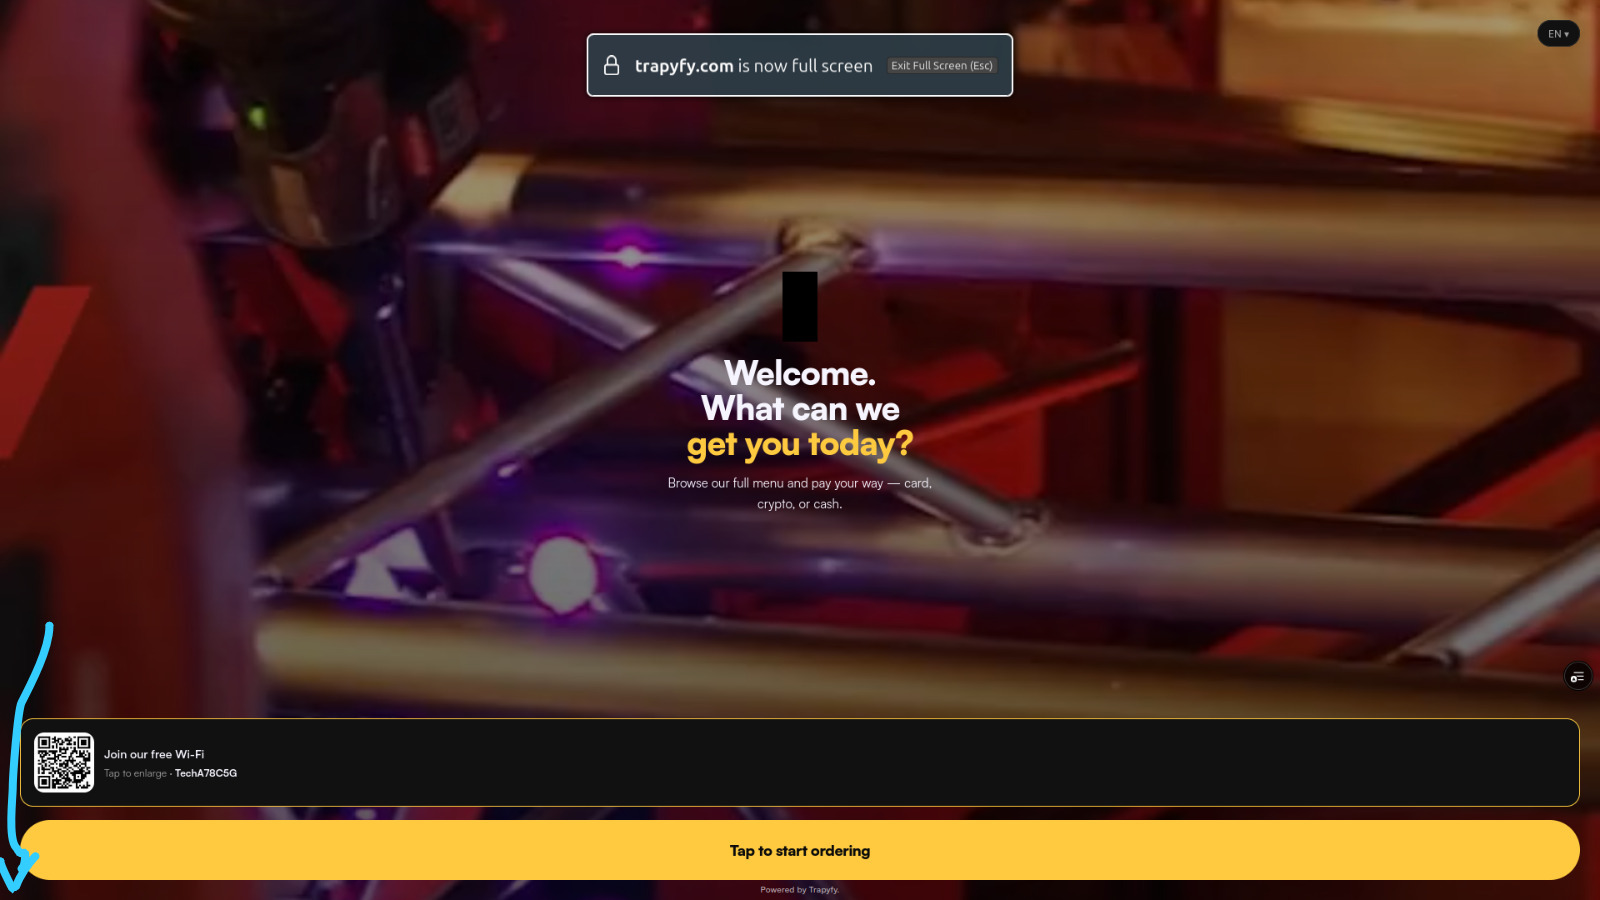
The kiosk welcome screen greets customers with your branding, a Wi-Fi QR code, and a prompt to start ordering.
How payment works: The kiosk generates a QR code at checkout. The customer scans it with their phone, which opens a Trapyfy-hosted payment page (via Niftipay). Payment is completed on the customer's device — card, Apple Pay, Google Pay, or crypto. Once paid, the order is confirmed on both the kiosk screen and the merchant backend.
Cash / failed payments: If payment is unsuccessful or a customer prefers to pay cash, staff can view the pending order in the backend and either collect cash manually or regenerate a payment QR code for the customer to scan again.
How the Kiosk Flow Works
From the moment a customer taps the screen to the moment staff hands over the order, every step is automated.
Customer browses
Customer approaches the kiosk, taps to start, browses the product catalogue by category, and adds items to their basket.
Order created
The kiosk sends basket contents to Trapyfy. A unique Order ID is generated and a temporary unpaid order record is created.
QR code appears
A secure payment QR code is displayed on the kiosk screen. The customer scans it with their mobile phone.
Customer pays on phone
The QR opens a Trapyfy payment page showing the order summary and total. Customer pays via card, Apple Pay, Google Pay, or crypto.
Payment confirmed
On success, the order status changes from Pending Payment to Paid. Confirmation shows on both the customer's phone and the kiosk screen.
Staff fulfil order
The paid order appears instantly in the merchant backend. Staff pick, pack, and mark it Ready for Collection, then hand it over and mark Complete.
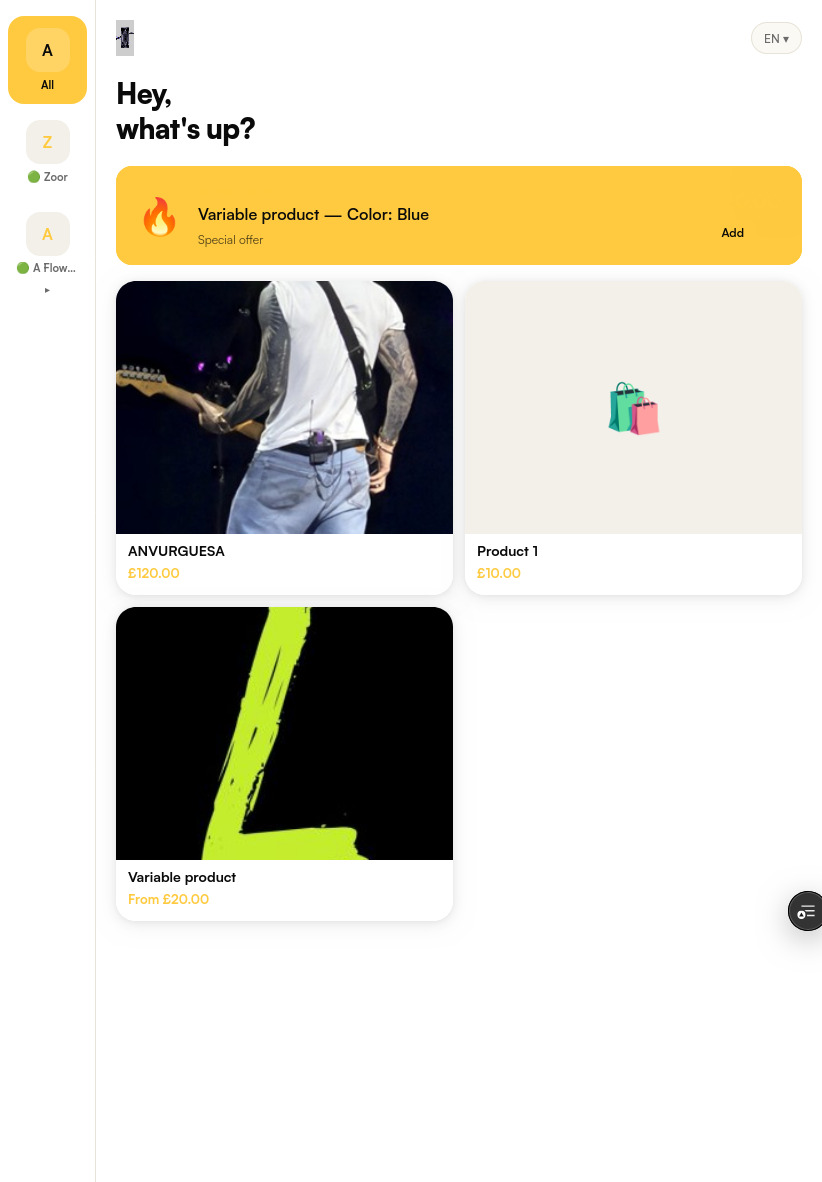
The customer-facing kiosk shows a category sidebar, a featured product promotional banner, and a product grid with images and prices.
Recommended Pre-Event Timeline
To ensure a smooth event, complete these tasks in this order:
- 2 weeks before: Create the trade show warehouse and configure pricing and stock for all products.
- 1 week before: Create the store, receipt template, and enable kiosk mode.
- 3 days before: Pair all kiosk devices and configure branding and settings.
- 1 day before: Run a complete end-to-end test — place a test order, scan the payment QR, and verify it appears in the backend.
- Day of event: Load the kiosk URL on all tablets, verify all devices are active, and brief staff on order fulfillment.
Step 1 — Create a Trade Show Warehouse
Before setting up the kiosk, create a dedicated warehouse for the event so inventory and pricing are tracked separately from your regular stock.
- Go to Inventory → Warehouses
- Click Add Warehouse
- Set the Name to something like TRADE SHOW
- Assign the Organisation and set the Country to the event country (e.g., Germany / DE)
- Click Save
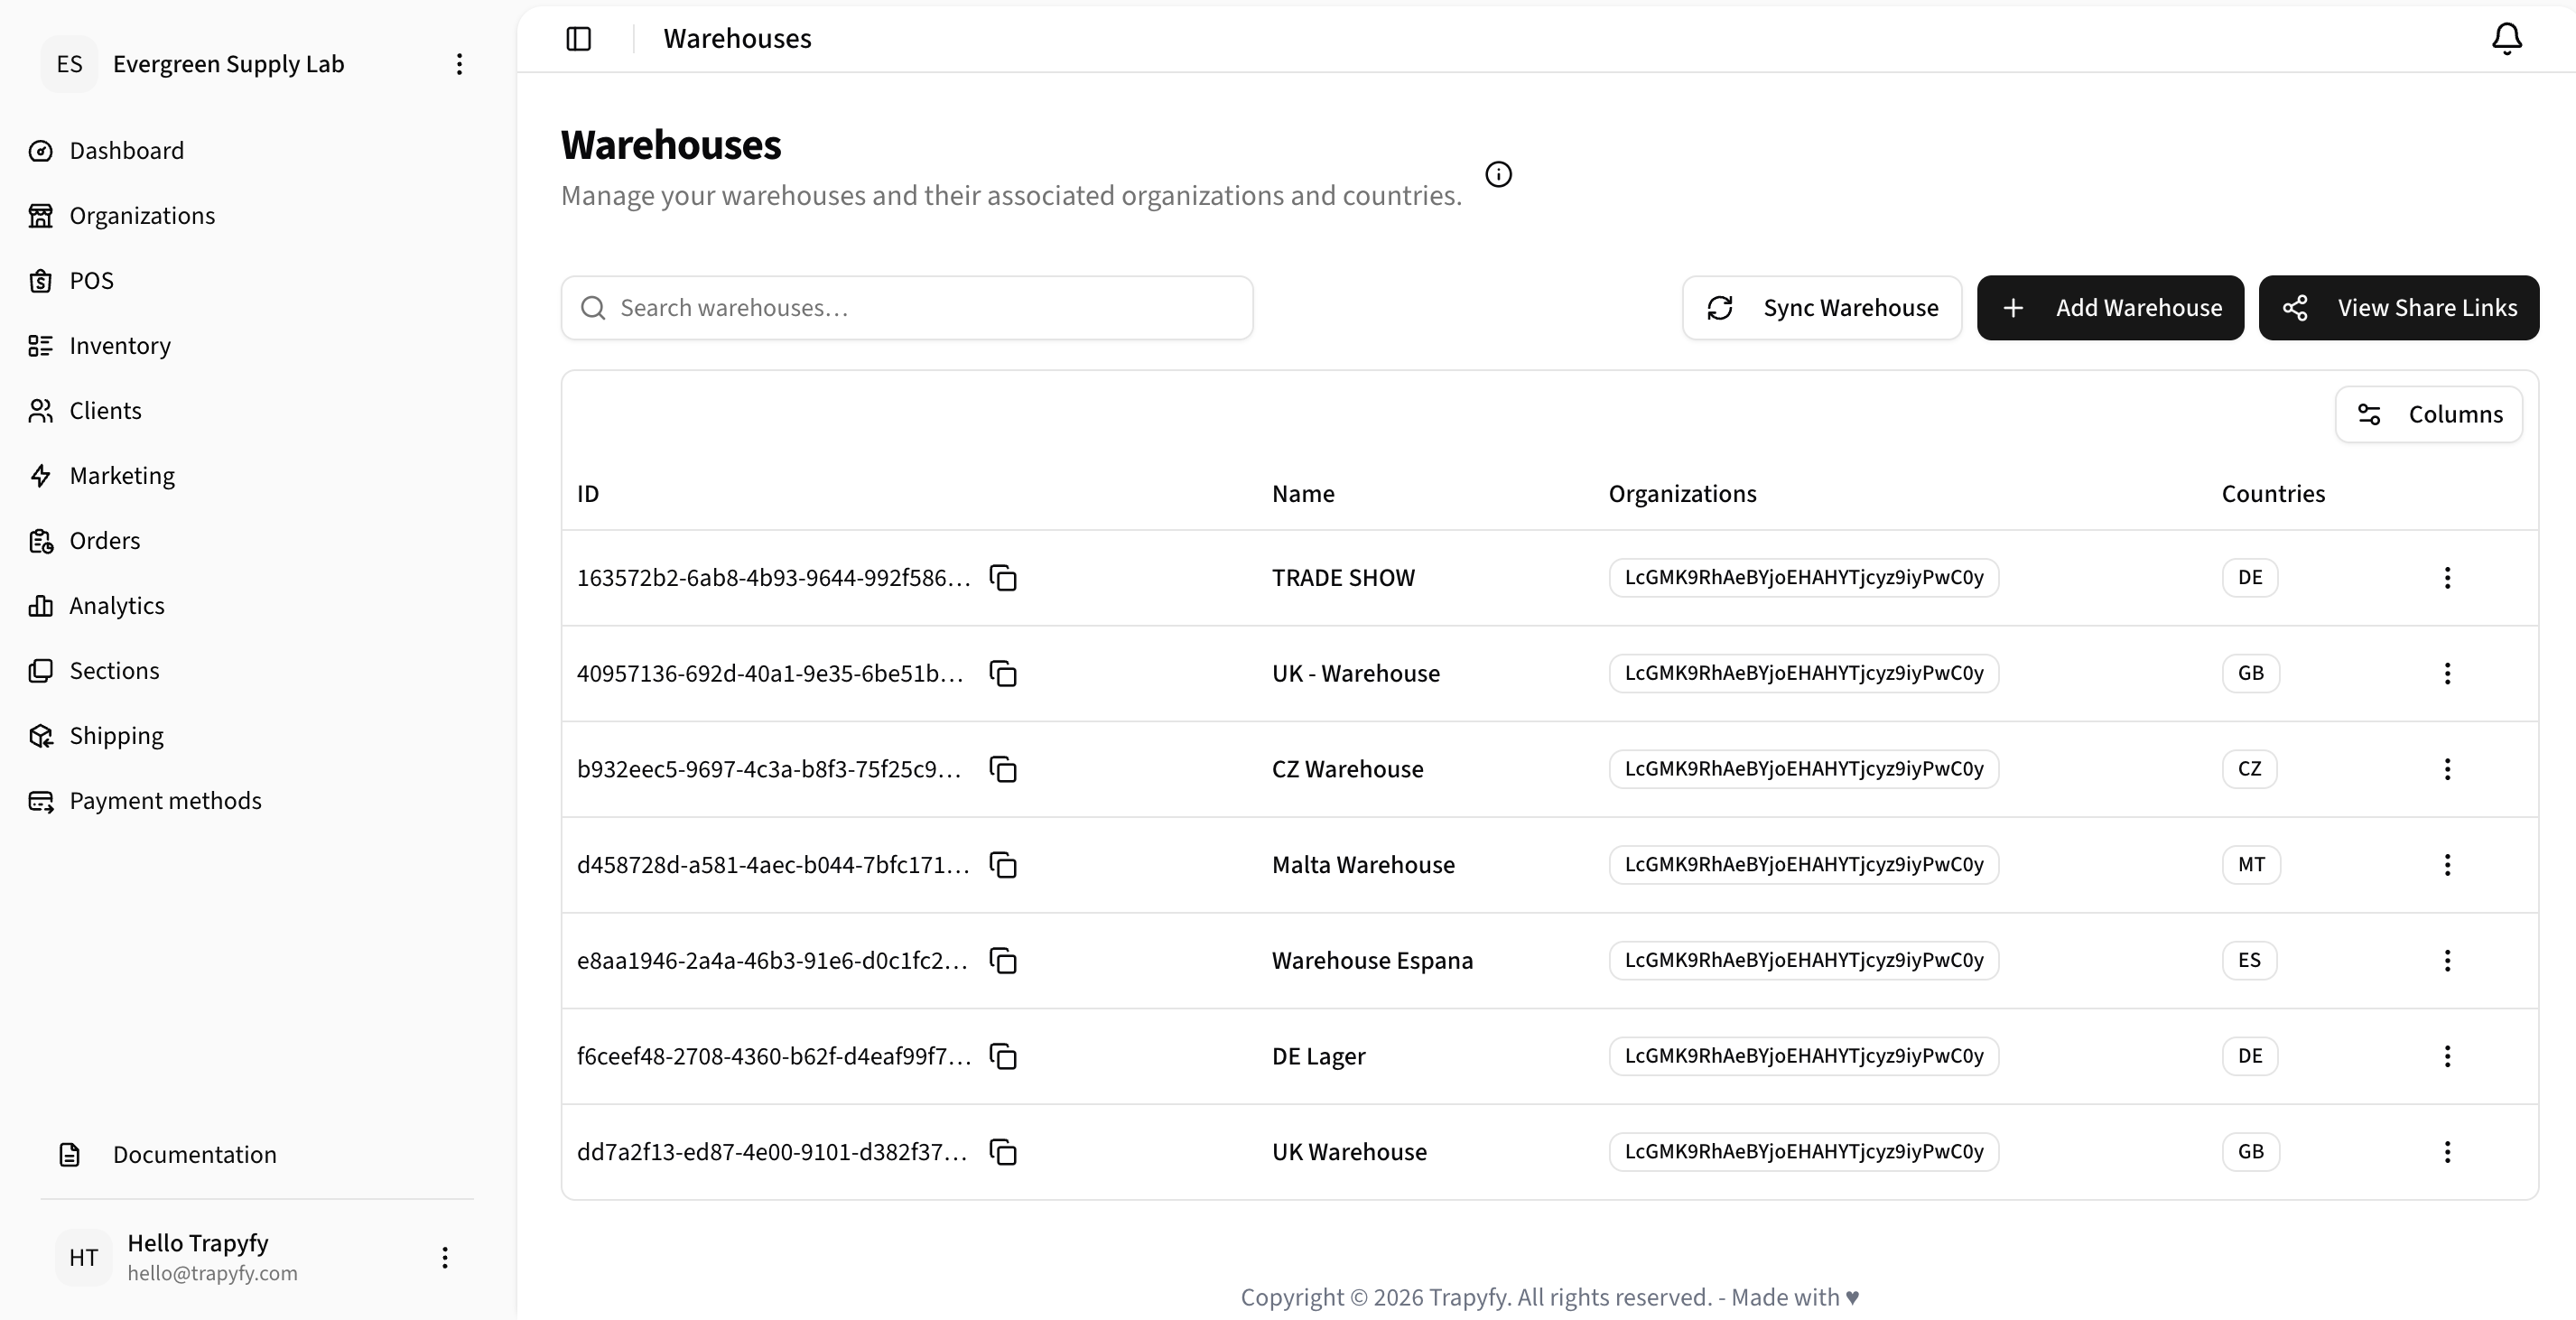
Warehouses list — TRADE SHOW appears alongside regular warehouses.
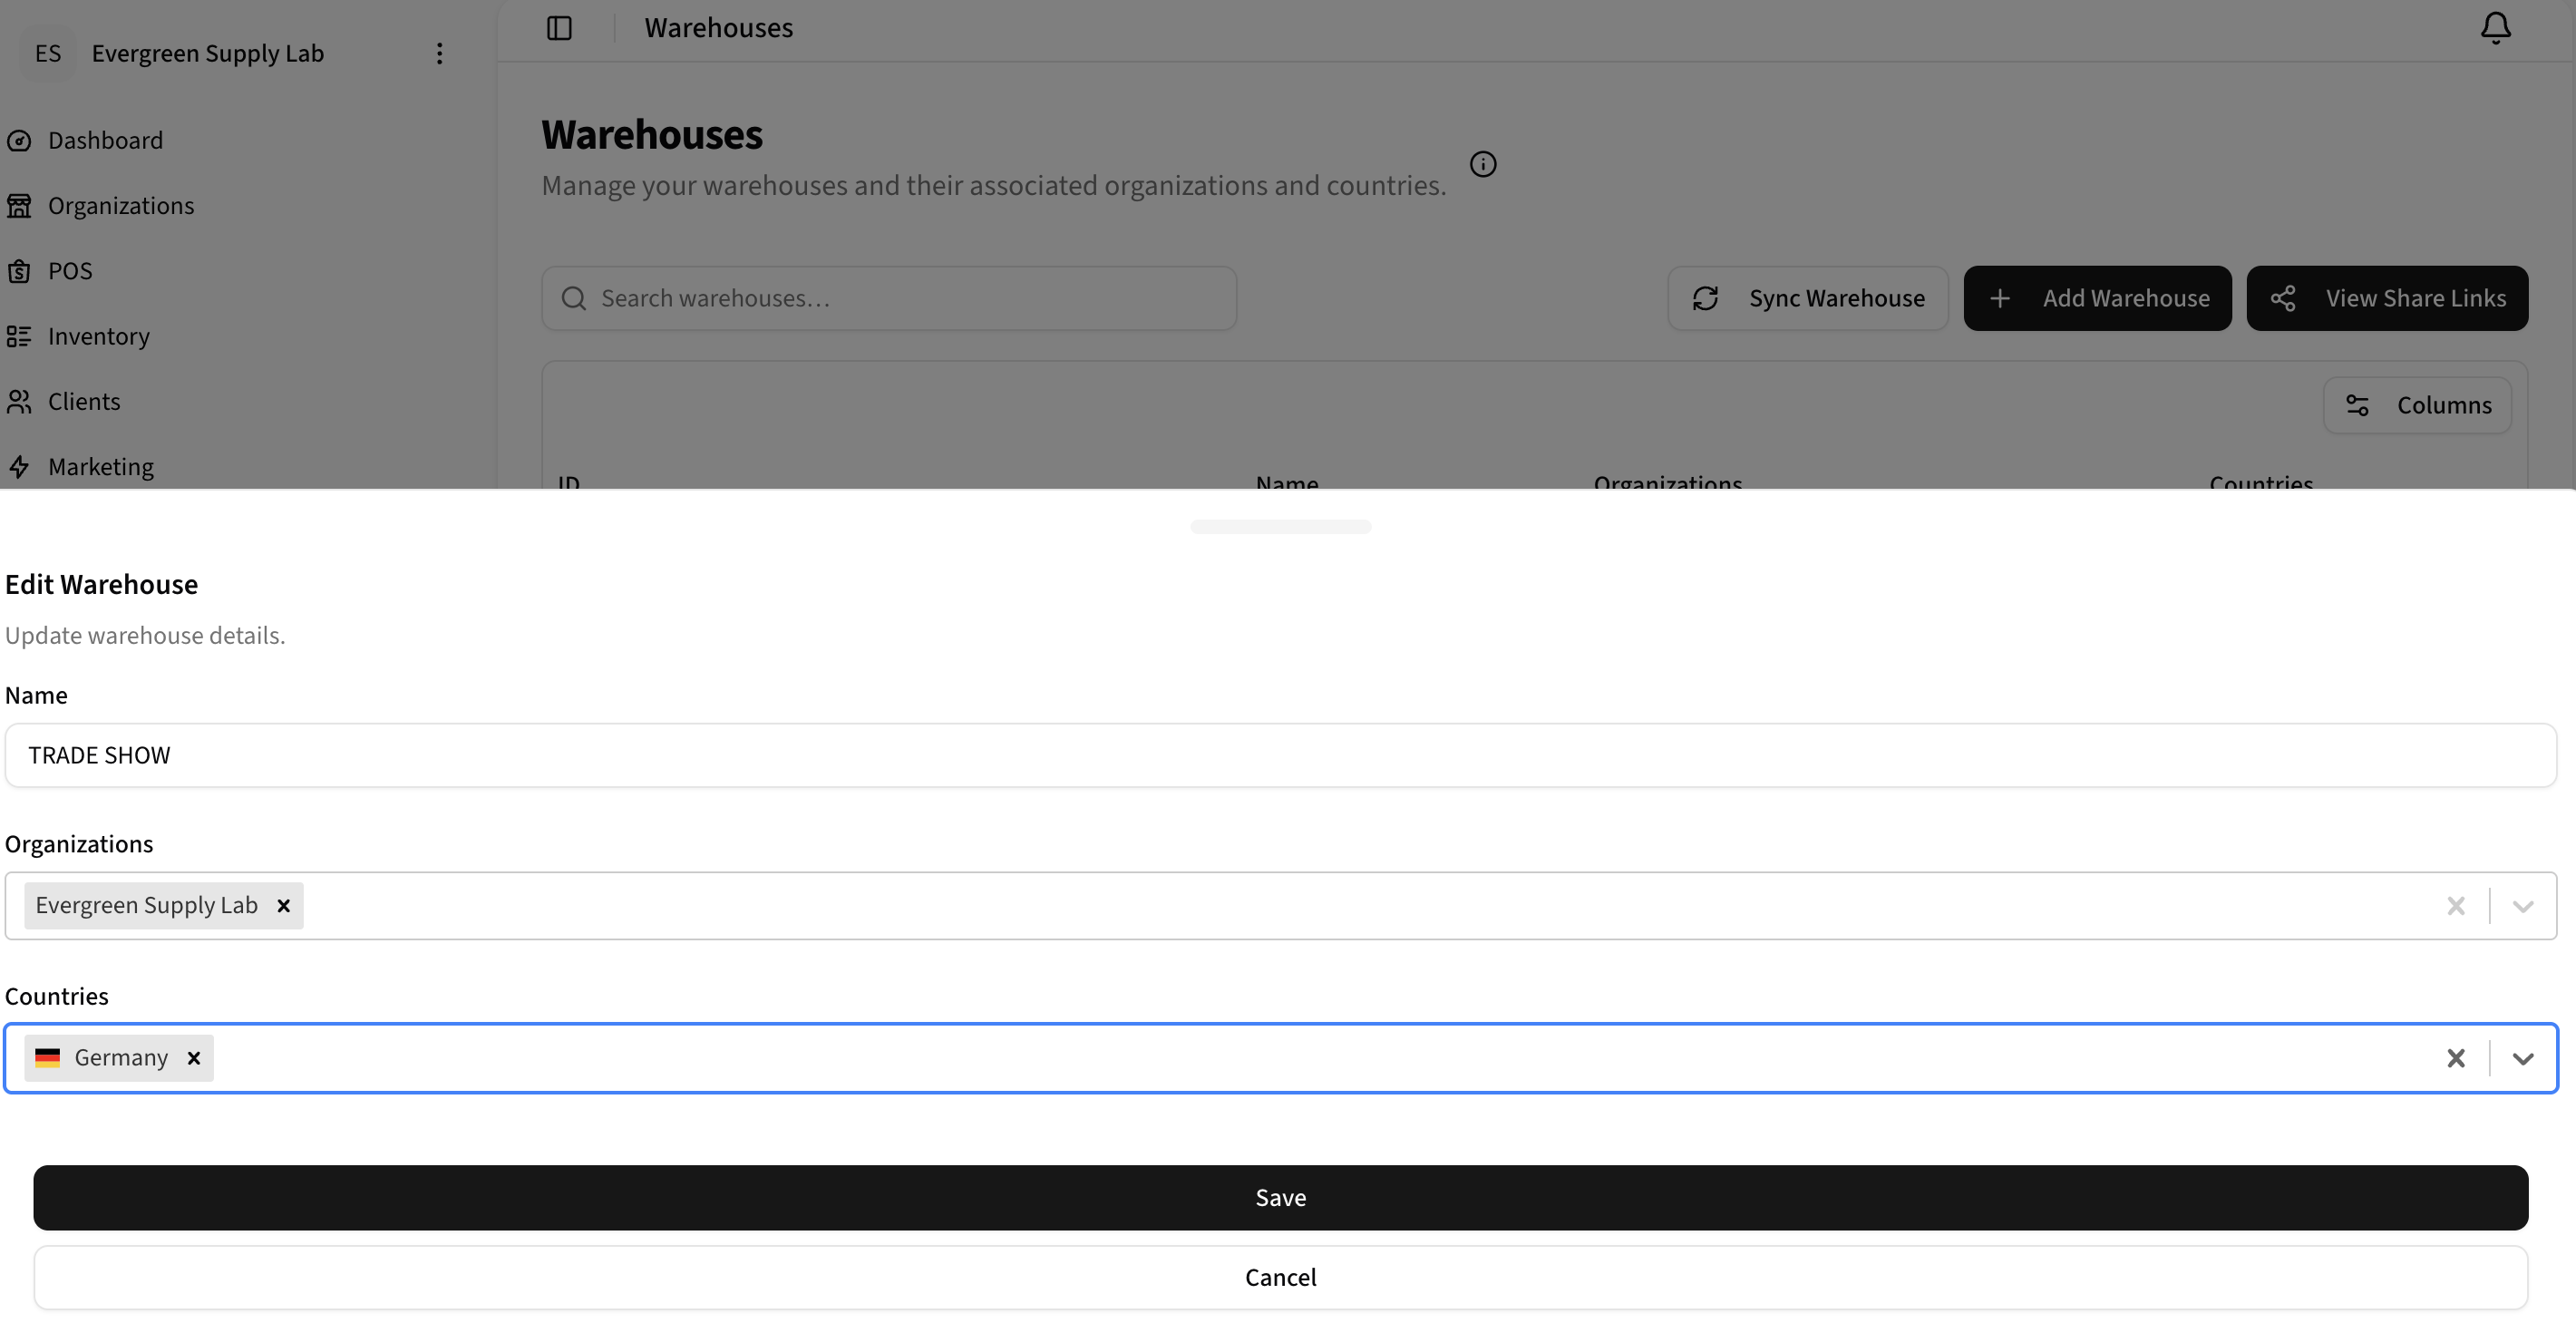
Edit Warehouse — set name, organisation, and country.
Step 2 — Add Products to the Trade Show Warehouse
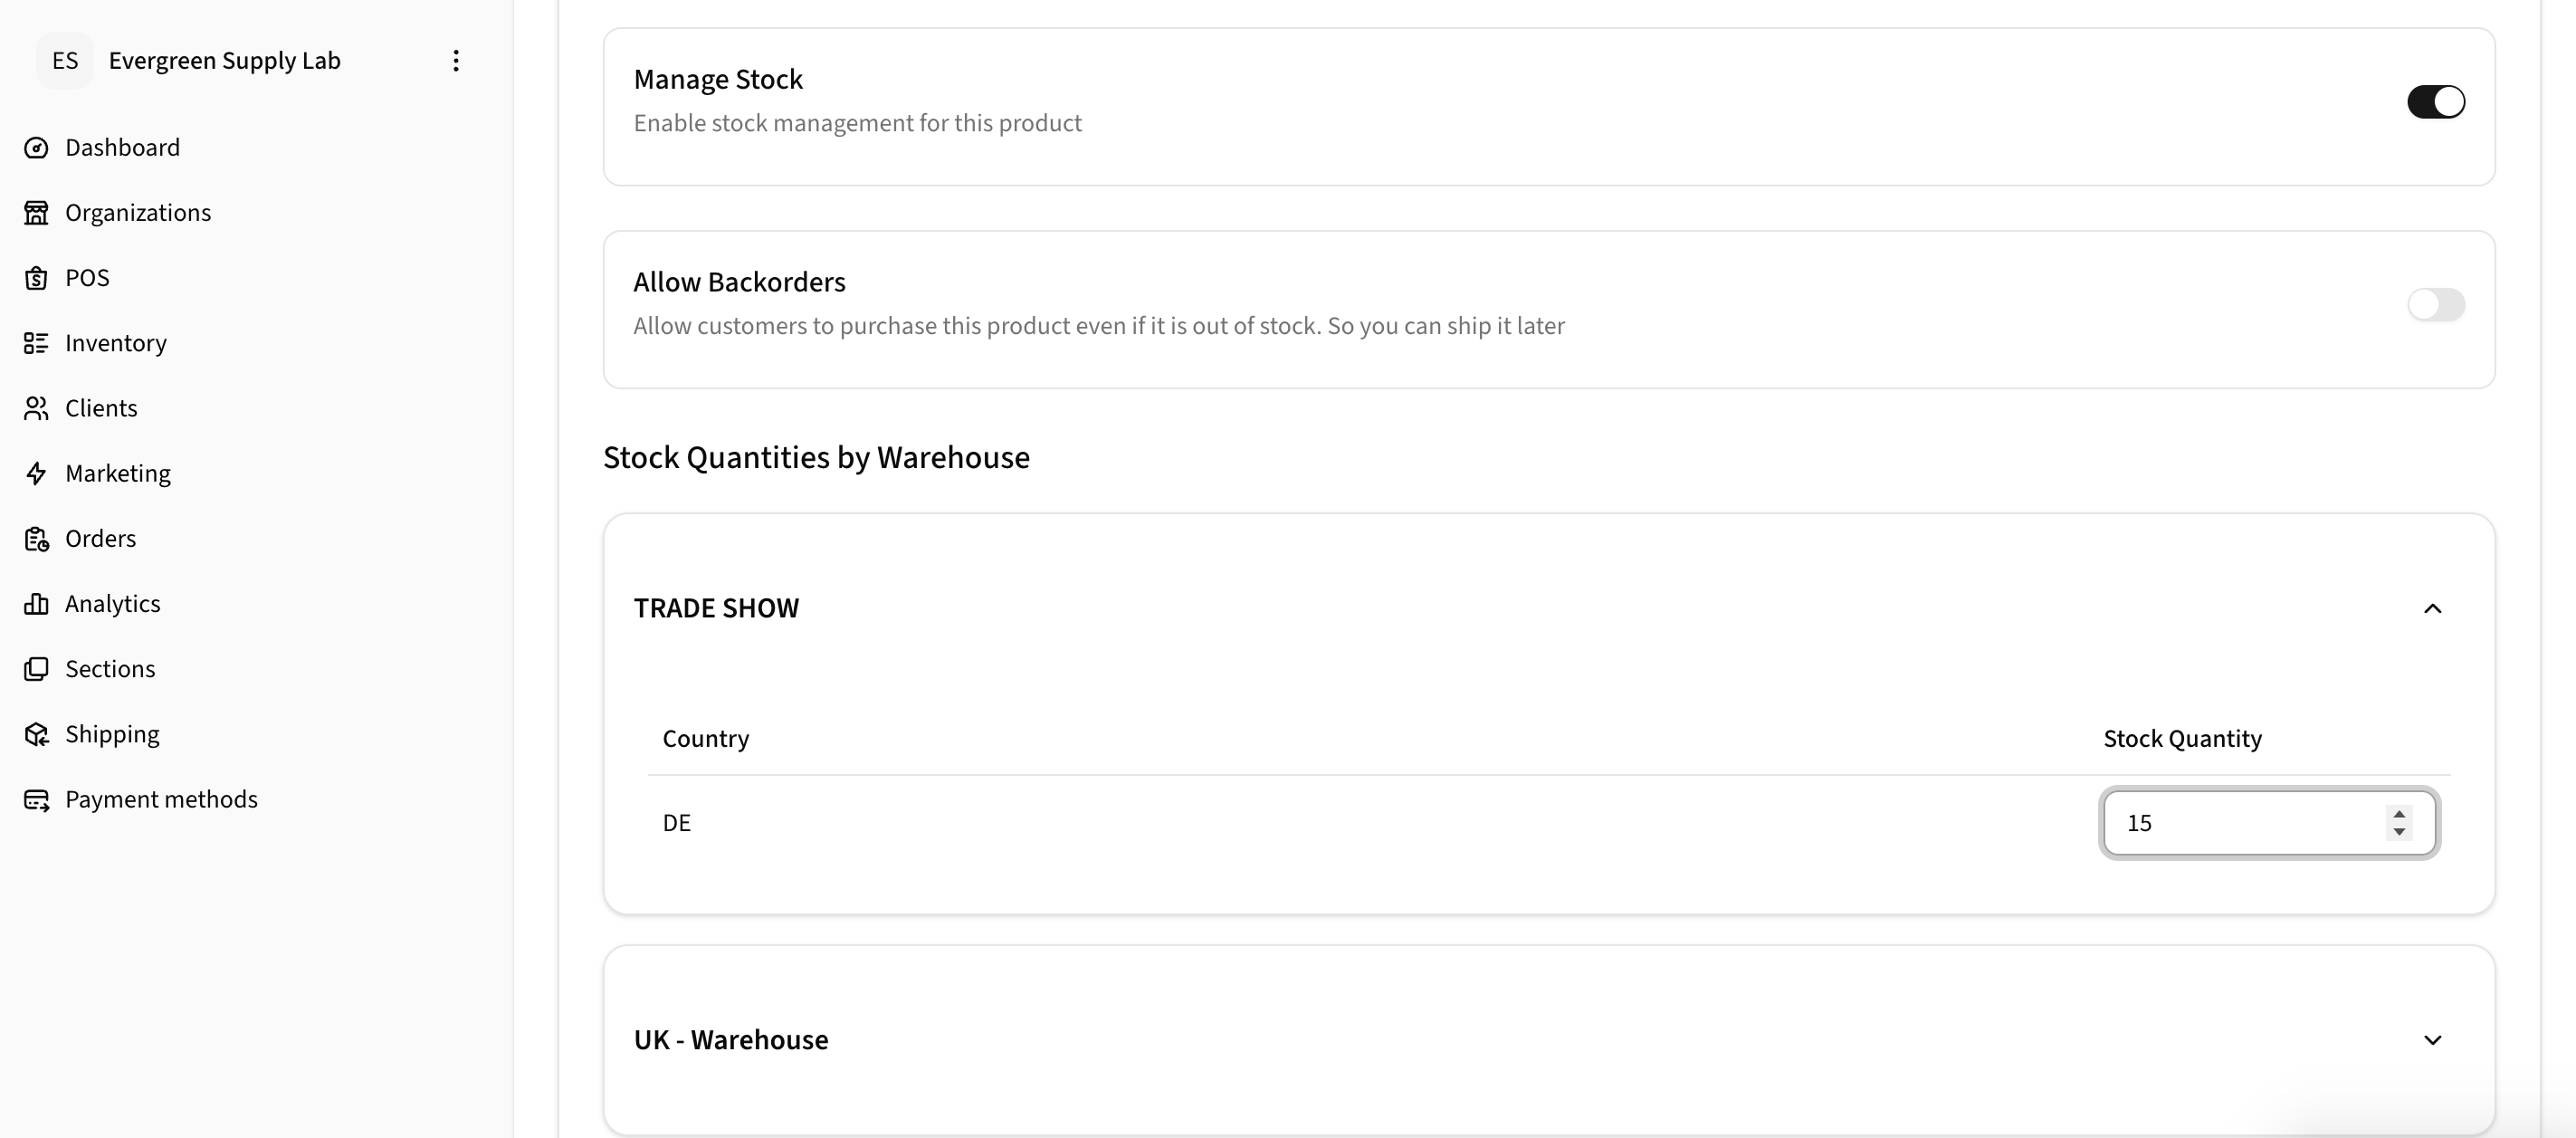
For each product you want available at the kiosk, set a price and stock quantity in the TRADE SHOW warehouse. Products without stock in this warehouse will not appear on the kiosk.
- Go to Inventory → Products and open the product you want to add
- Click the Inventory tab
- Under Cost and Prices per country, enter the Regular price for the event country (e.g., DE)
- Scroll to Stock Quantities by Warehouse and expand the TRADE SHOW section
- Enter the stock quantity for the event country
- Click Update Product to save
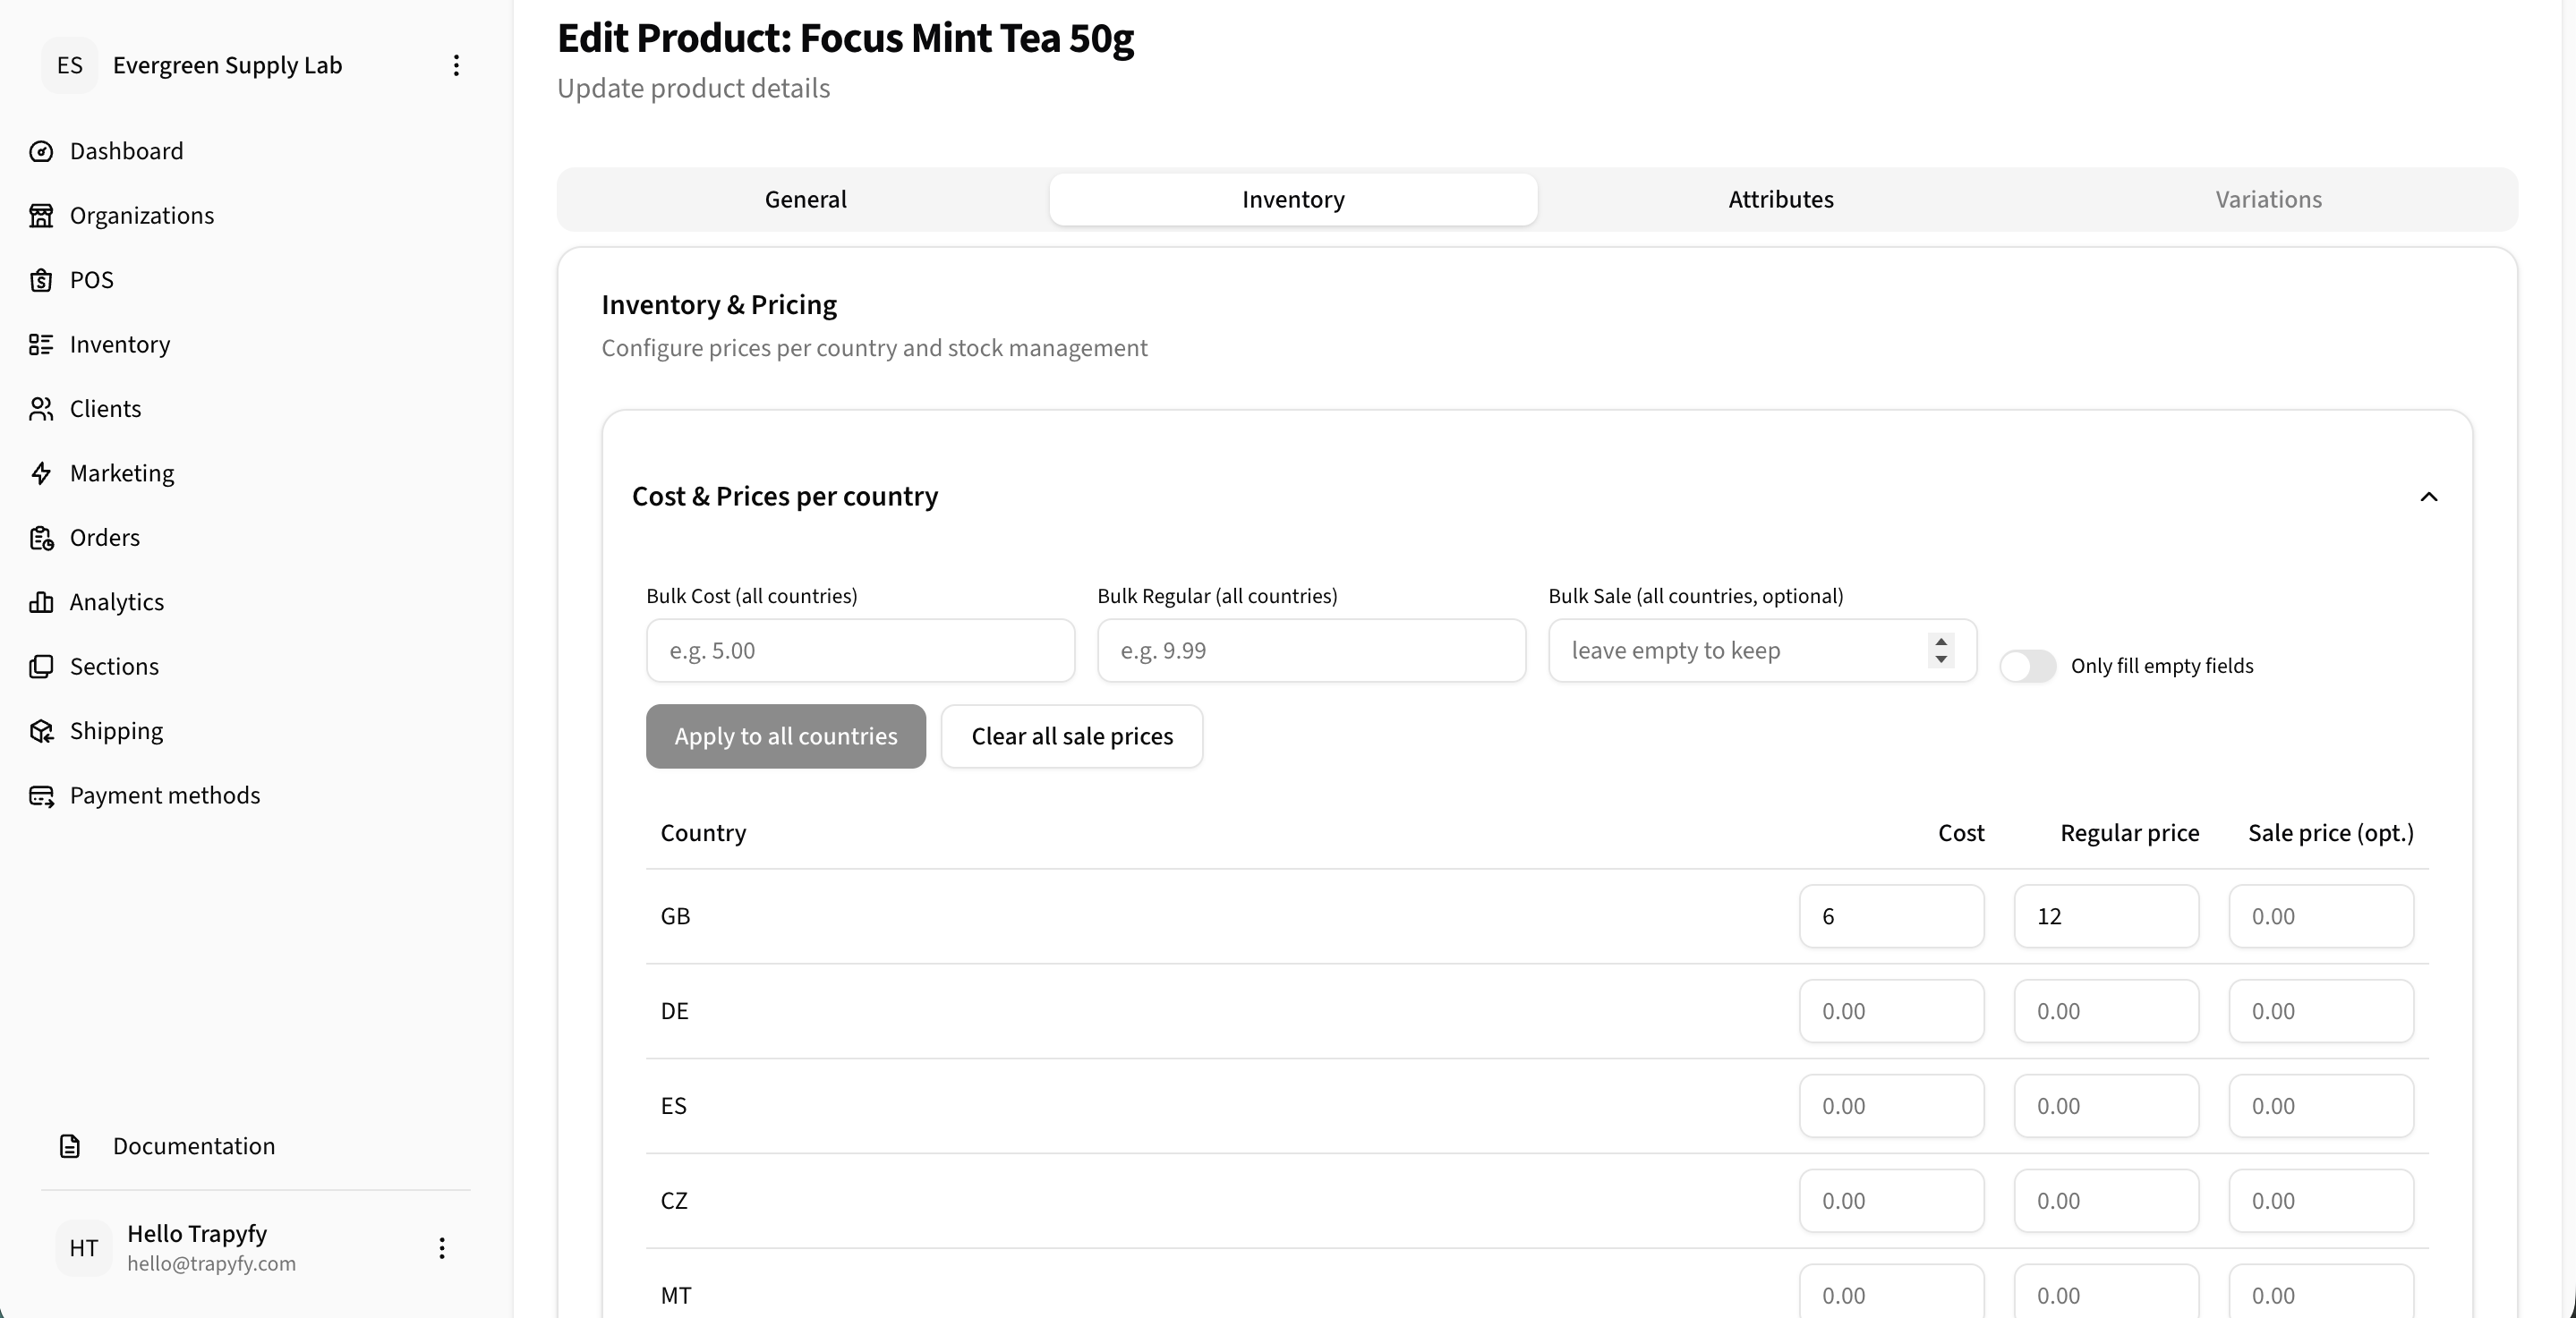
Set pricing per country in the Inventory tab.
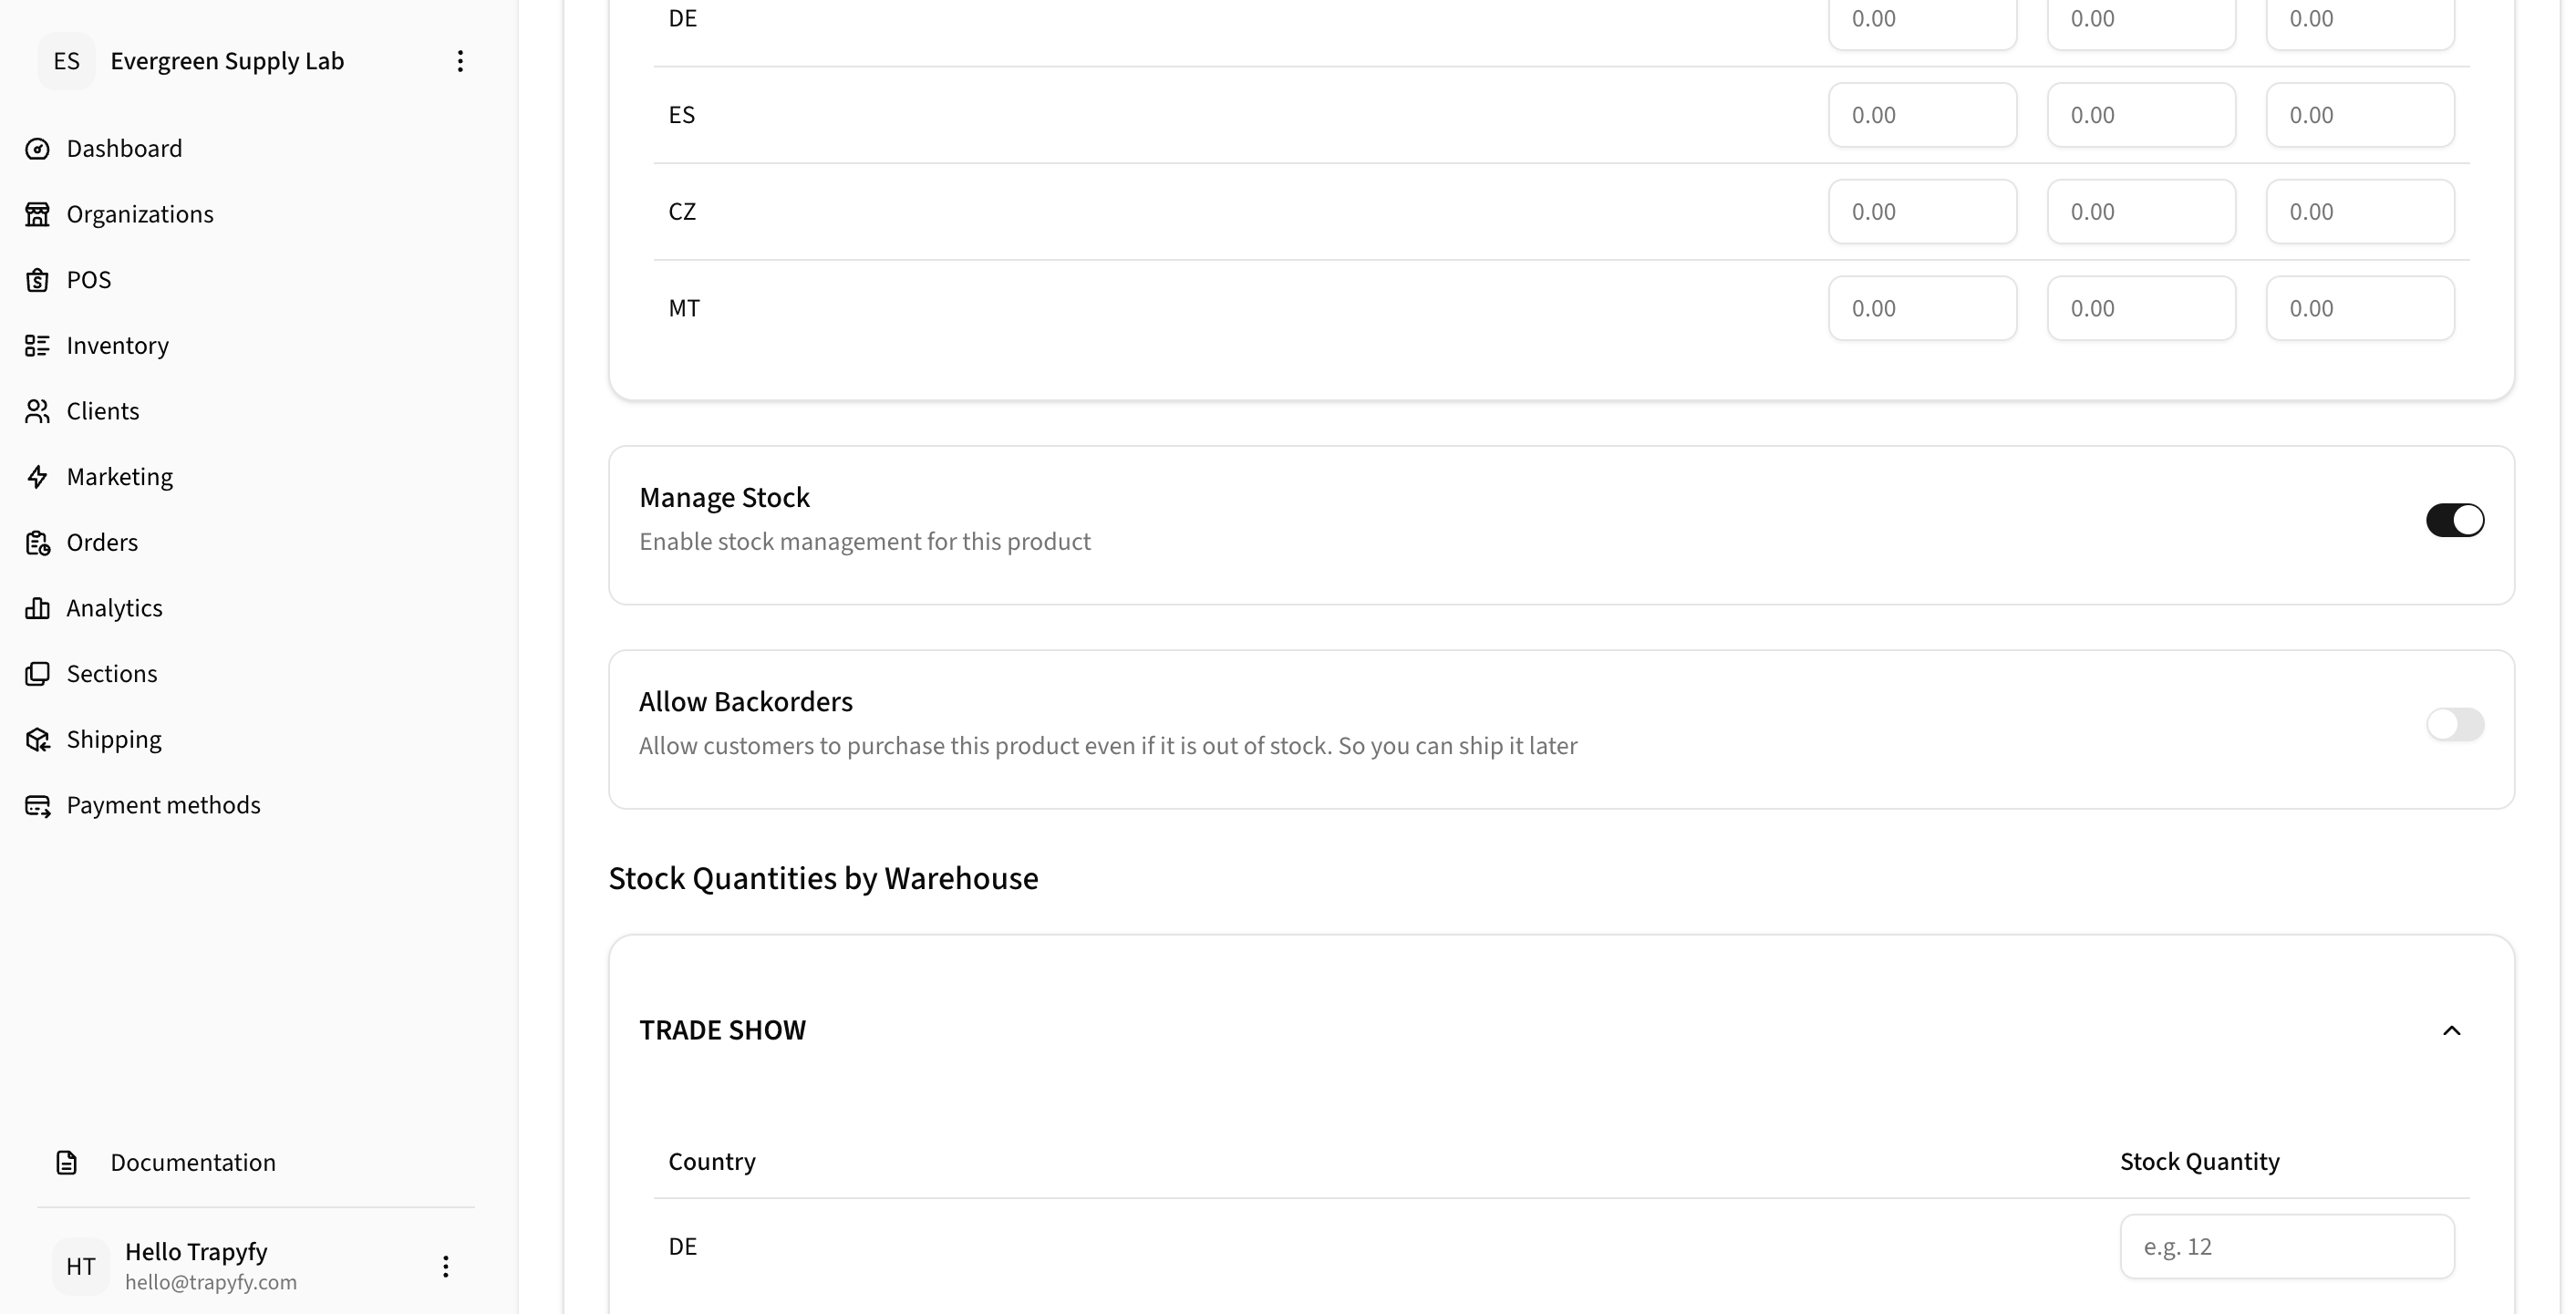
Enter stock quantity in the TRADE SHOW warehouse for the event country.
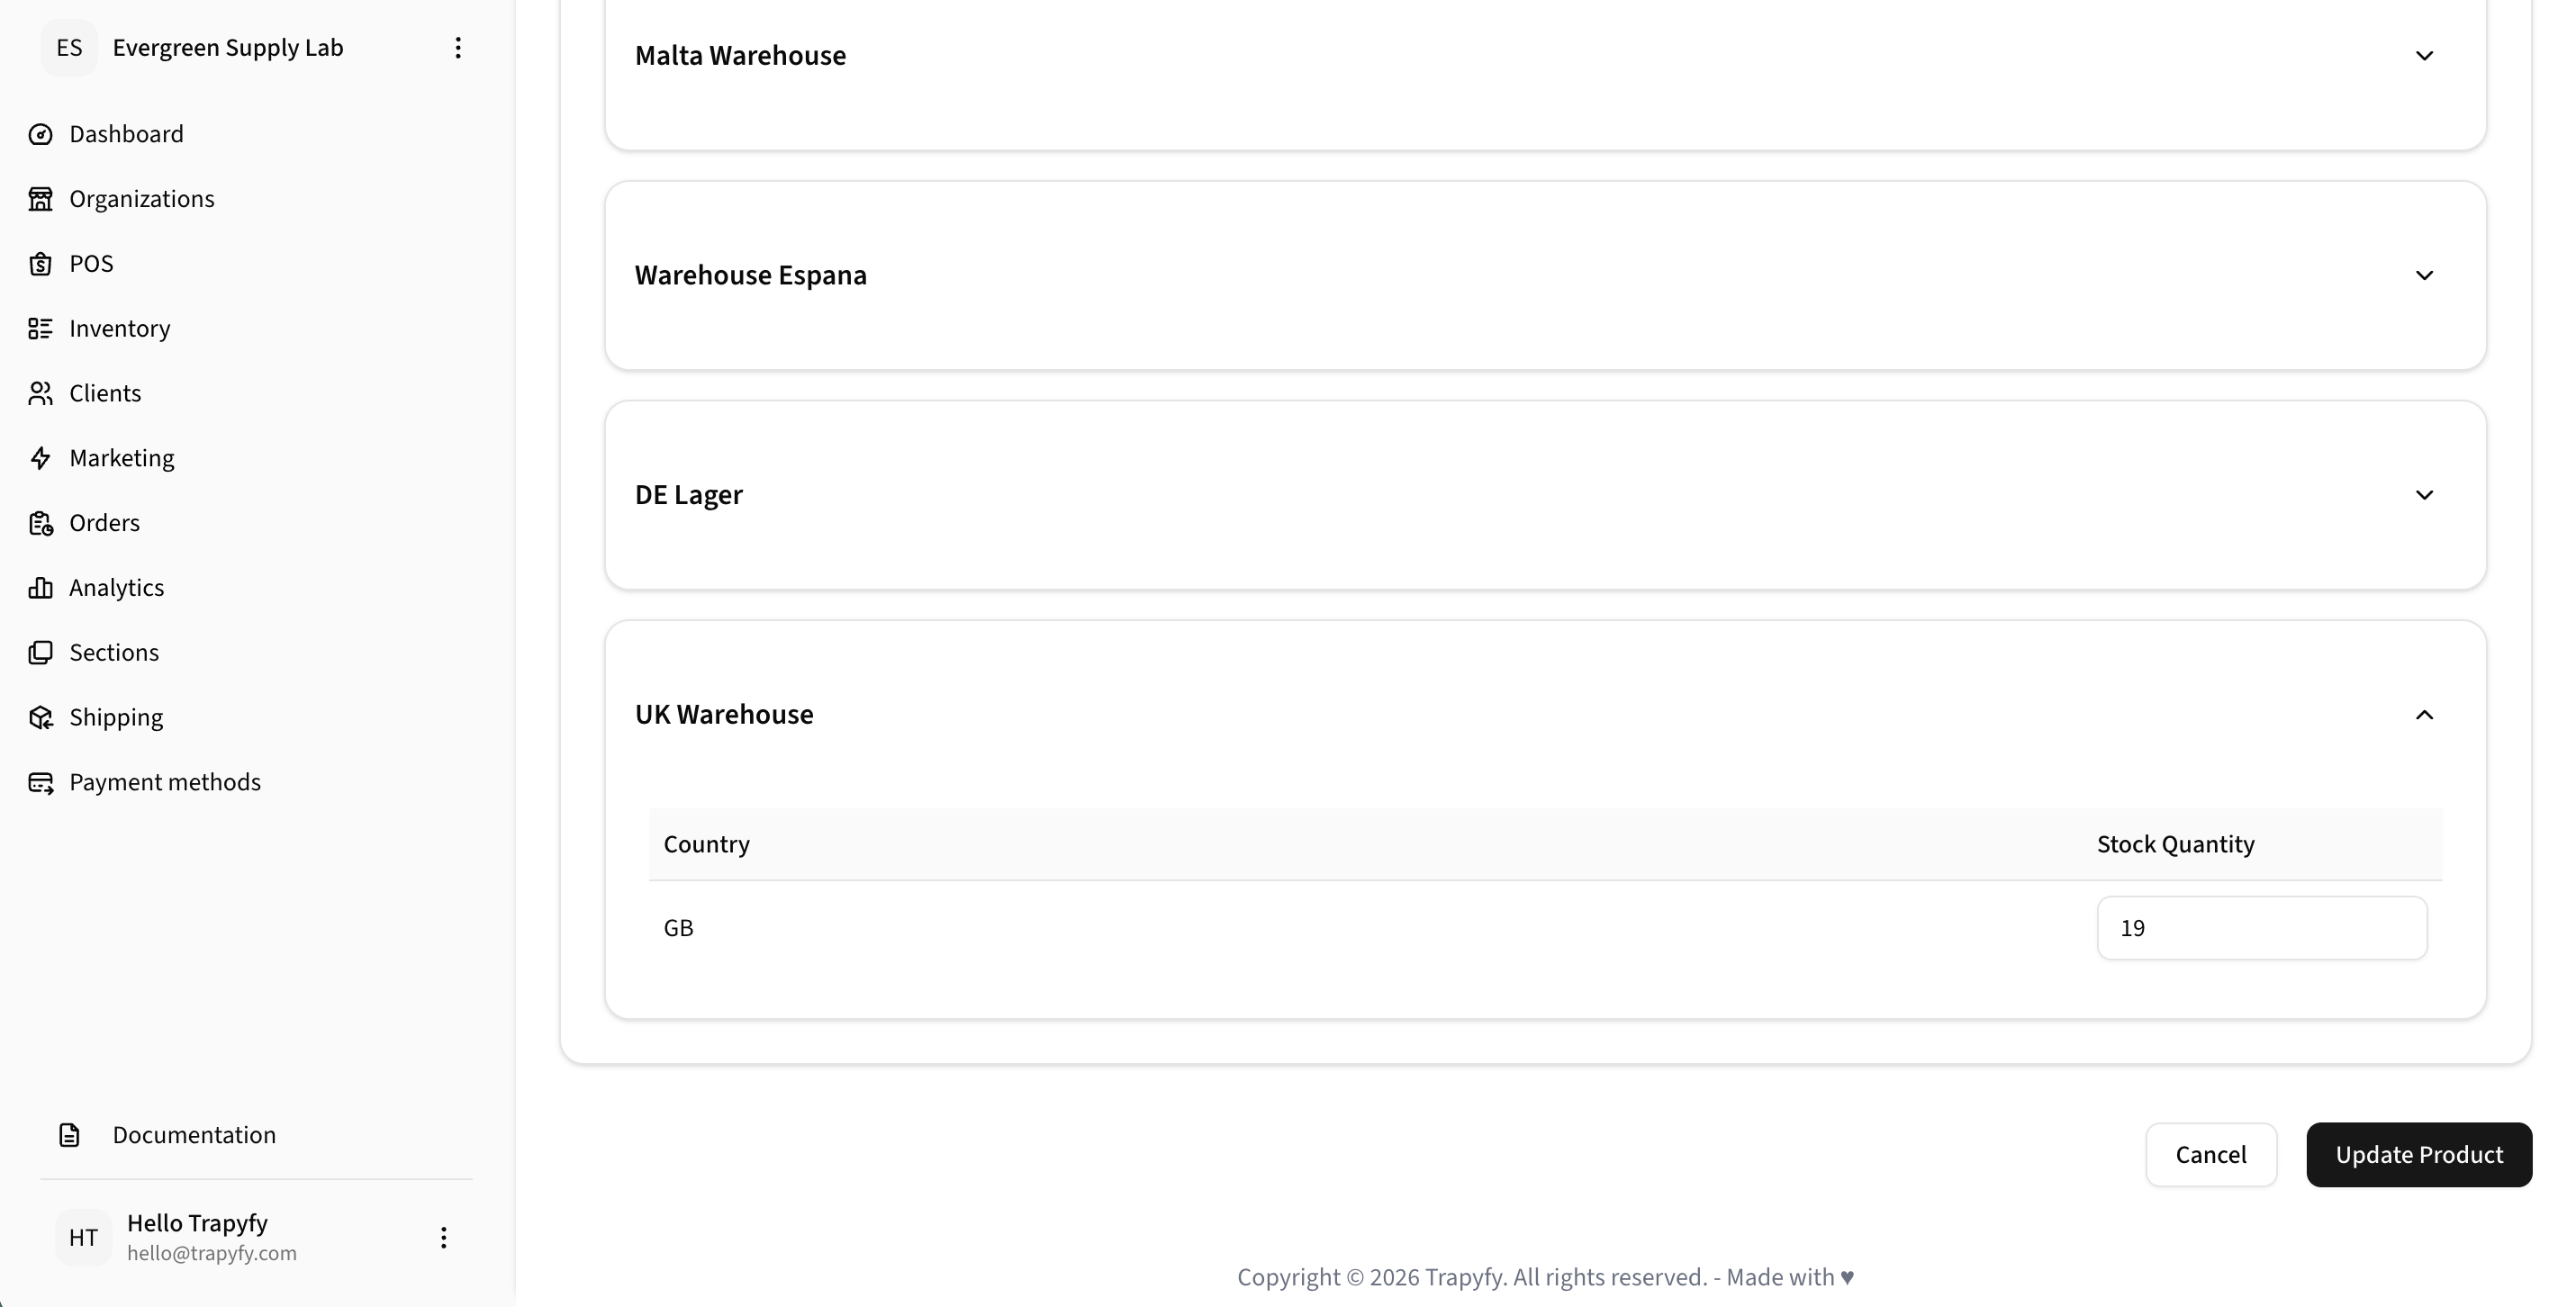
Scroll to the bottom and click Update Product to save all warehouse stock changes.
Important: Only products with stock assigned to the selected warehouse and country will appear on the kiosk. If a product is missing from the kiosk, check that its stock quantity is greater than 0 in the correct warehouse.
Step 3 — Create a Store
A Store represents a physical location or event where the kiosk will operate. Each store has its own kiosk URL, device pairings, registers, and receipt template.
- Navigate to POS → Stores
- Click Add Store
- Enter a Store Name (e.g., "Mary Jane Berlin")
- Enter the store Street address, City, Postal code, and Country
- Optionally assign a Receipt Template
- Click Save
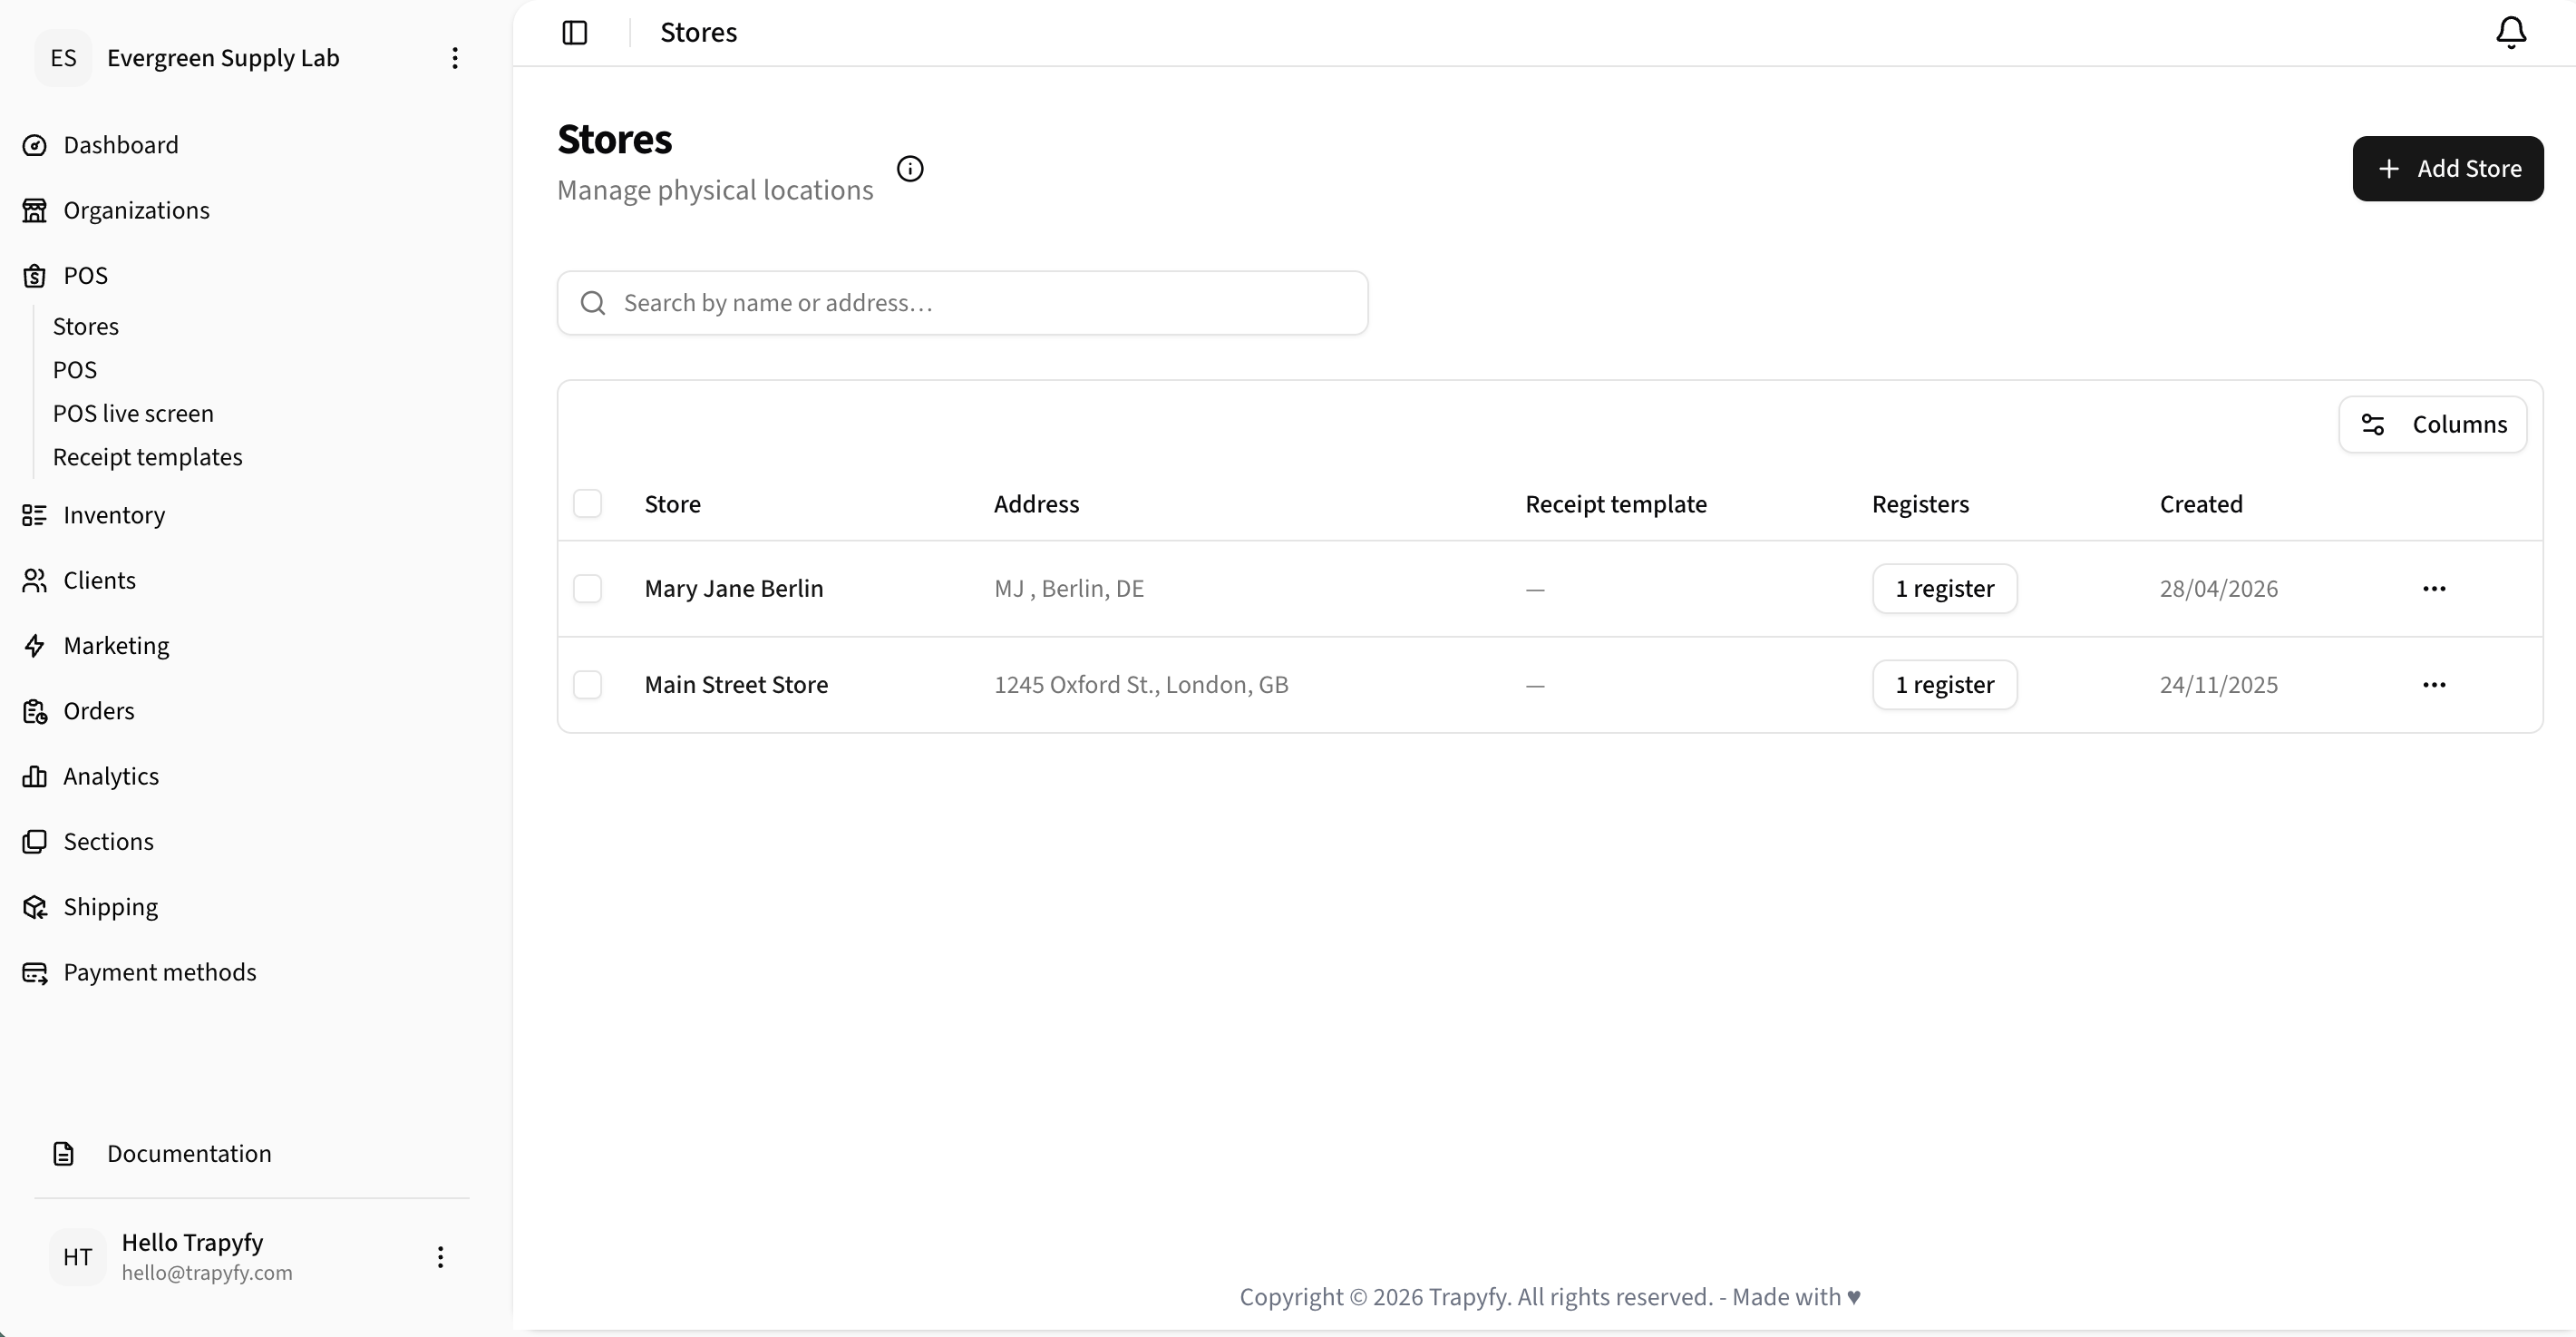
Stores list — view all your physical locations.
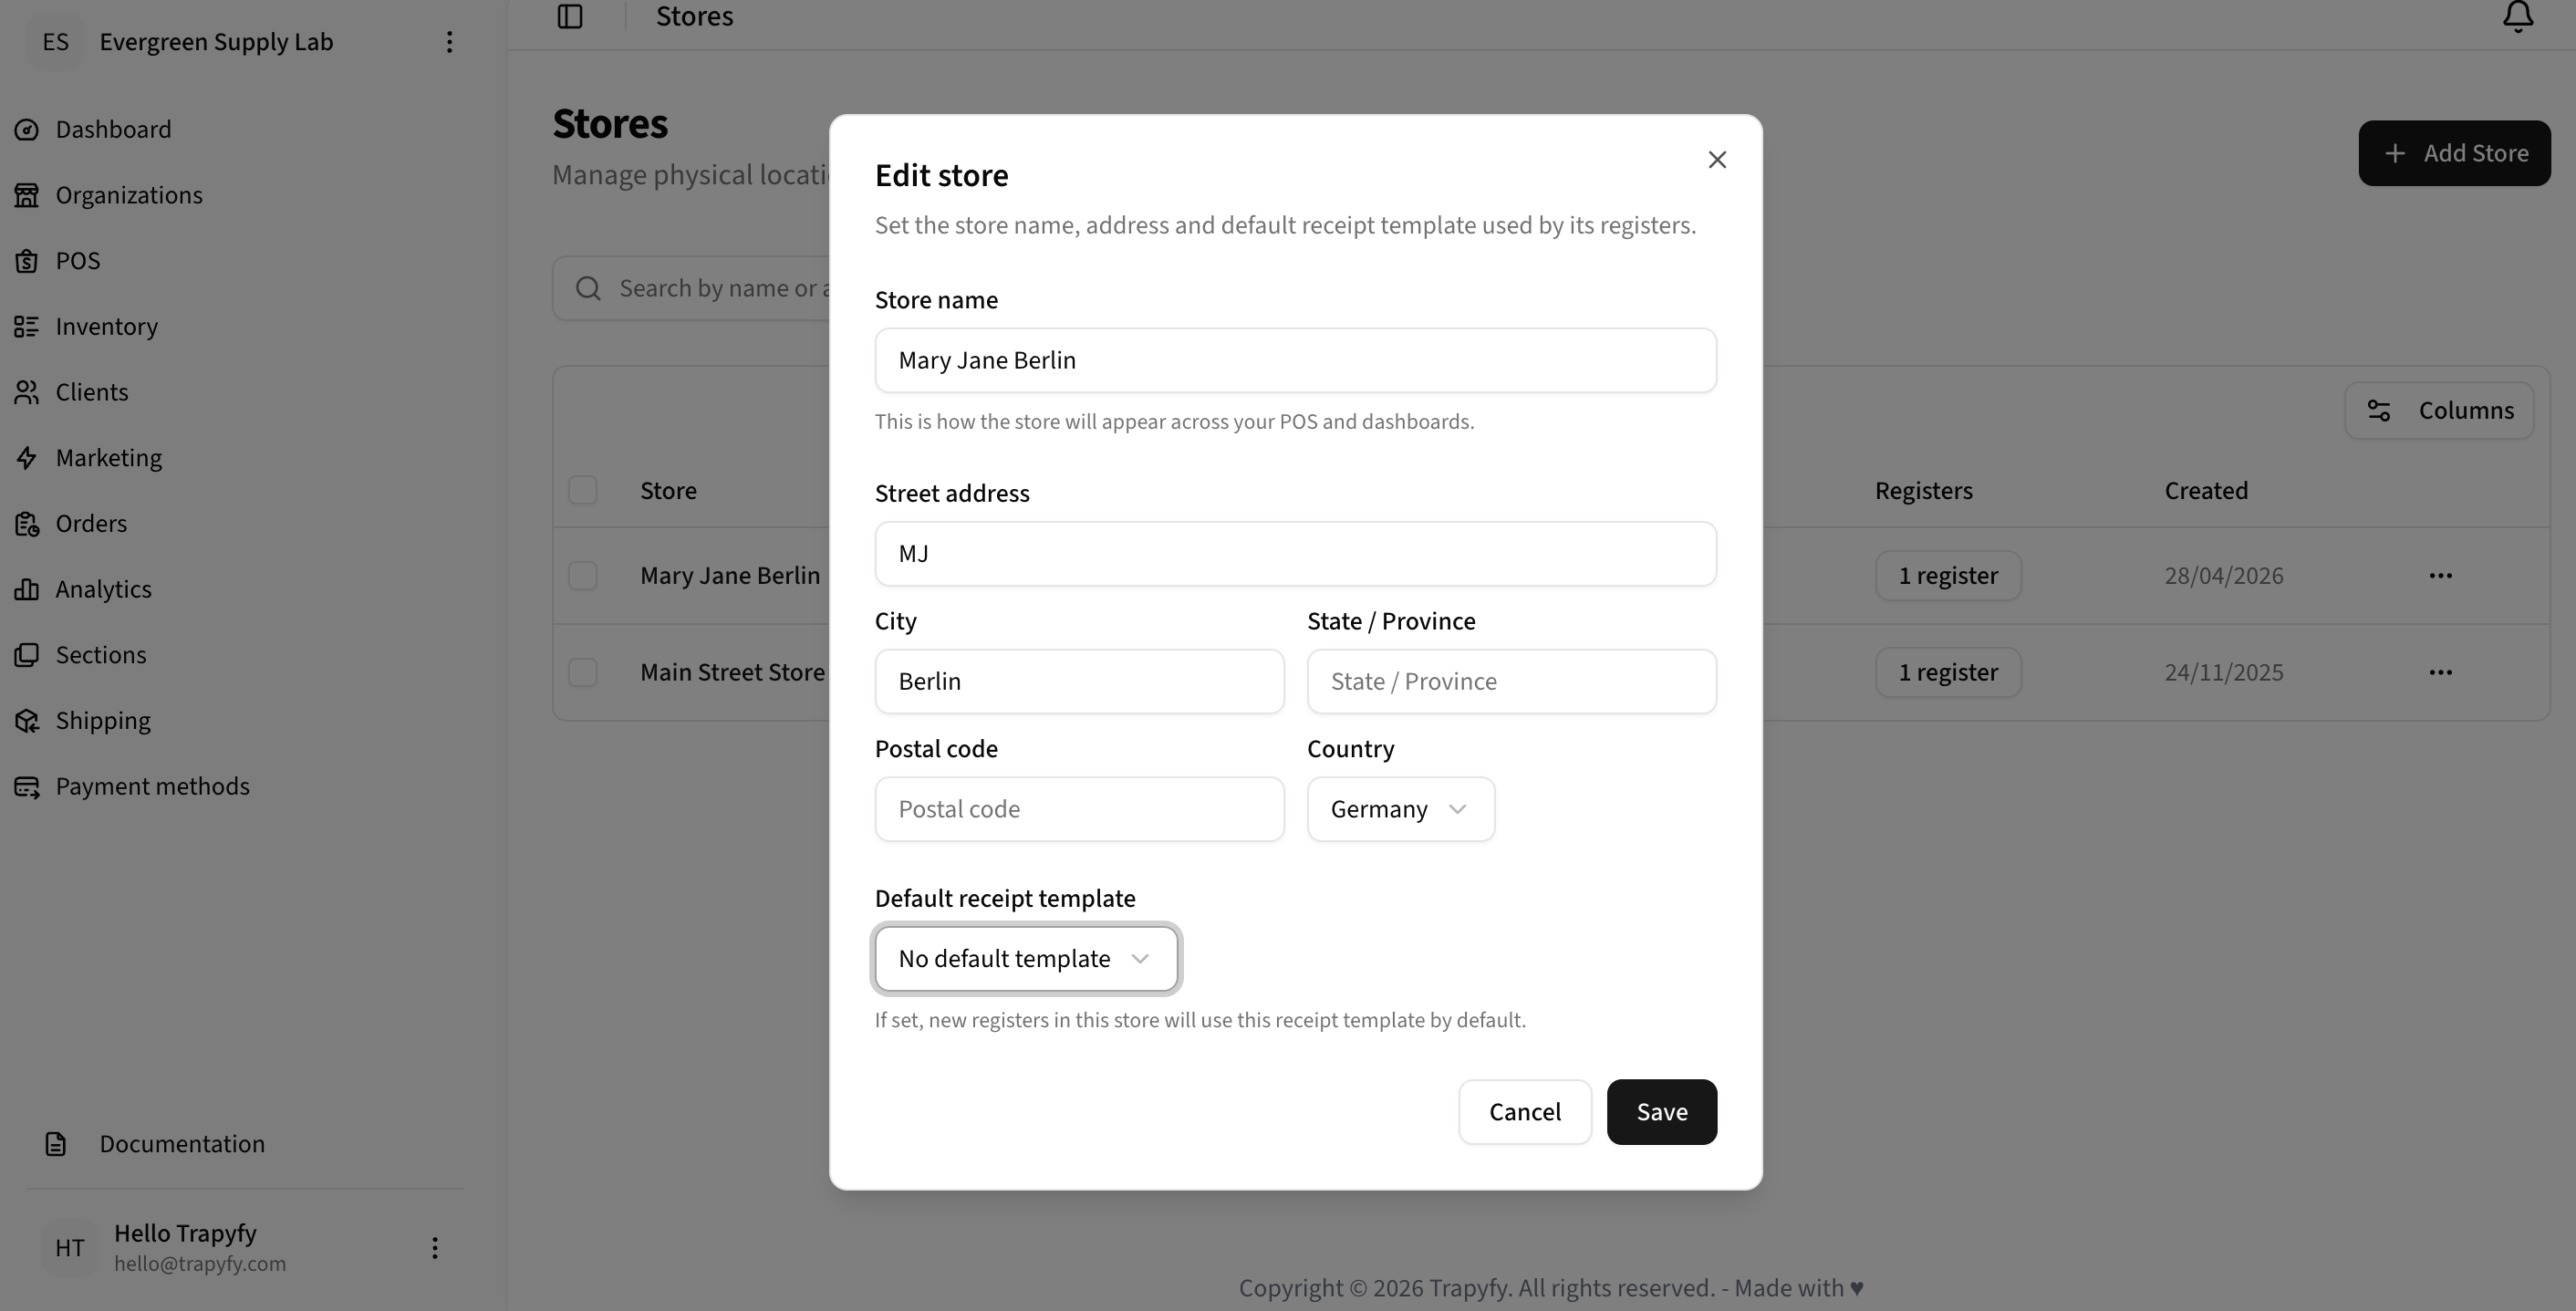
Edit store — enter name, address, and receipt template.
Step 4 — Create a Receipt Template
Receipt templates define the format used for POS receipts and emailed order confirmations. Create one before enabling kiosk mode.
- Navigate to POS → Receipt templates
- Click Add Template
- Enter a Name for the template (e.g., "Mary Jane 2026")
- Select a Print format: Thermal (POS) for receipt printers, or A4 for full-page invoices
- Click Save
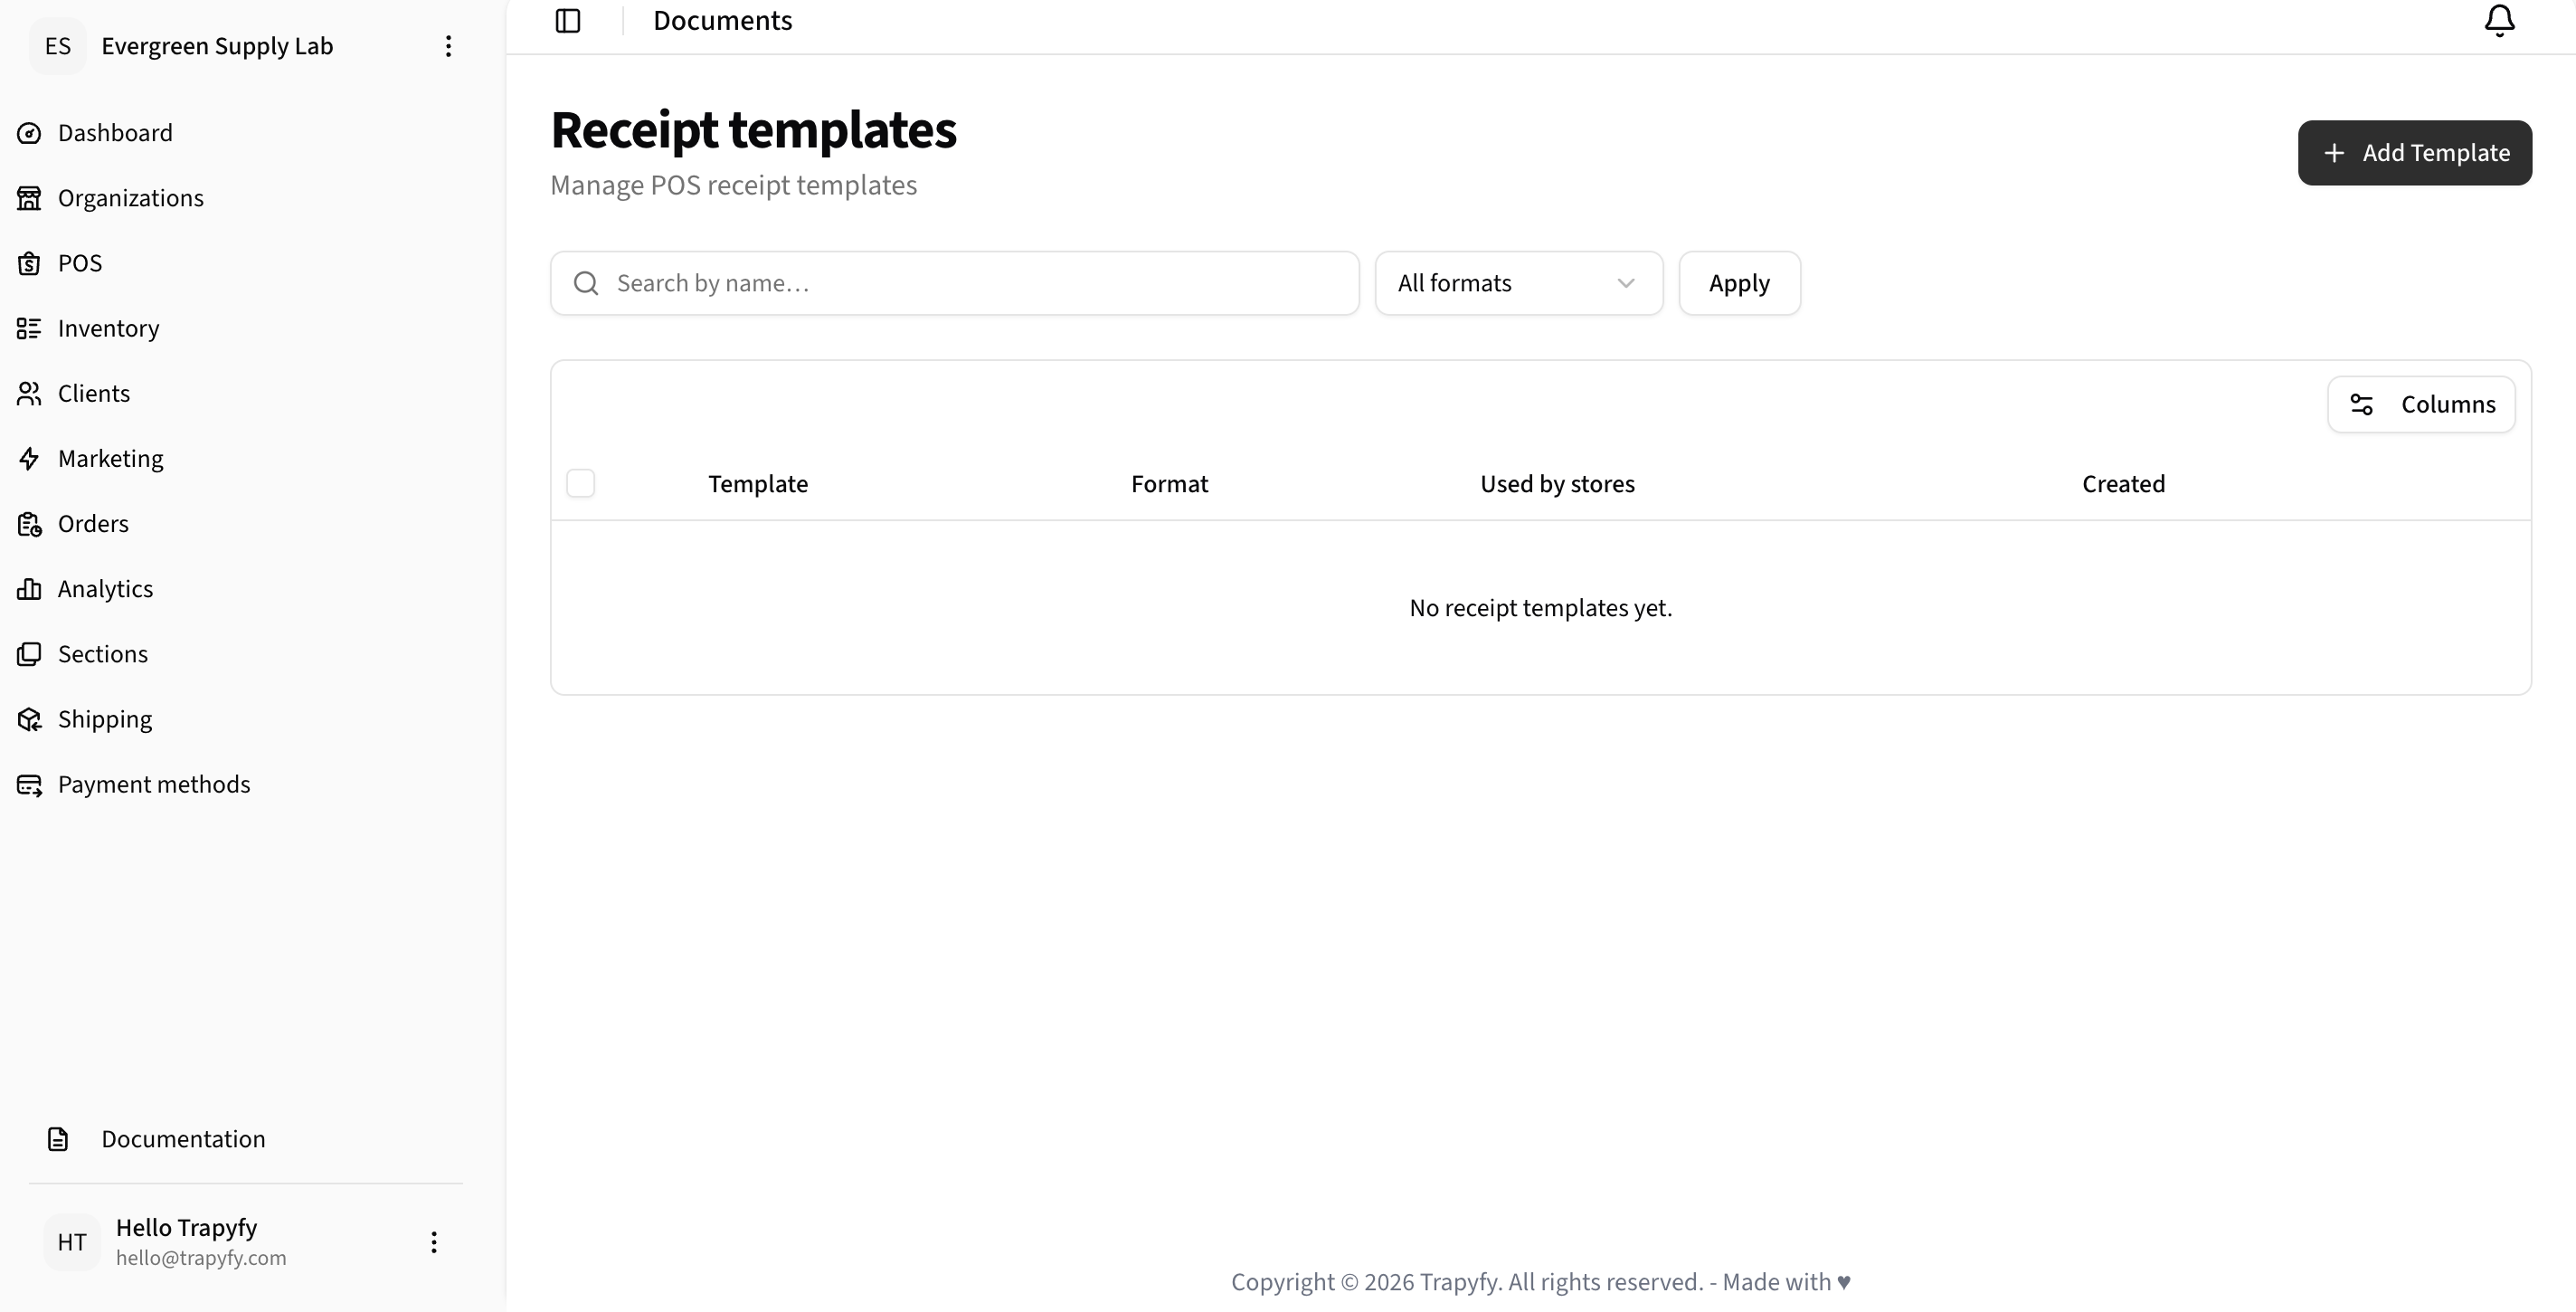
Receipt templates list — click Add Template to create a new one.
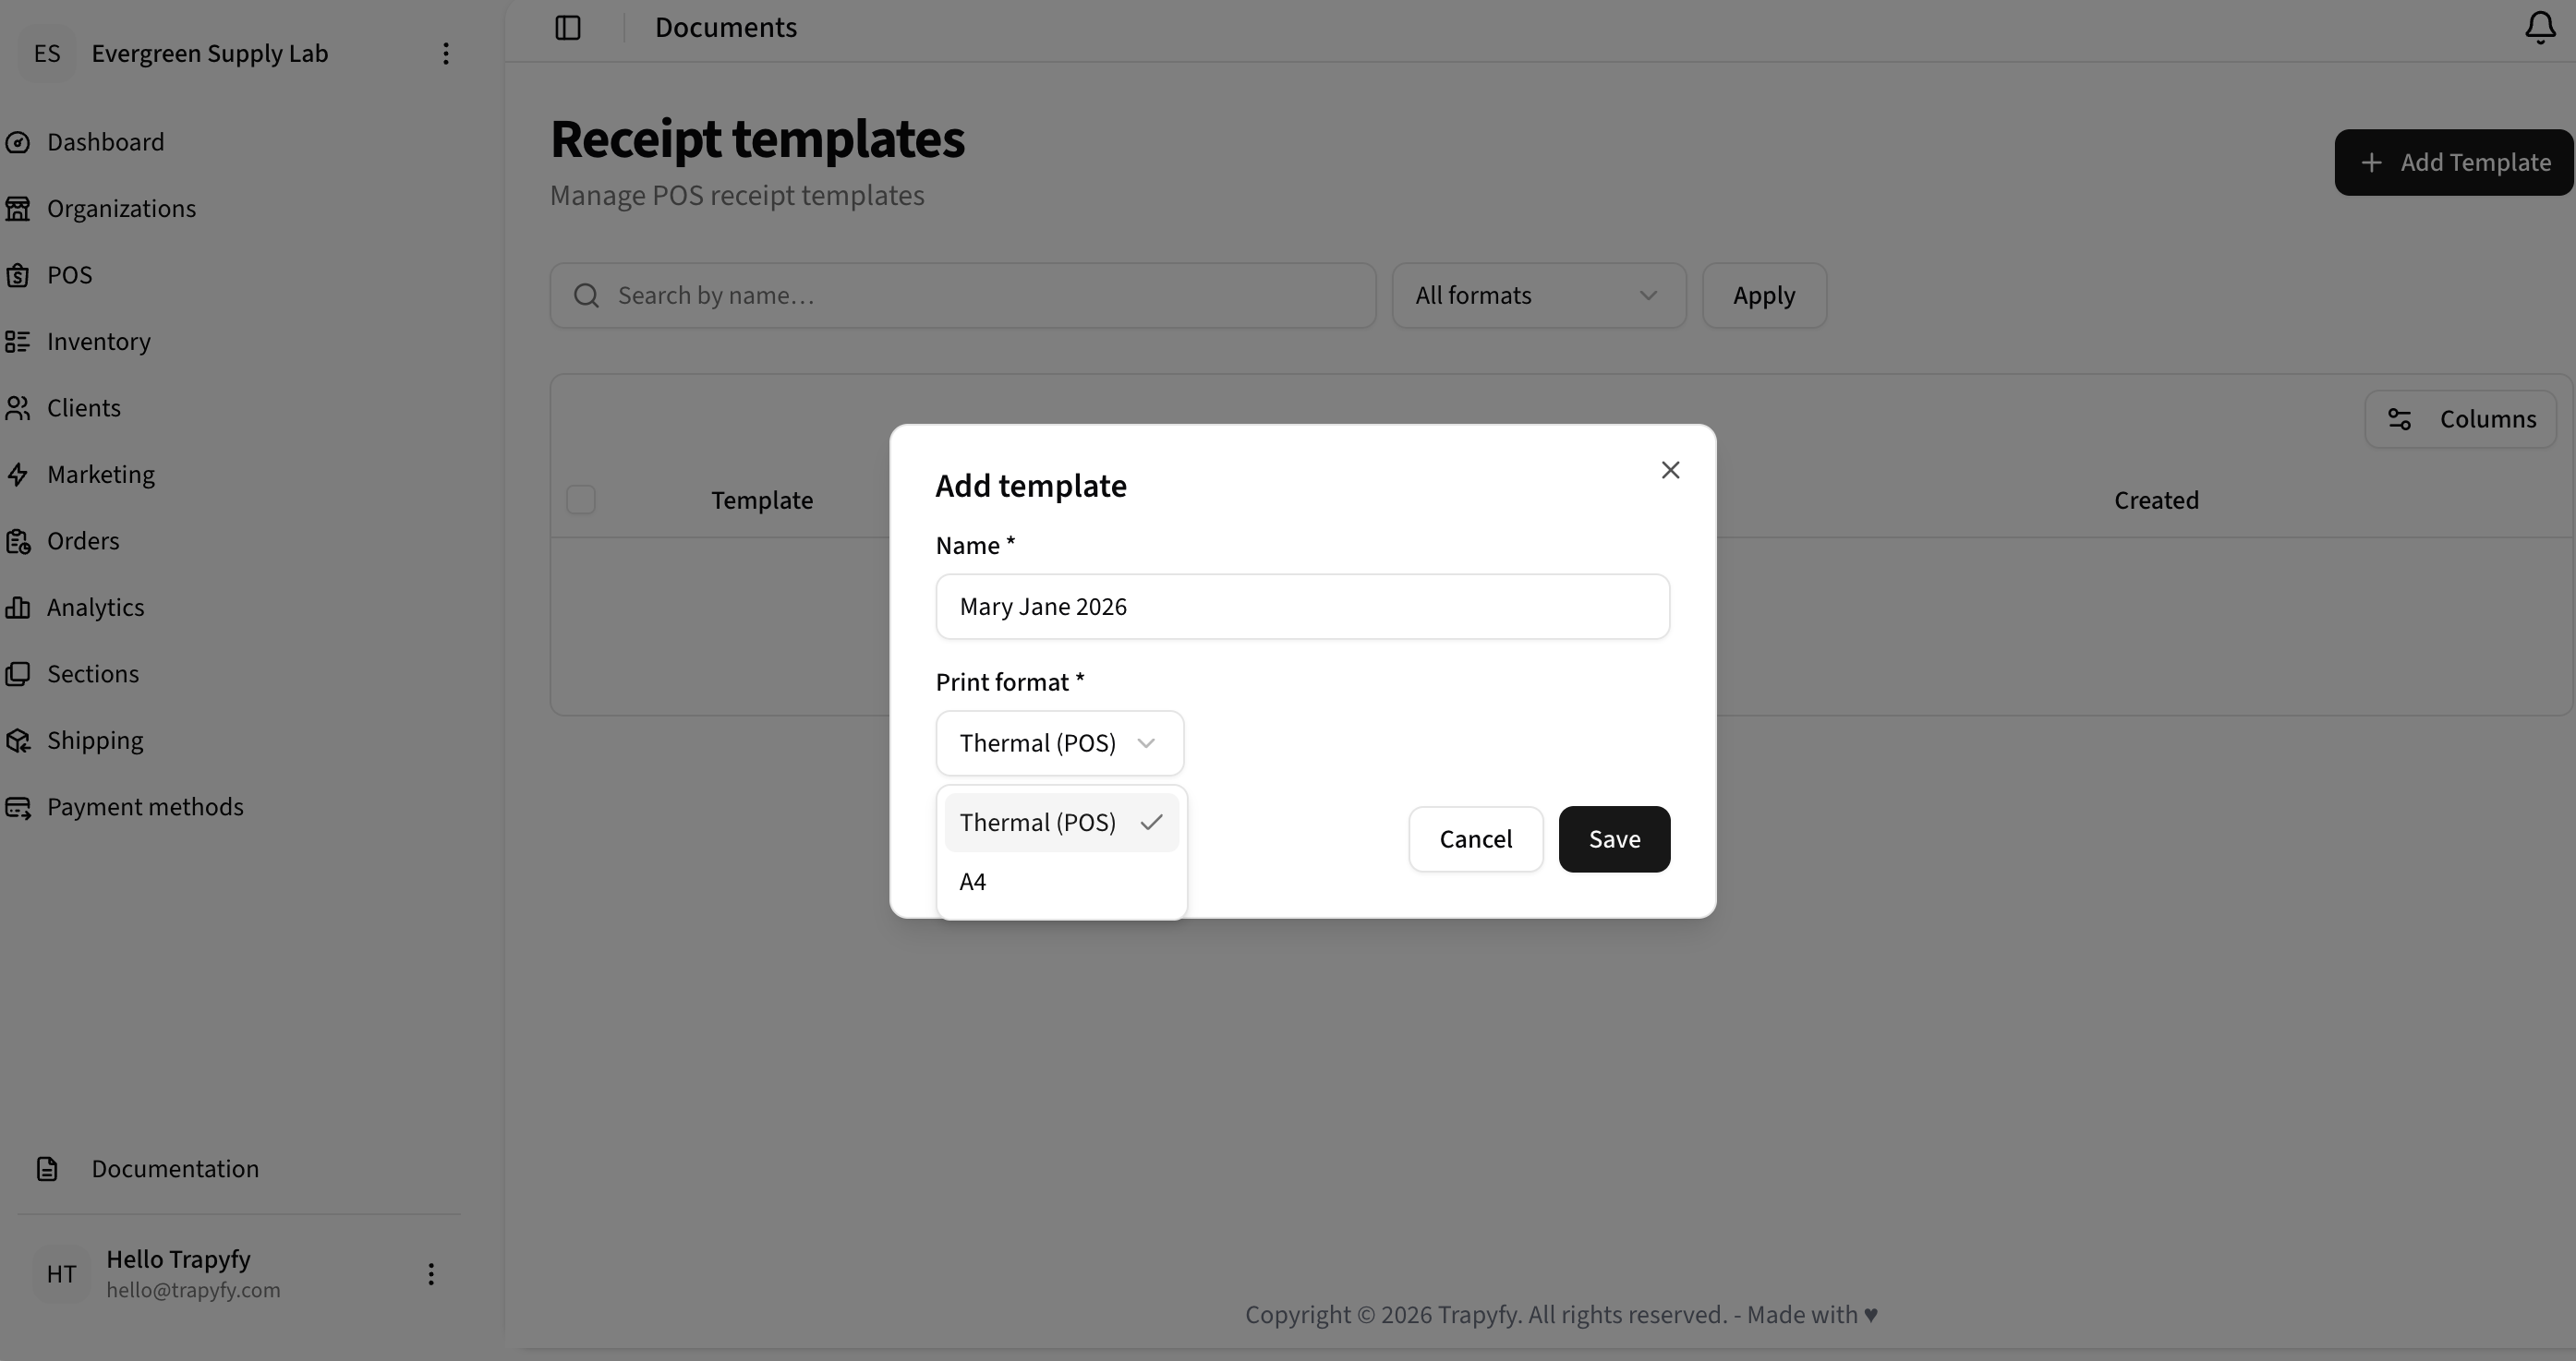
Choose Thermal (POS) for receipt printers or A4 for invoices.
Step 5 — Enable Kiosk Mode on the Store
Inside the store settings, enable Kiosk mode to activate the self-service tablet URL and device pairing system.
- Go to POS → Stores and open the store
- Toggle Kiosk mode ON (top right of the Kiosk mode section)
- The Tablet URL will appear — this is the URL you load on the tablet
- Assign the Default receipt template you created in Step 4
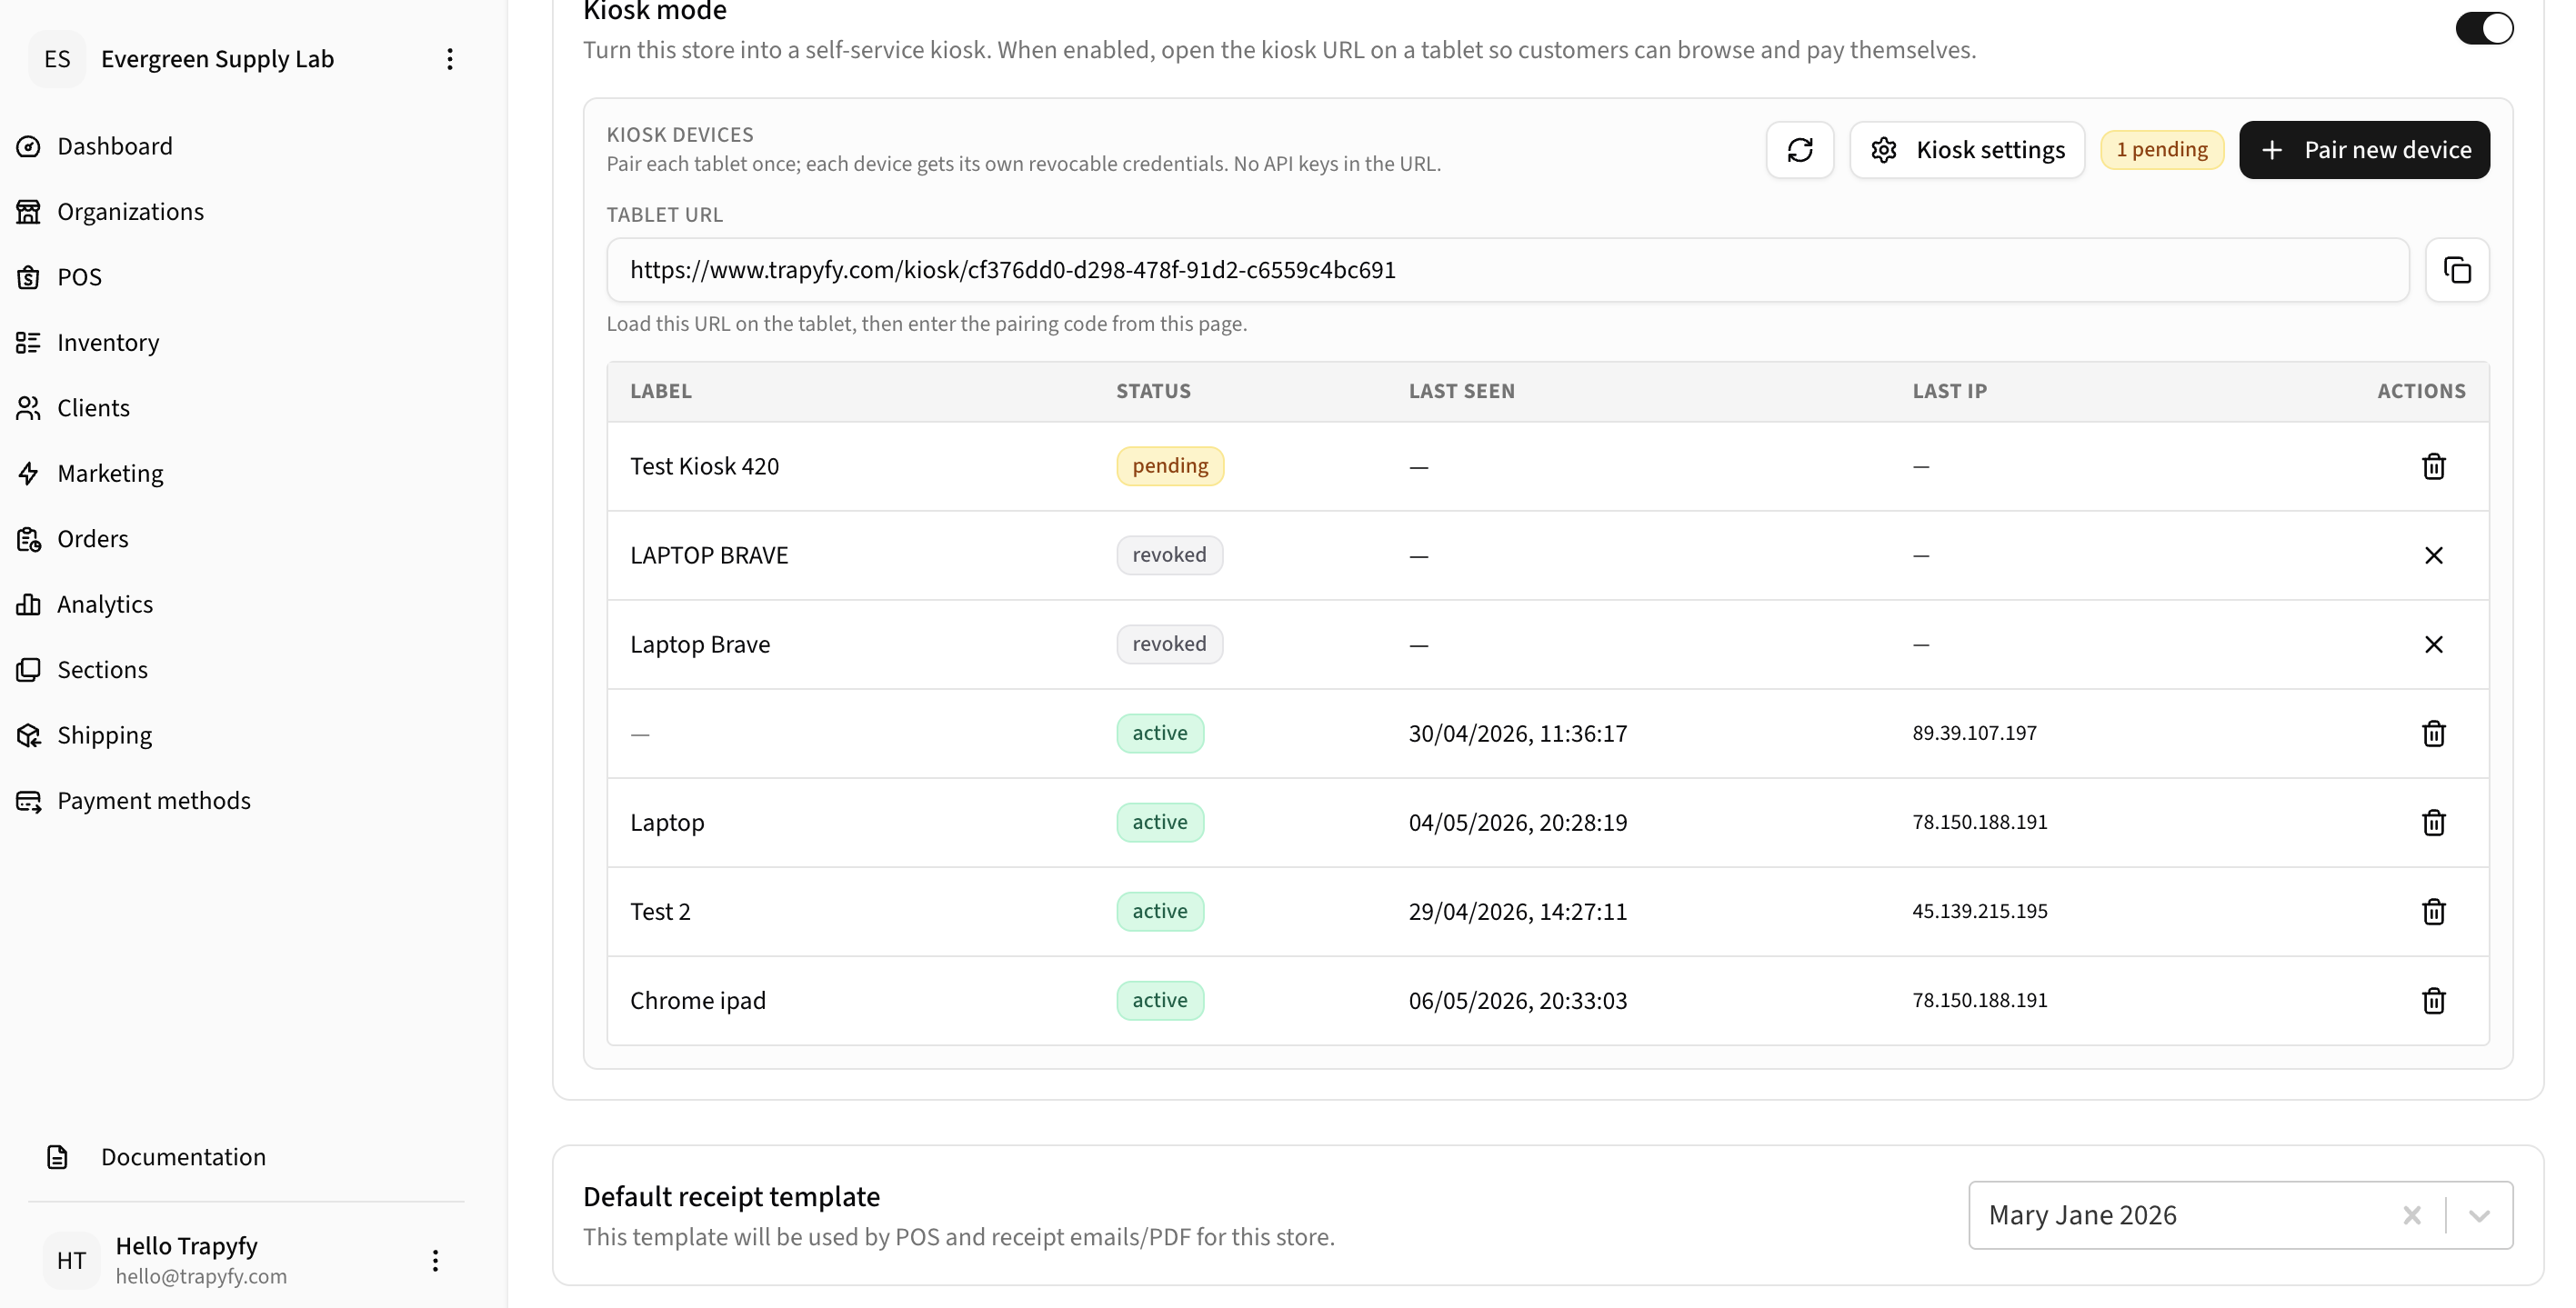
Kiosk mode enabled with Tablet URL visible and device pairing section.
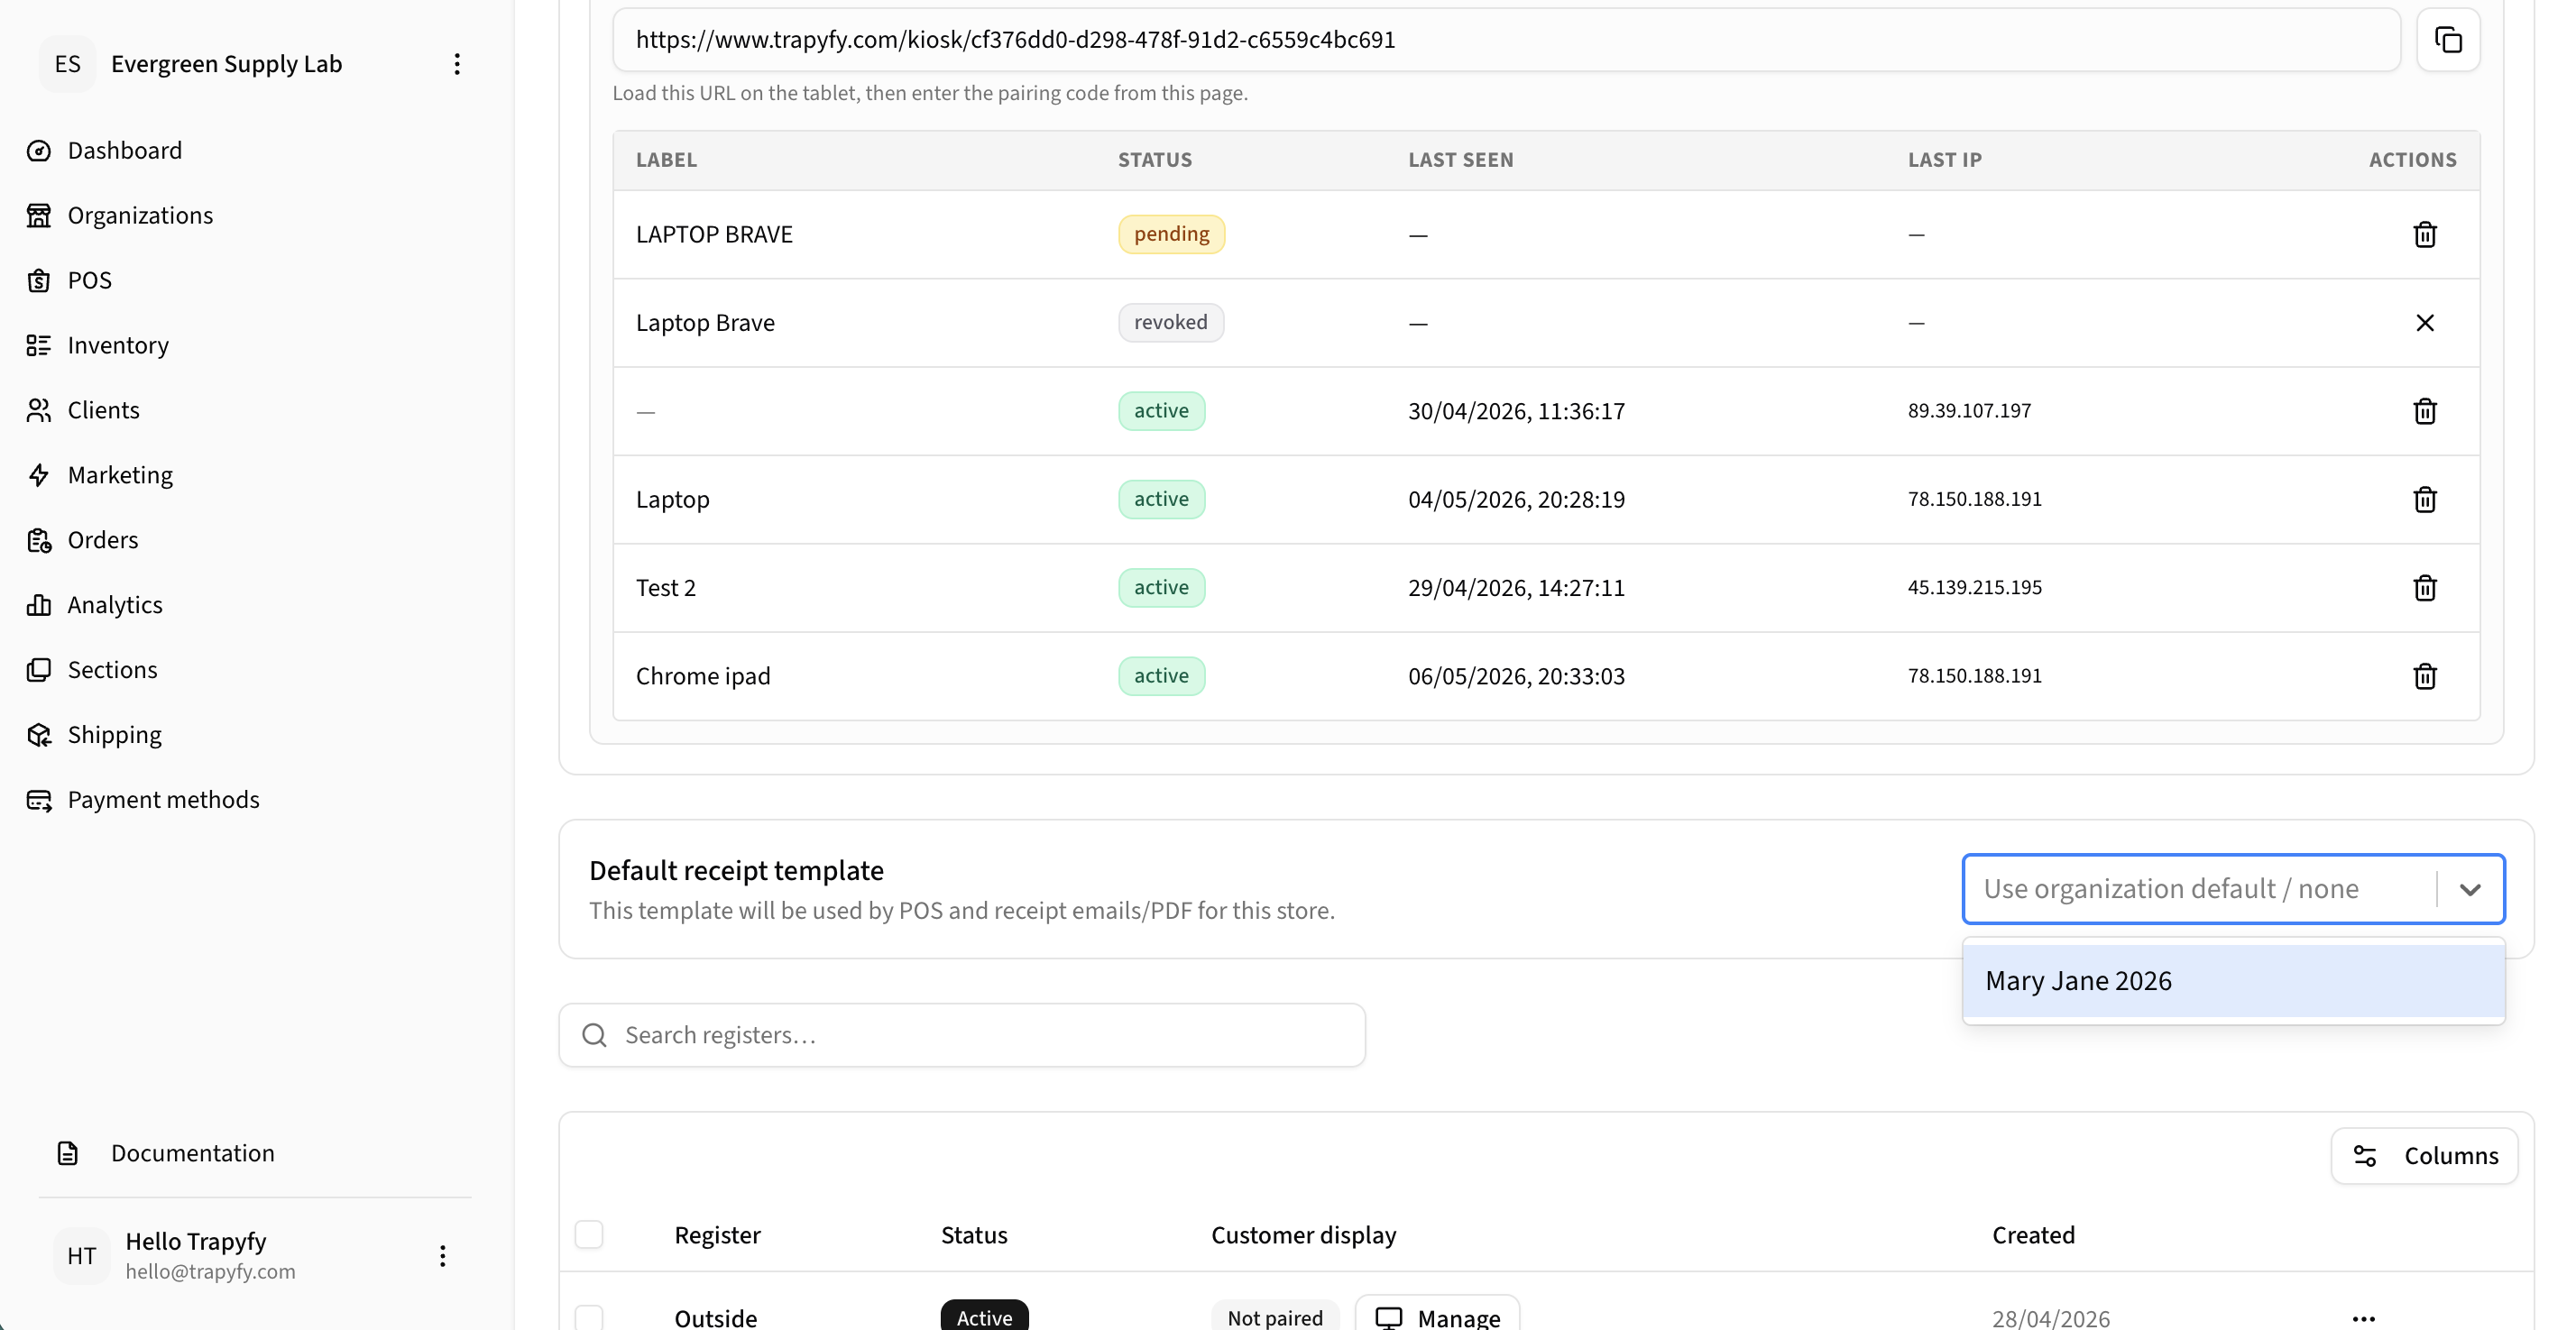
Select your receipt template — it will be used for all kiosk orders at this store.
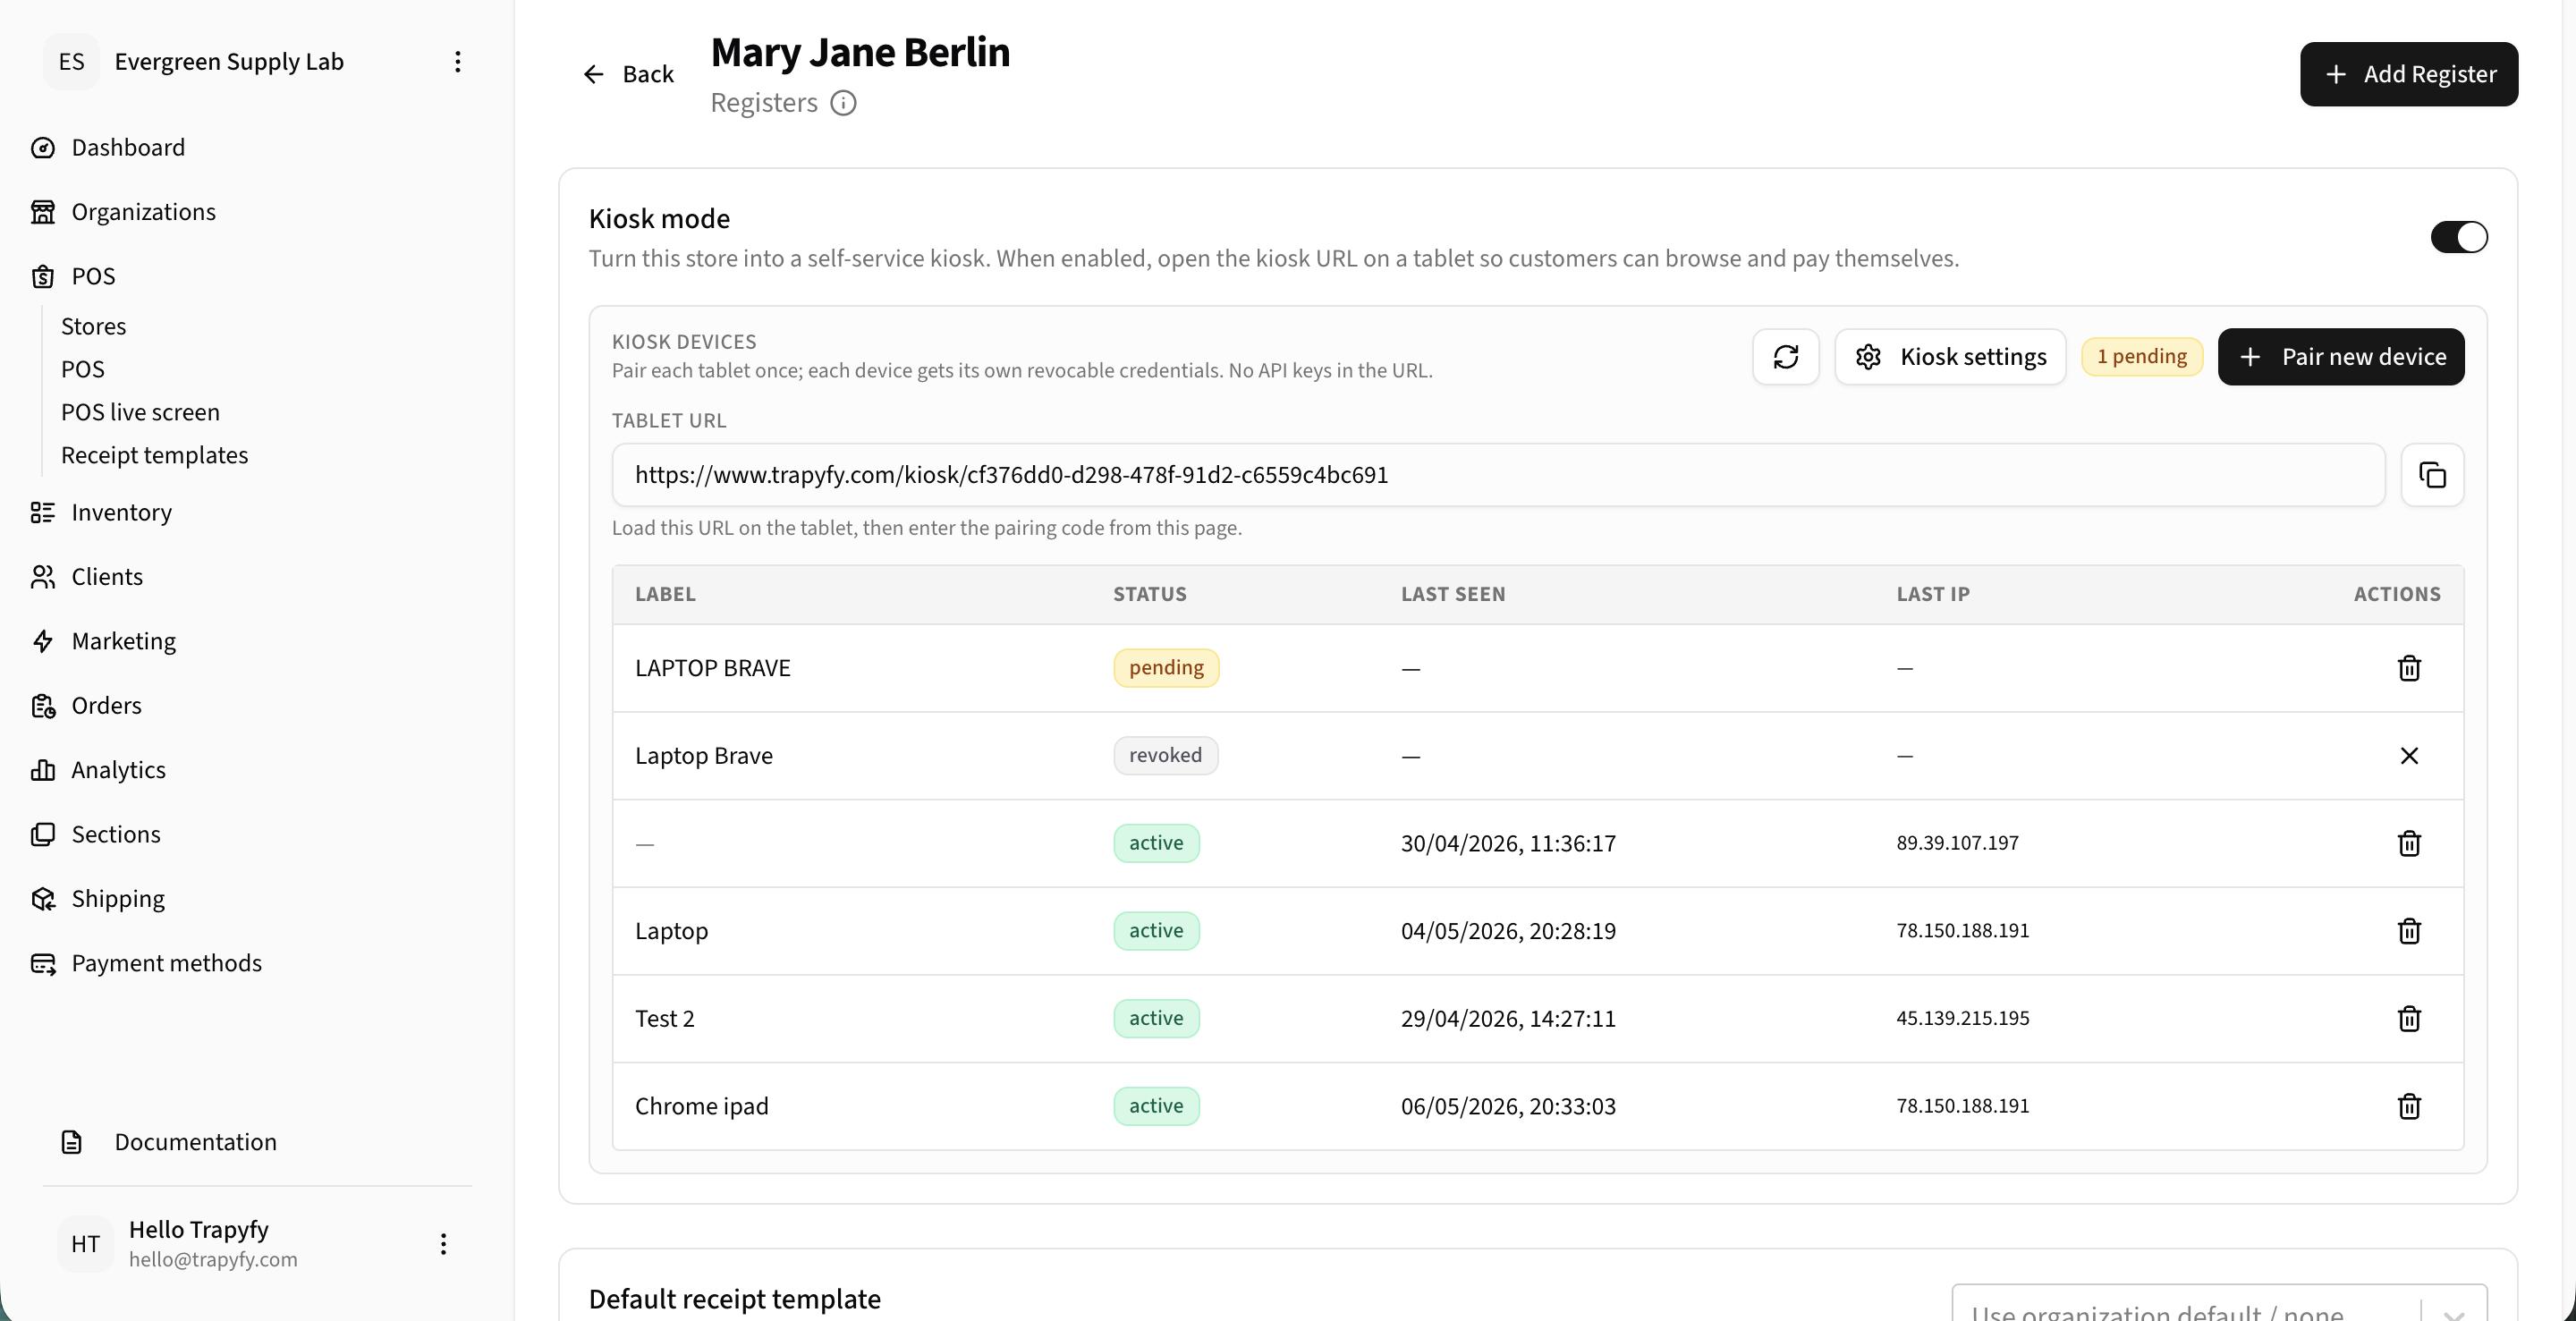
Step 6 — Pair a Kiosk Device
Each tablet or device must be paired once. Pairing generates a one-time 8-character code that the device uses to authenticate. No API keys are embedded in the URL.
On the backend (admin):
- Inside the store, click + Pair new device
- Enter an optional Device label (e.g., "Test Kiosk 420") so you can identify it later
- Click Generate code
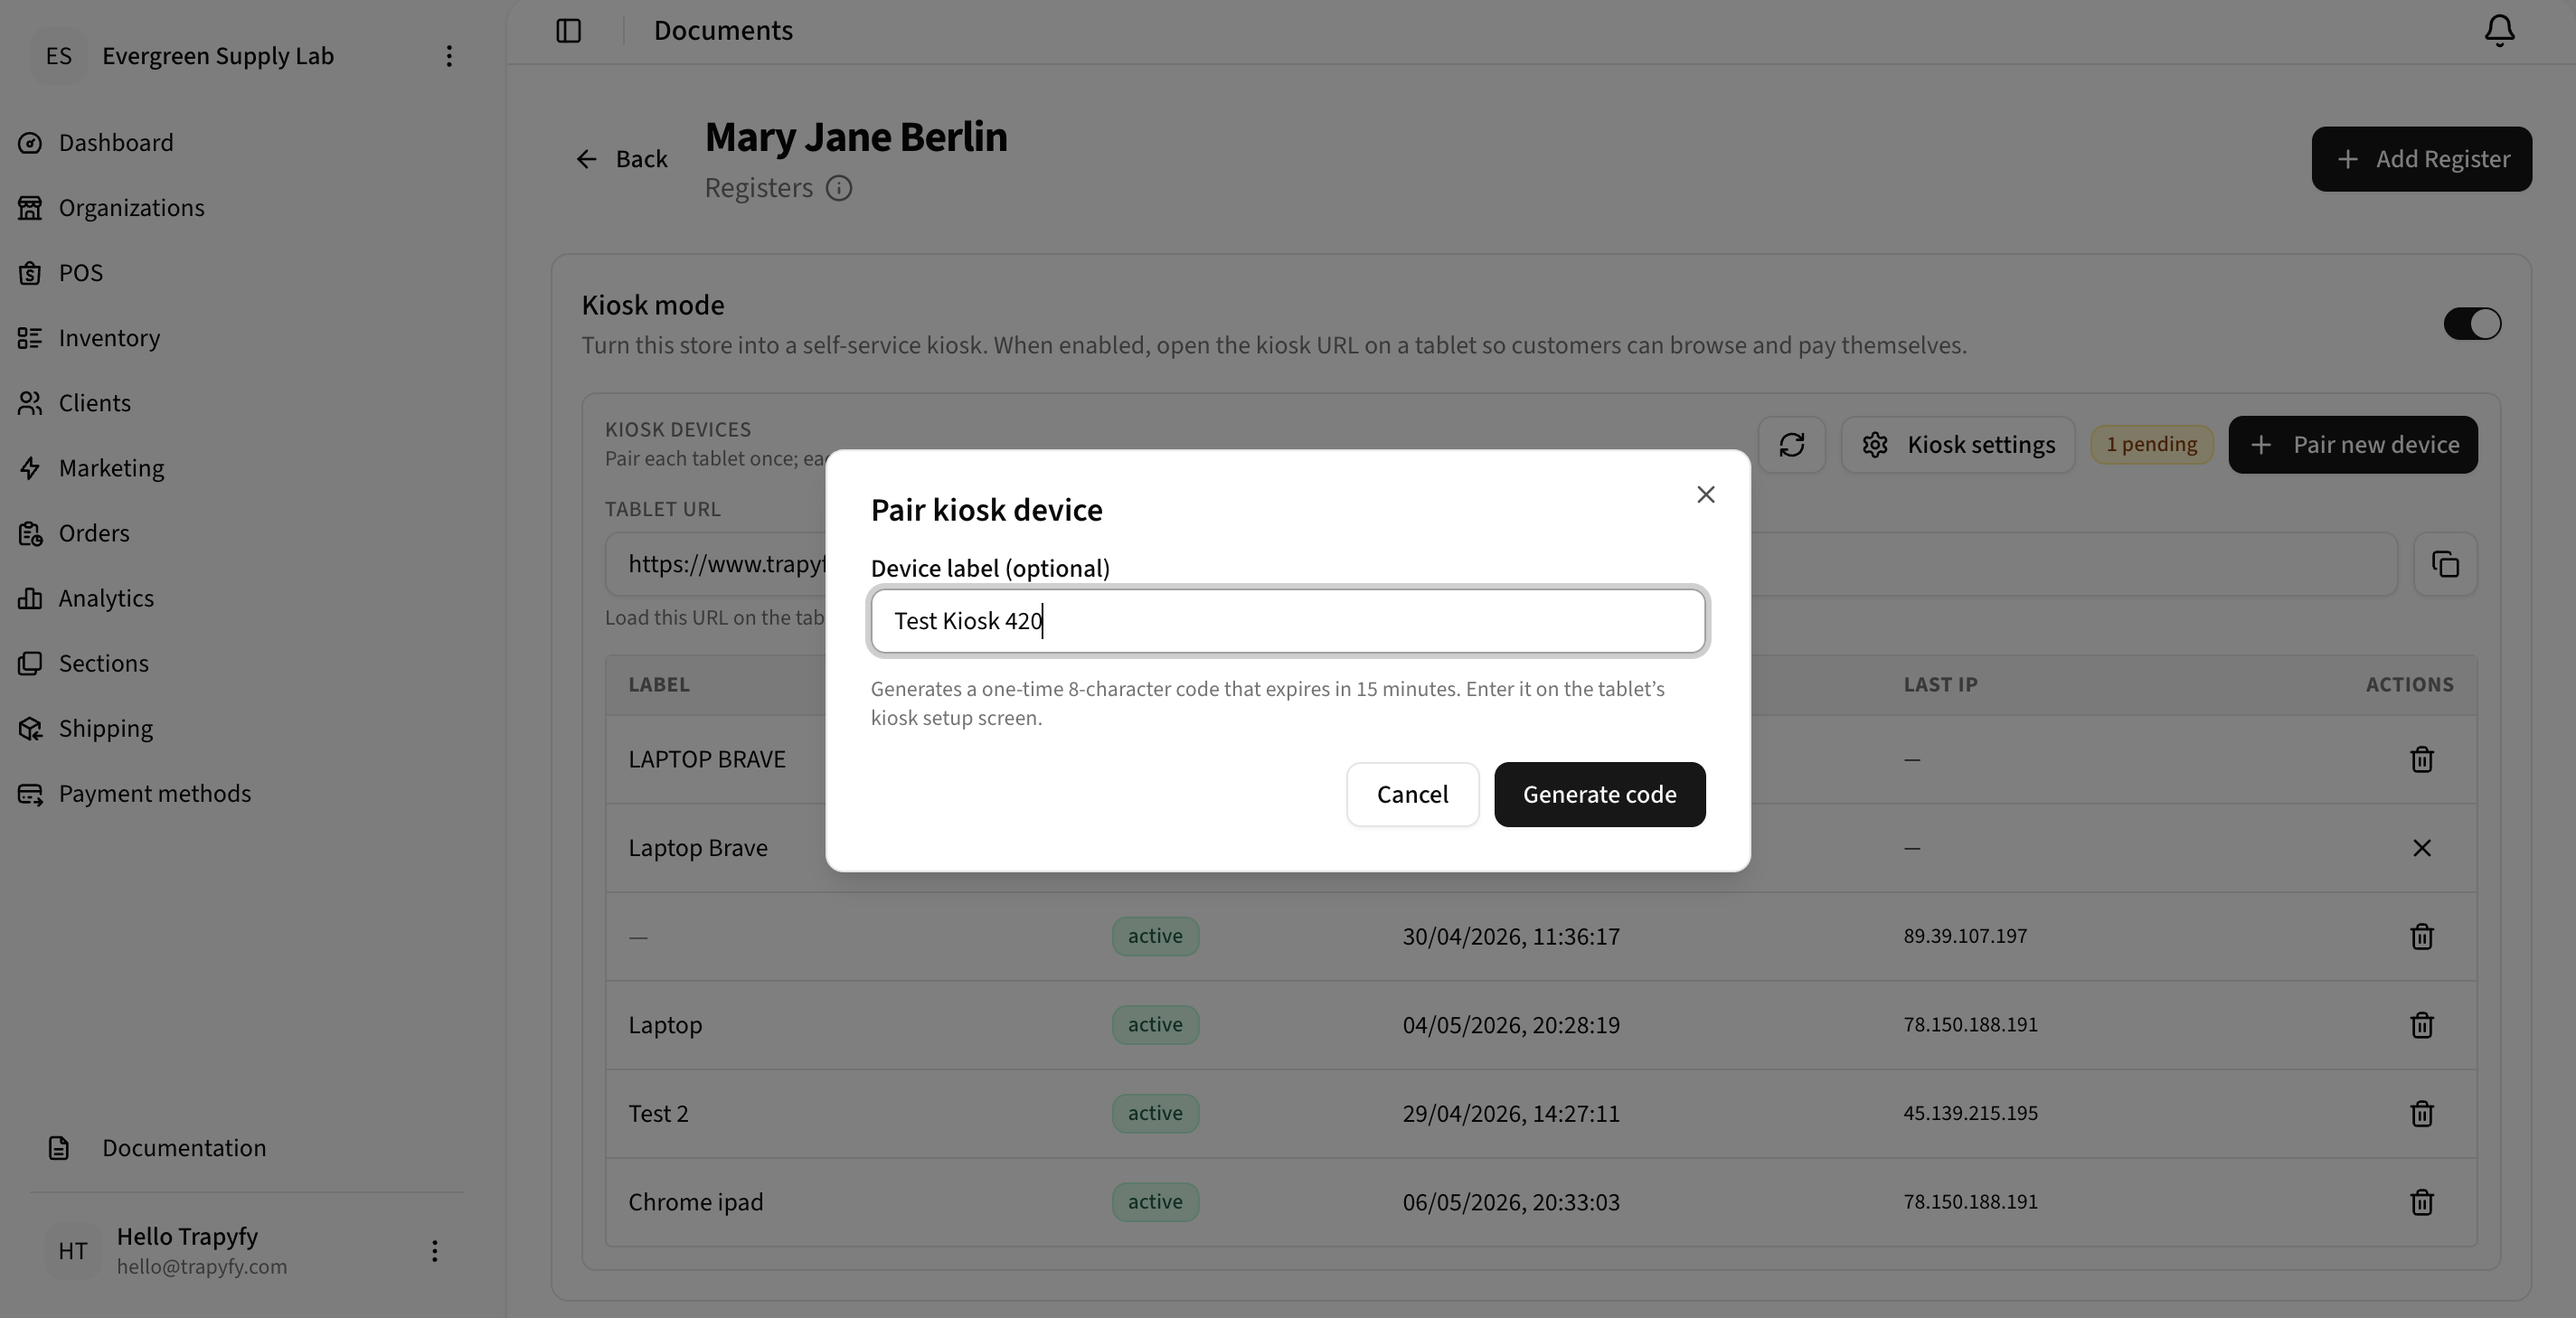
Enter an optional label to identify the device, then click Generate code.
An 8-character pairing code is displayed:
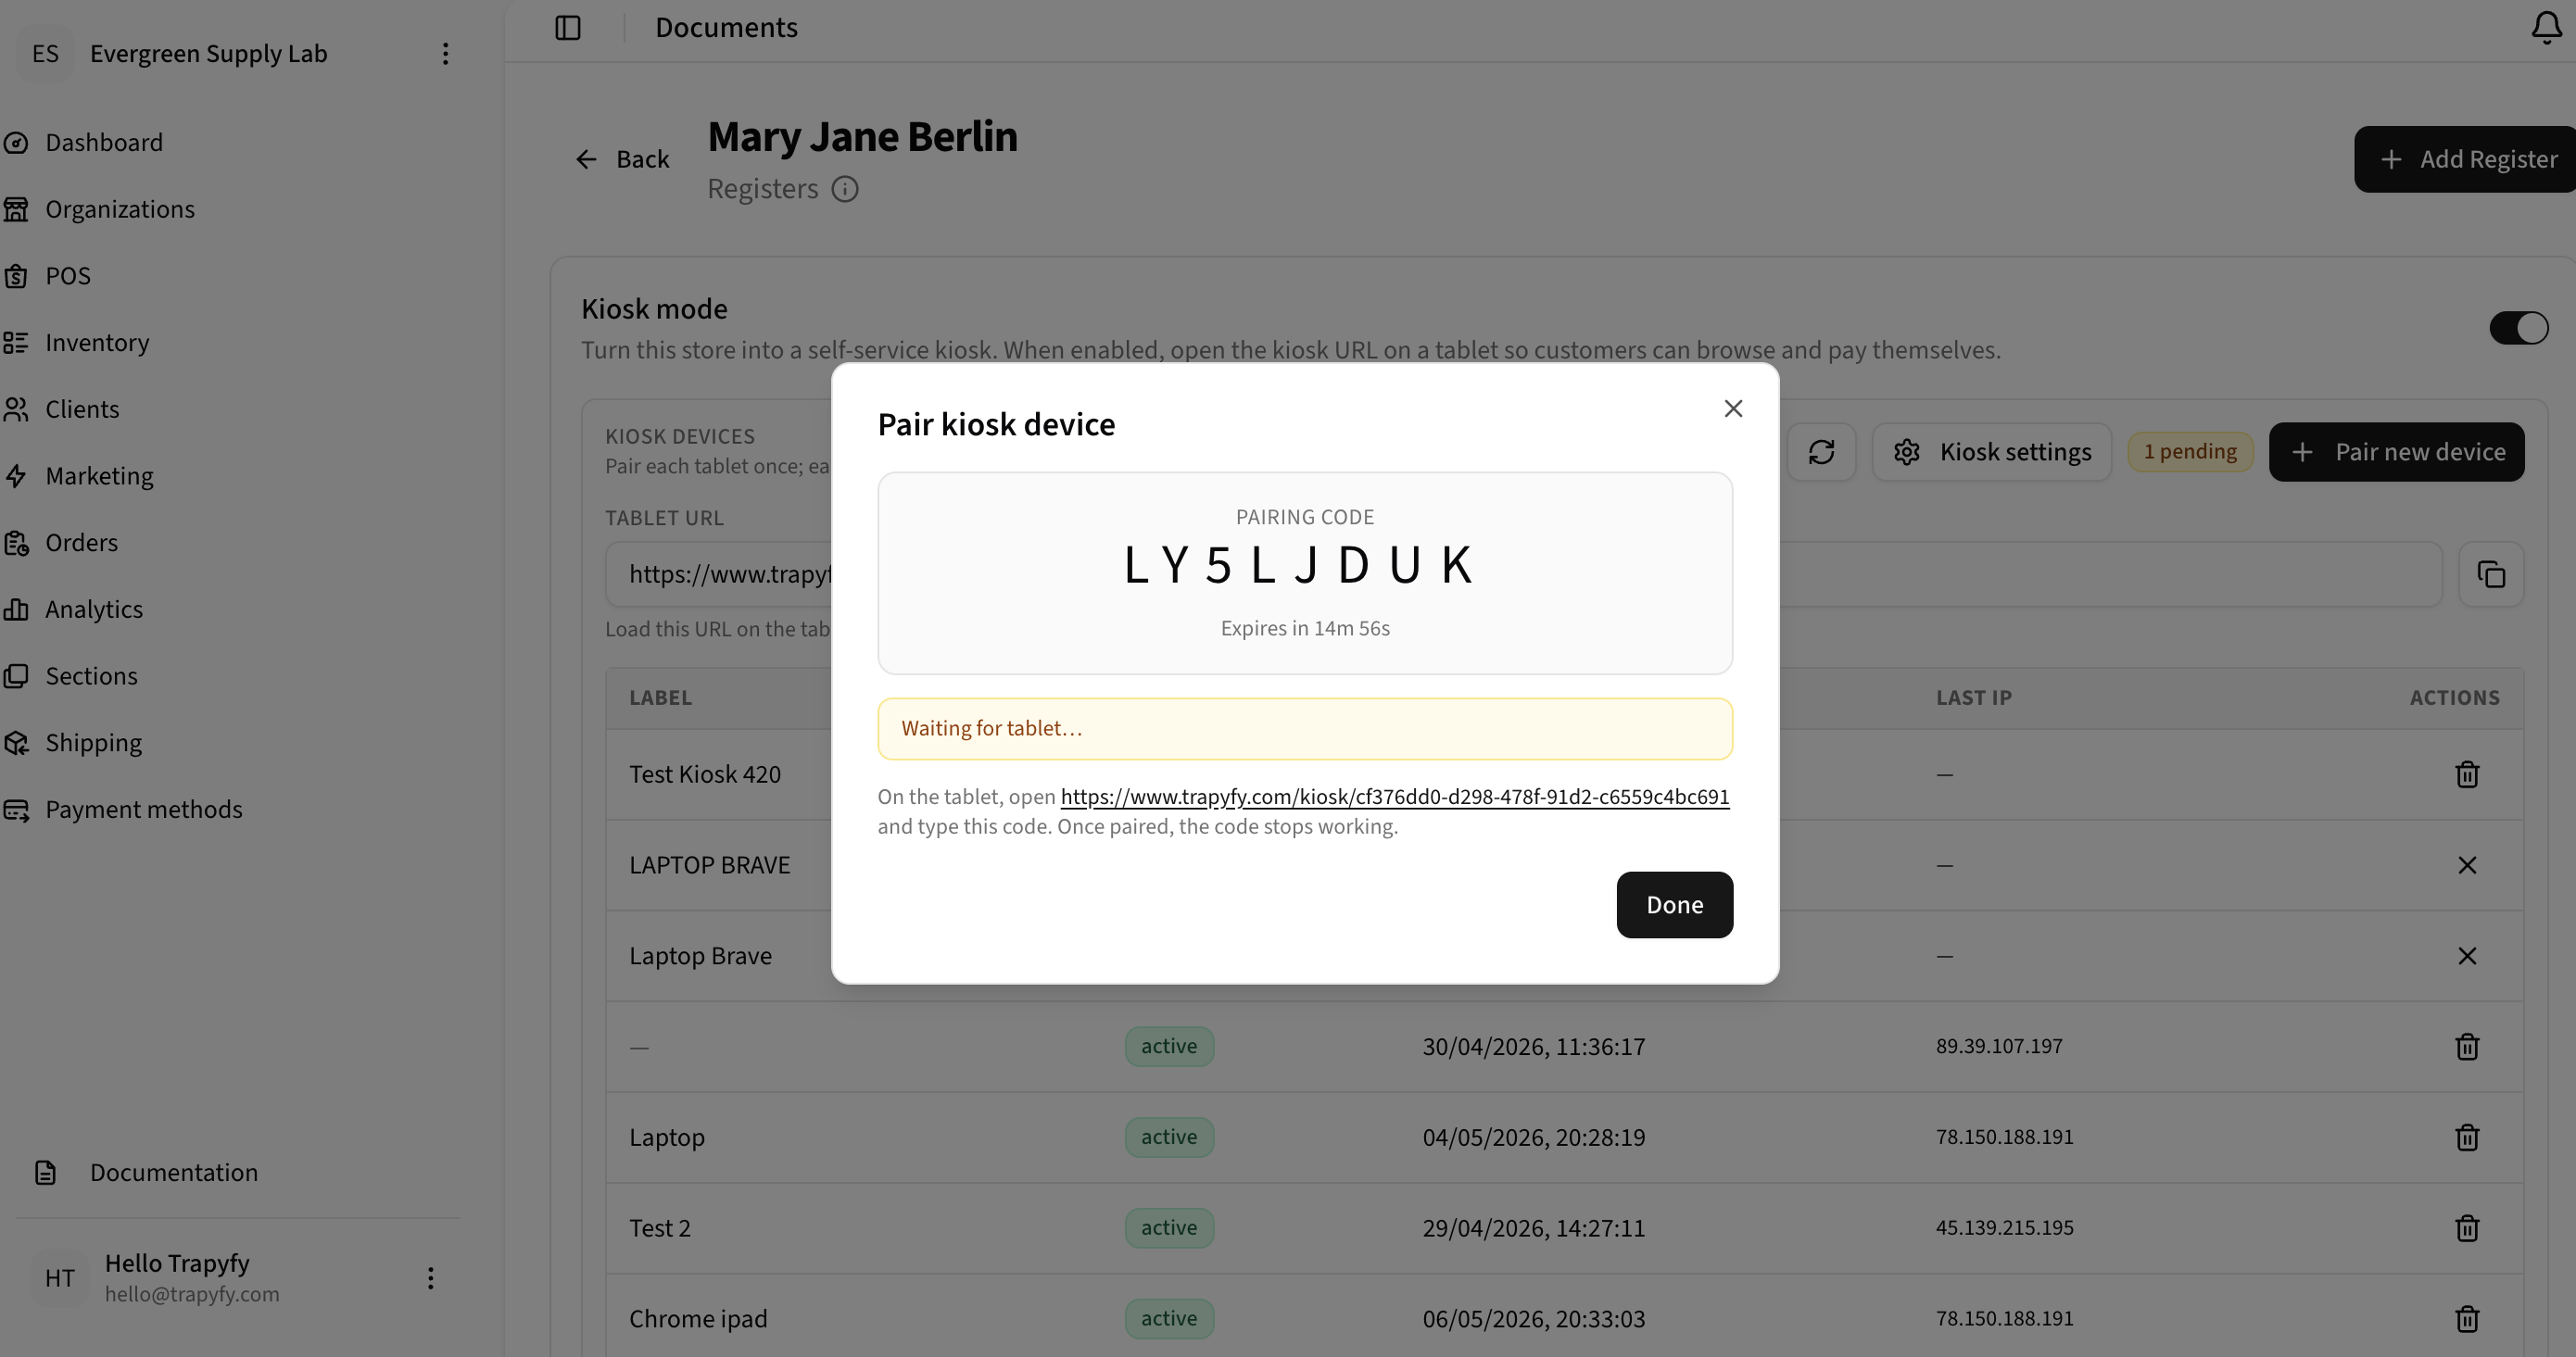
The pairing code expires in 15 minutes. The status shows Waiting for tablet… until the device enters the code.
On the tablet:
- Open the Tablet URL from the store page in the tablet's browser
- The kiosk setup screen will appear and prompt for the pairing code
- Type in the 8-character code shown on the backend
- The tablet is now paired — status changes to active
Security note: Each device gets its own revocable credentials. You can delete a device from the table at any time to immediately revoke its access. The tablet URL itself contains no API keys.
Step 7 — Verify Device Status
After pairing, confirm the device shows as active in the Kiosk Devices table and check the Last Seen timestamp.
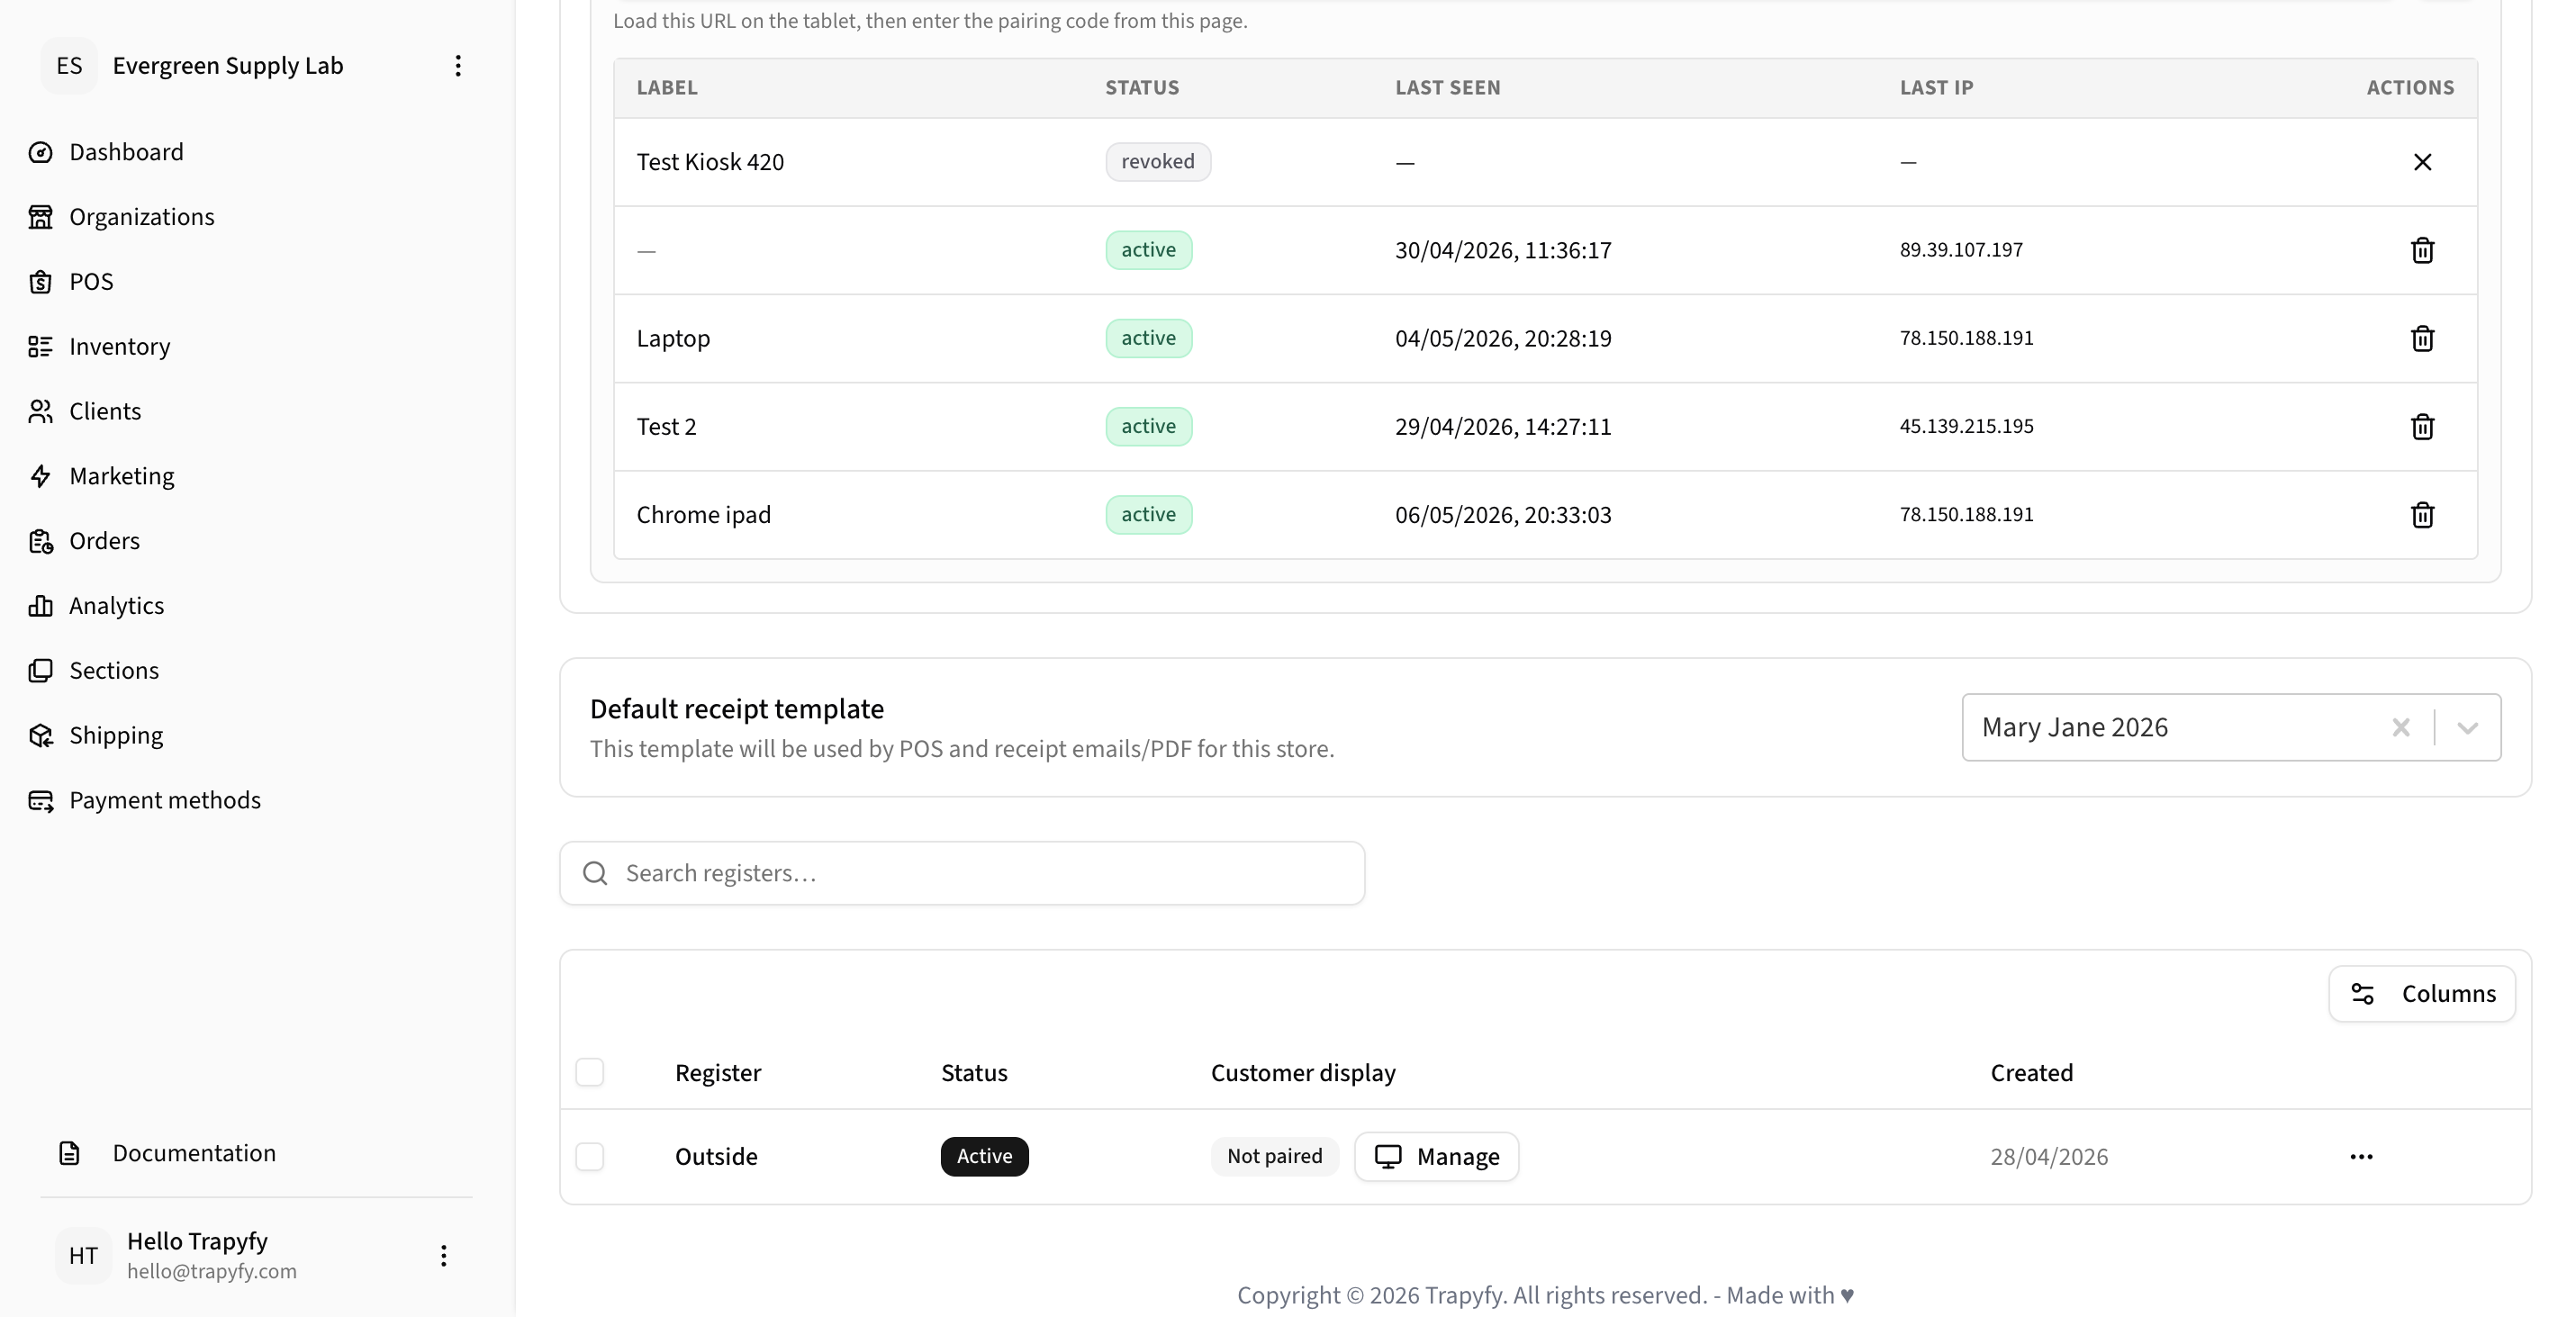
Device statuses: active = connected and ready, pending = waiting for pairing code, revoked = deleted or access denied.
Step 8 — Create a Register
A Register represents a checkout point or staff member using the POS. Each register can be assigned to a staff member and is used for staff-to-customer transactions and refunds.
- Inside the store page, click + Add Register
- Enter a Name (e.g., "Front Counter", "Staff 1", "Backup")
- Toggle Active to enable/disable the register
- Click Save
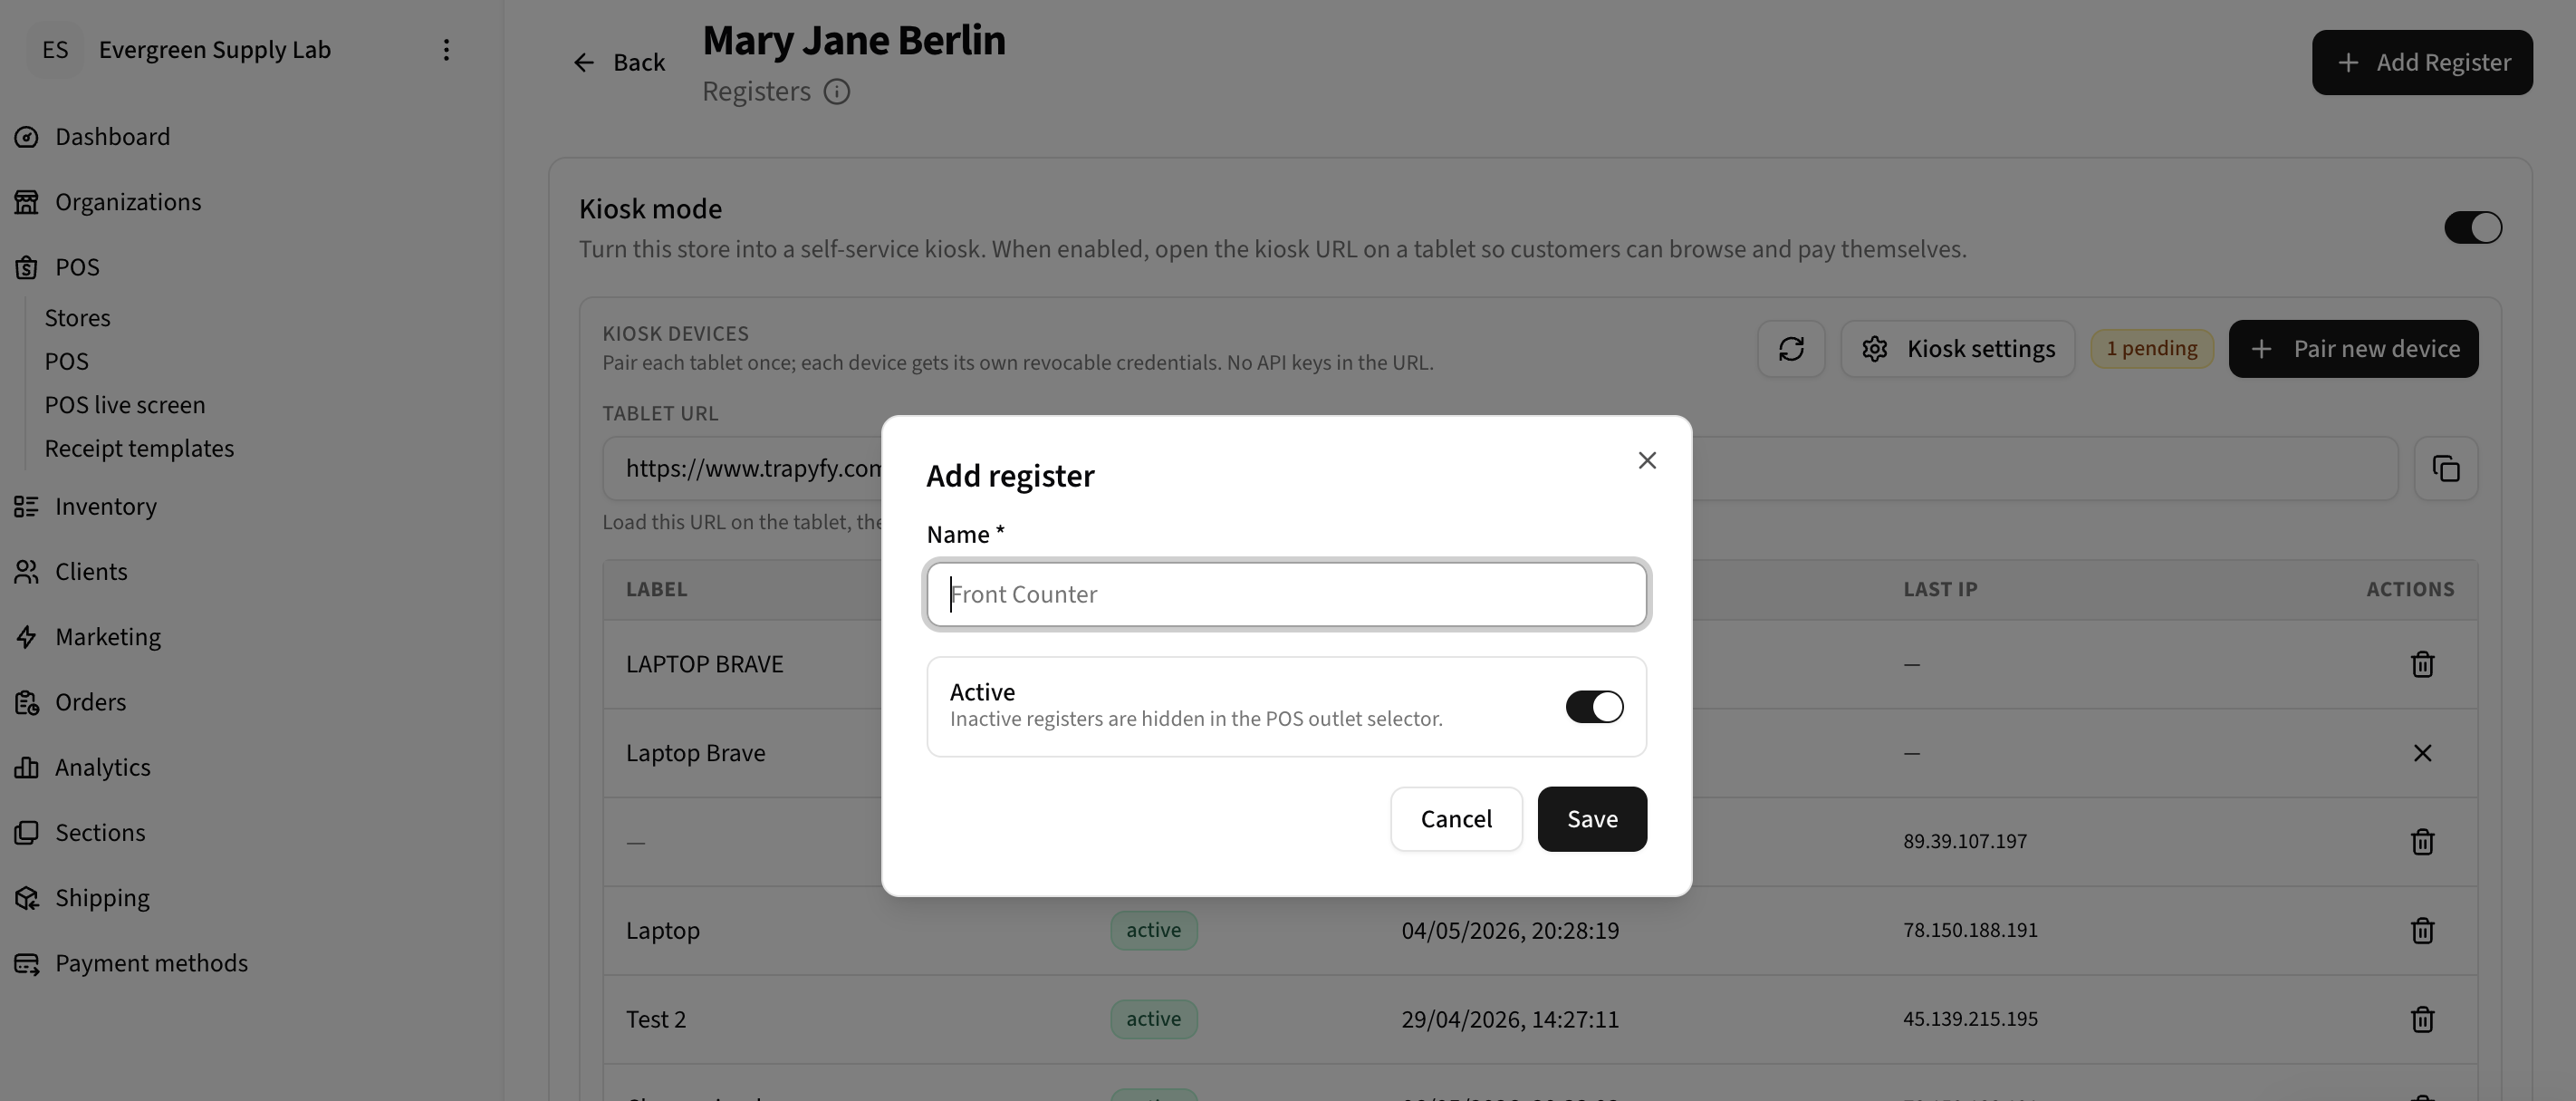
Registers are displayed in the POS outlet selector during checkout.
Step 9 — Configure Kiosk Branding
Customize the kiosk welcome screen with your logo and brand colors to match your event or store.
- Inside the store, click the Kiosk settings button
- Scroll to the Branding section
- Upload a Logo (PNG or JPG, max 5 MB, transparent PNG recommended)
- Set Brand color 1 (primary), Brand color 2 (accent), and Brand color 3 (hover)
- Optionally enable Use video background for an animated welcome screen
- Click Save
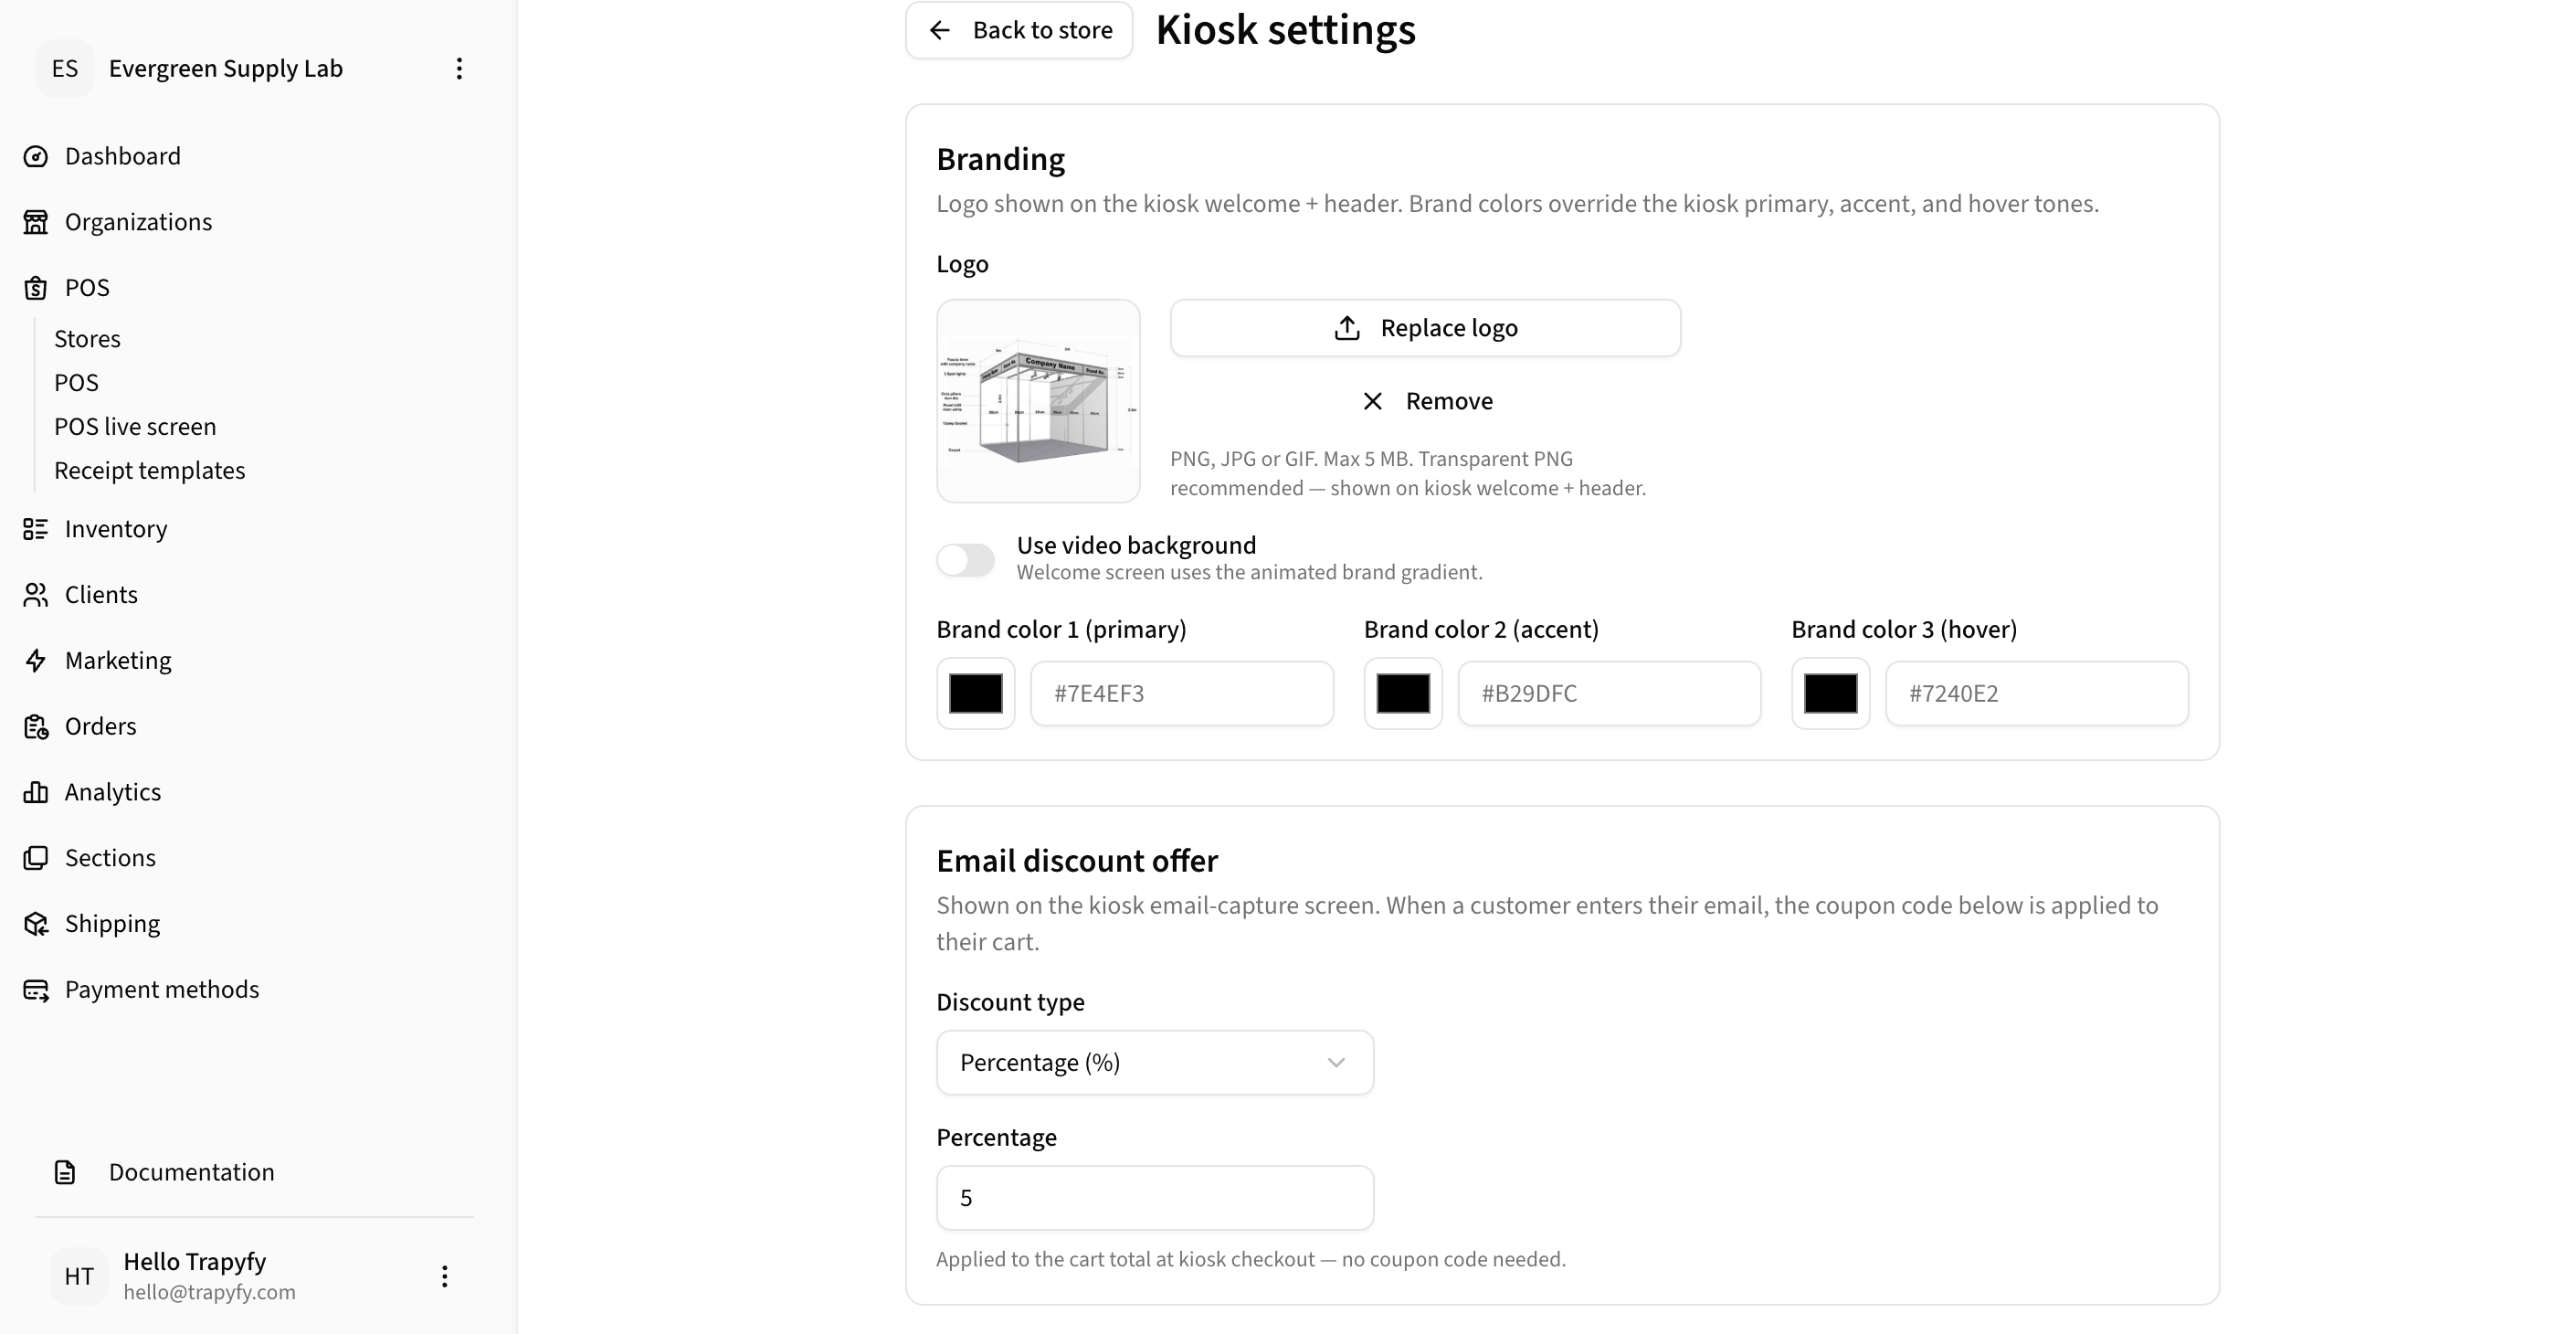
Upload your logo and select brand colors. These appear on the kiosk welcome and header screens.
Step 10 — Configure Guest Wi-Fi QR
Display a Wi-Fi QR code on the kiosk welcome screen so customers can connect to your event Wi-Fi without asking staff for the password.
- Inside Kiosk settings, scroll to the Guest Wi-Fi QR section
- Enter your network name (SSID), security type (WPA/WPA2/WPA3), and password
- A live QR preview appears on the right — customers can scan it to join your network
- Toggle Hidden network if your Wi-Fi is not broadcast
- Click Save
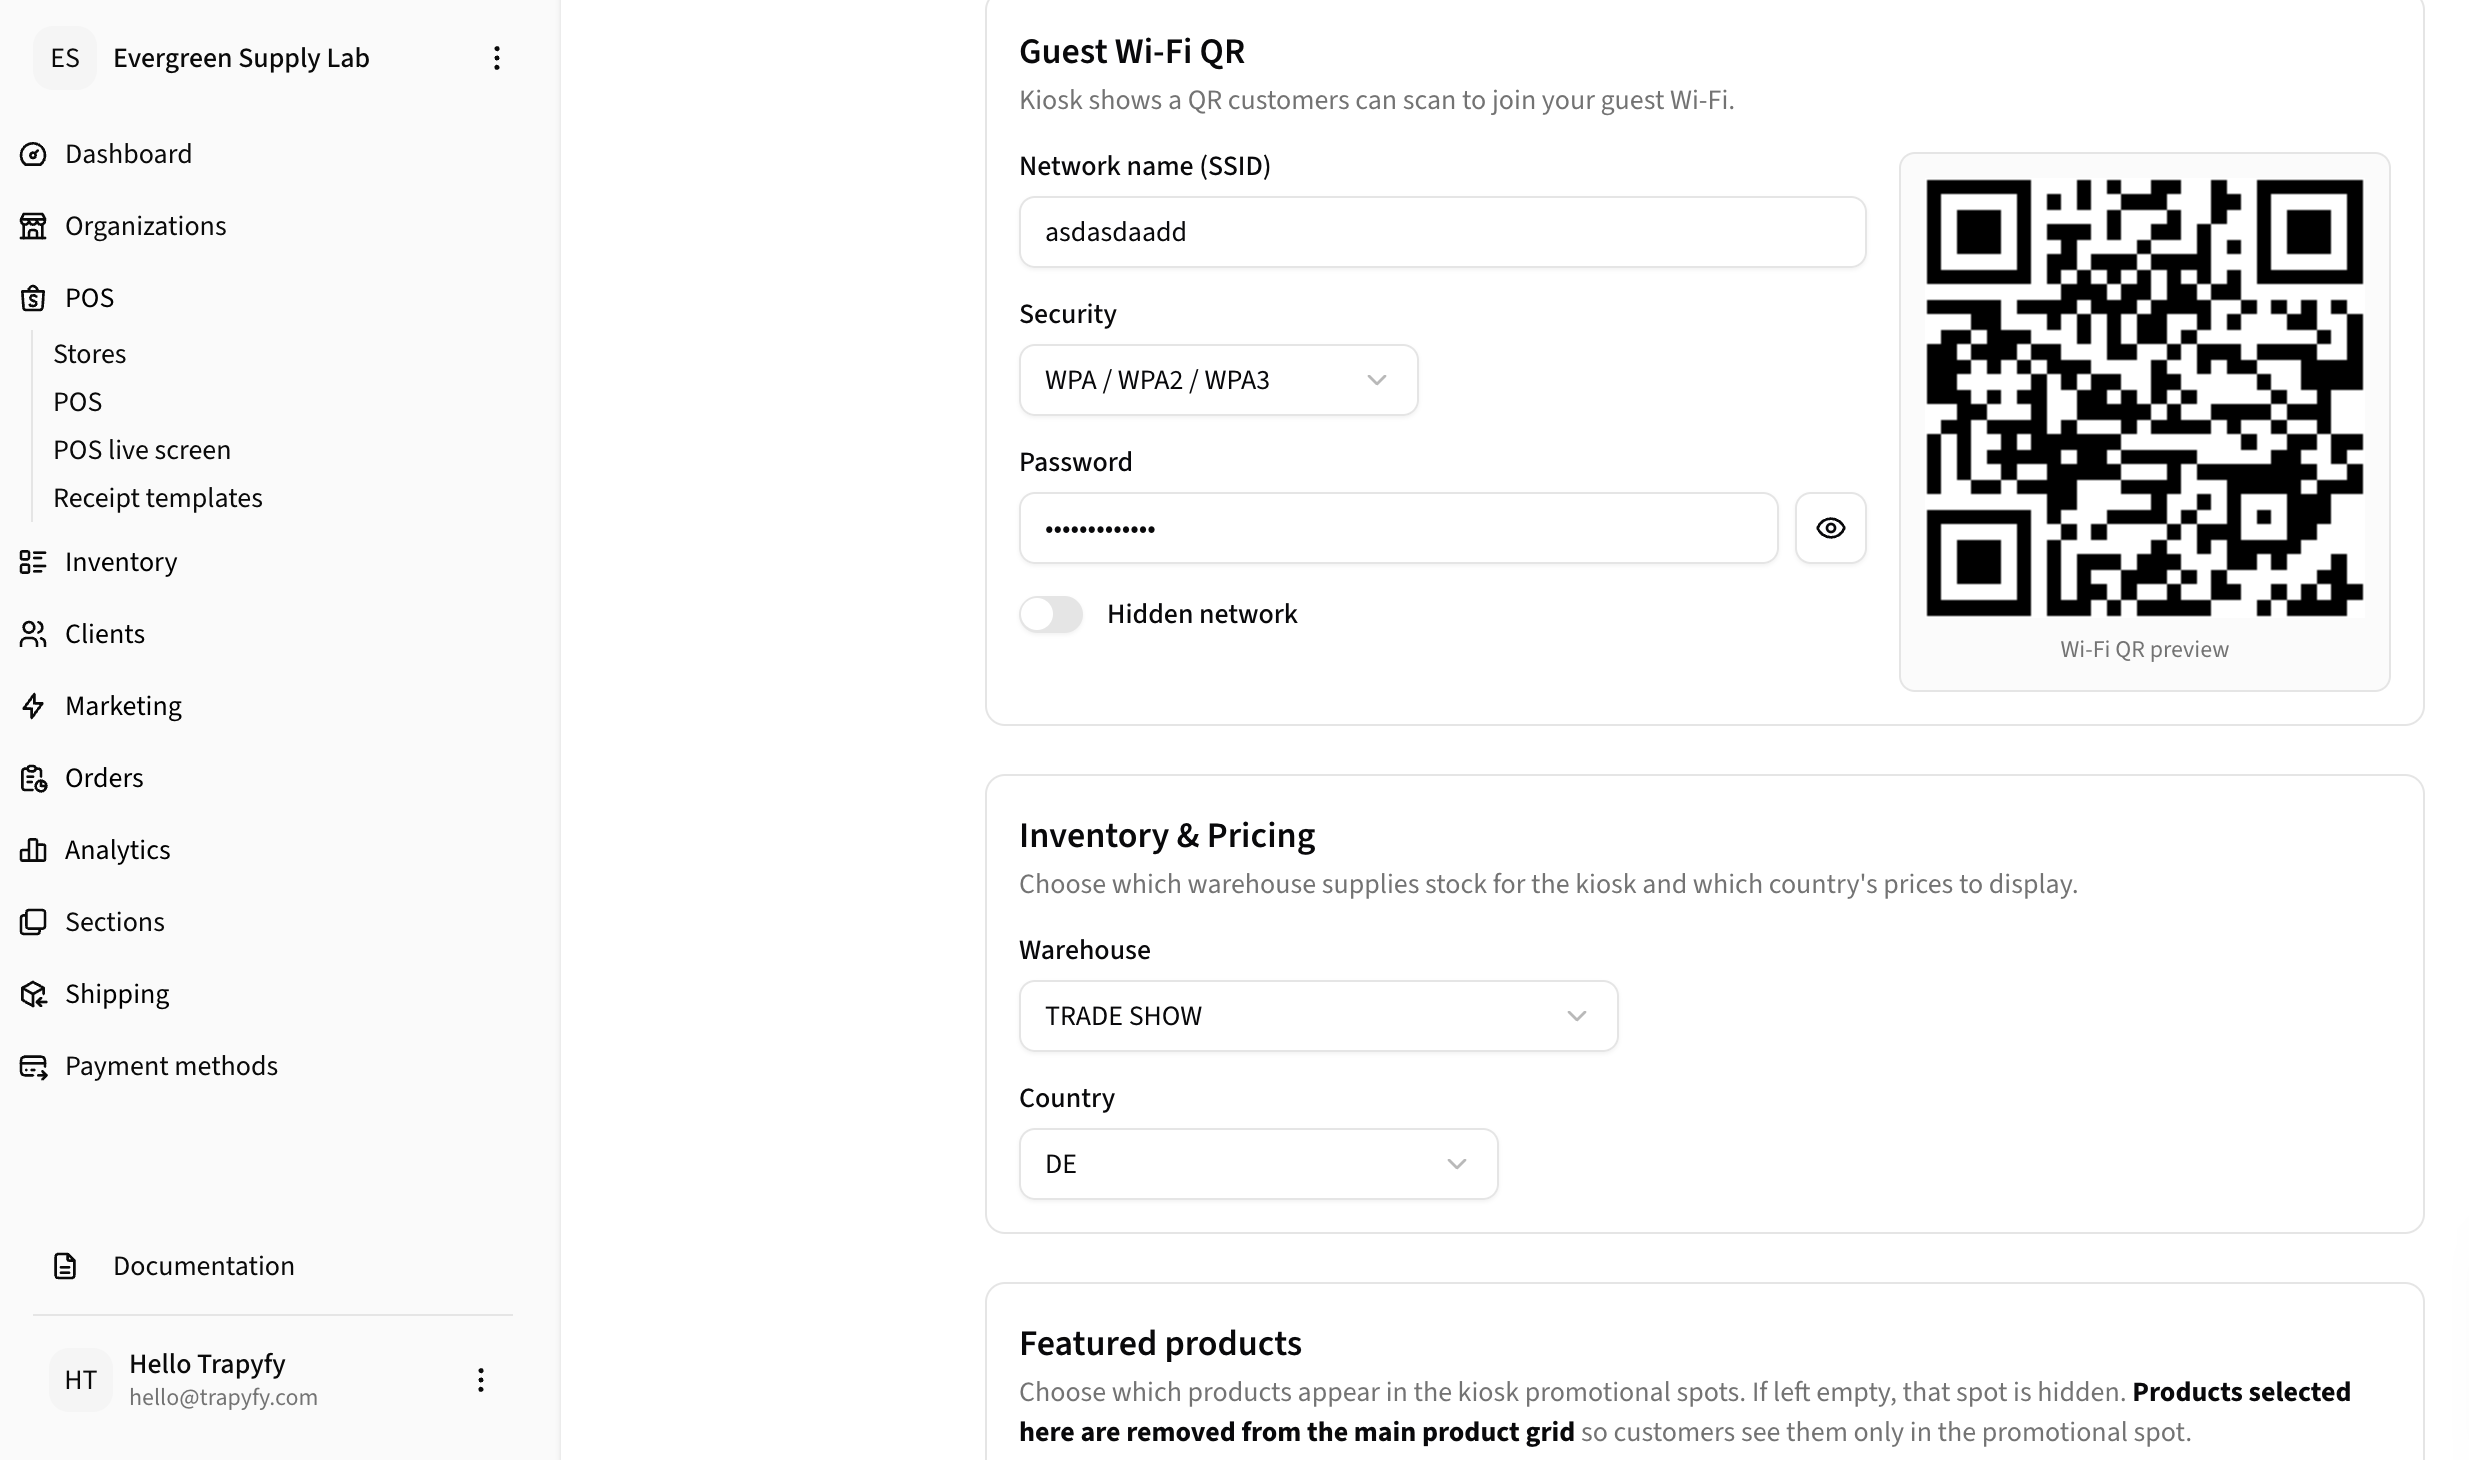
The Wi-Fi QR code appears on the kiosk welcome screen. Customers scan it to connect without asking staff.
Step 11 — Configure Inventory and Pricing
Select which warehouse supplies stock and which country's prices to display on the kiosk.
- Inside Kiosk settings, scroll to Inventory and Pricing
- Select the Warehouse (e.g., TRADE SHOW) — only products with stock in this warehouse appear on the kiosk
- Select the Country (e.g., DE) — prices for this country are displayed
- Click Save
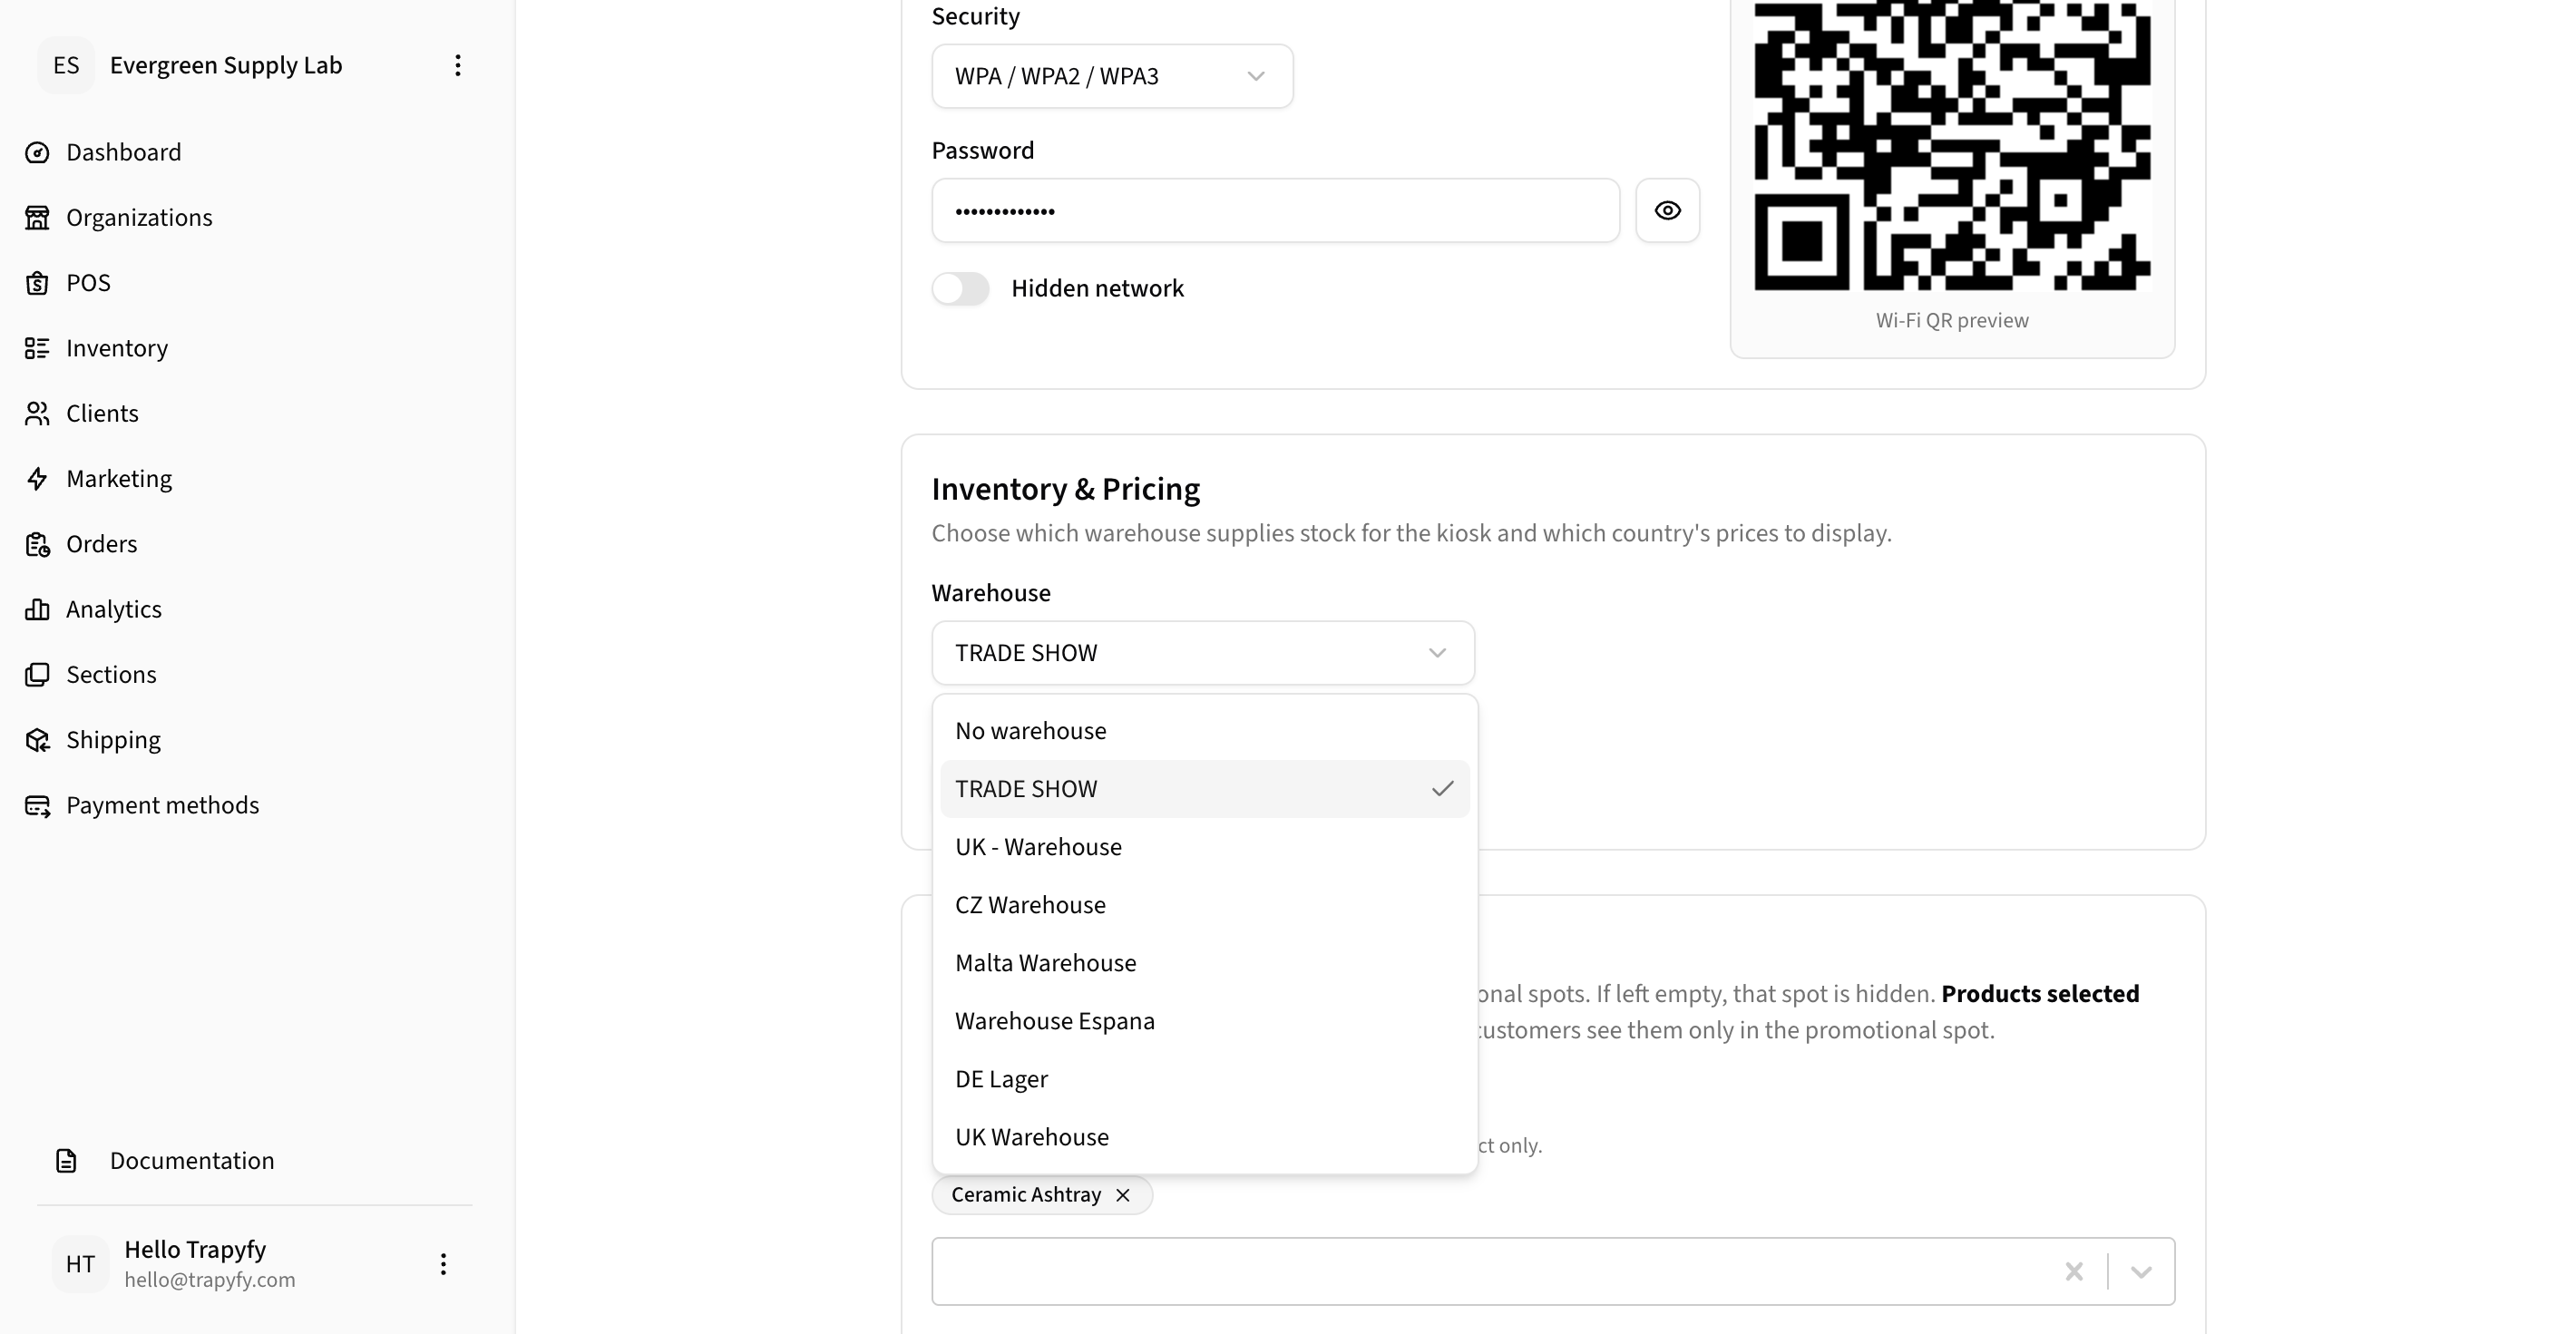
Only products with stock in the selected warehouse and prices for the selected country will appear on the kiosk.
Step 12 — Configure Featured Products
Highlight promotional products on the kiosk welcome screen to drive sales. Featured products are removed from the main grid and only appear in the promotional spots.
- Inside Kiosk settings, scroll to Featured products
- Under Today's deal, search and select one product (large feature card shown above the product grid)
- Under Goes great with your order, select multiple products (shown as a scrollable strip below the product grid)
- Under Fancy anything else?, optionally select products for a quick-add nudge on the post-payment screen
- Click Save
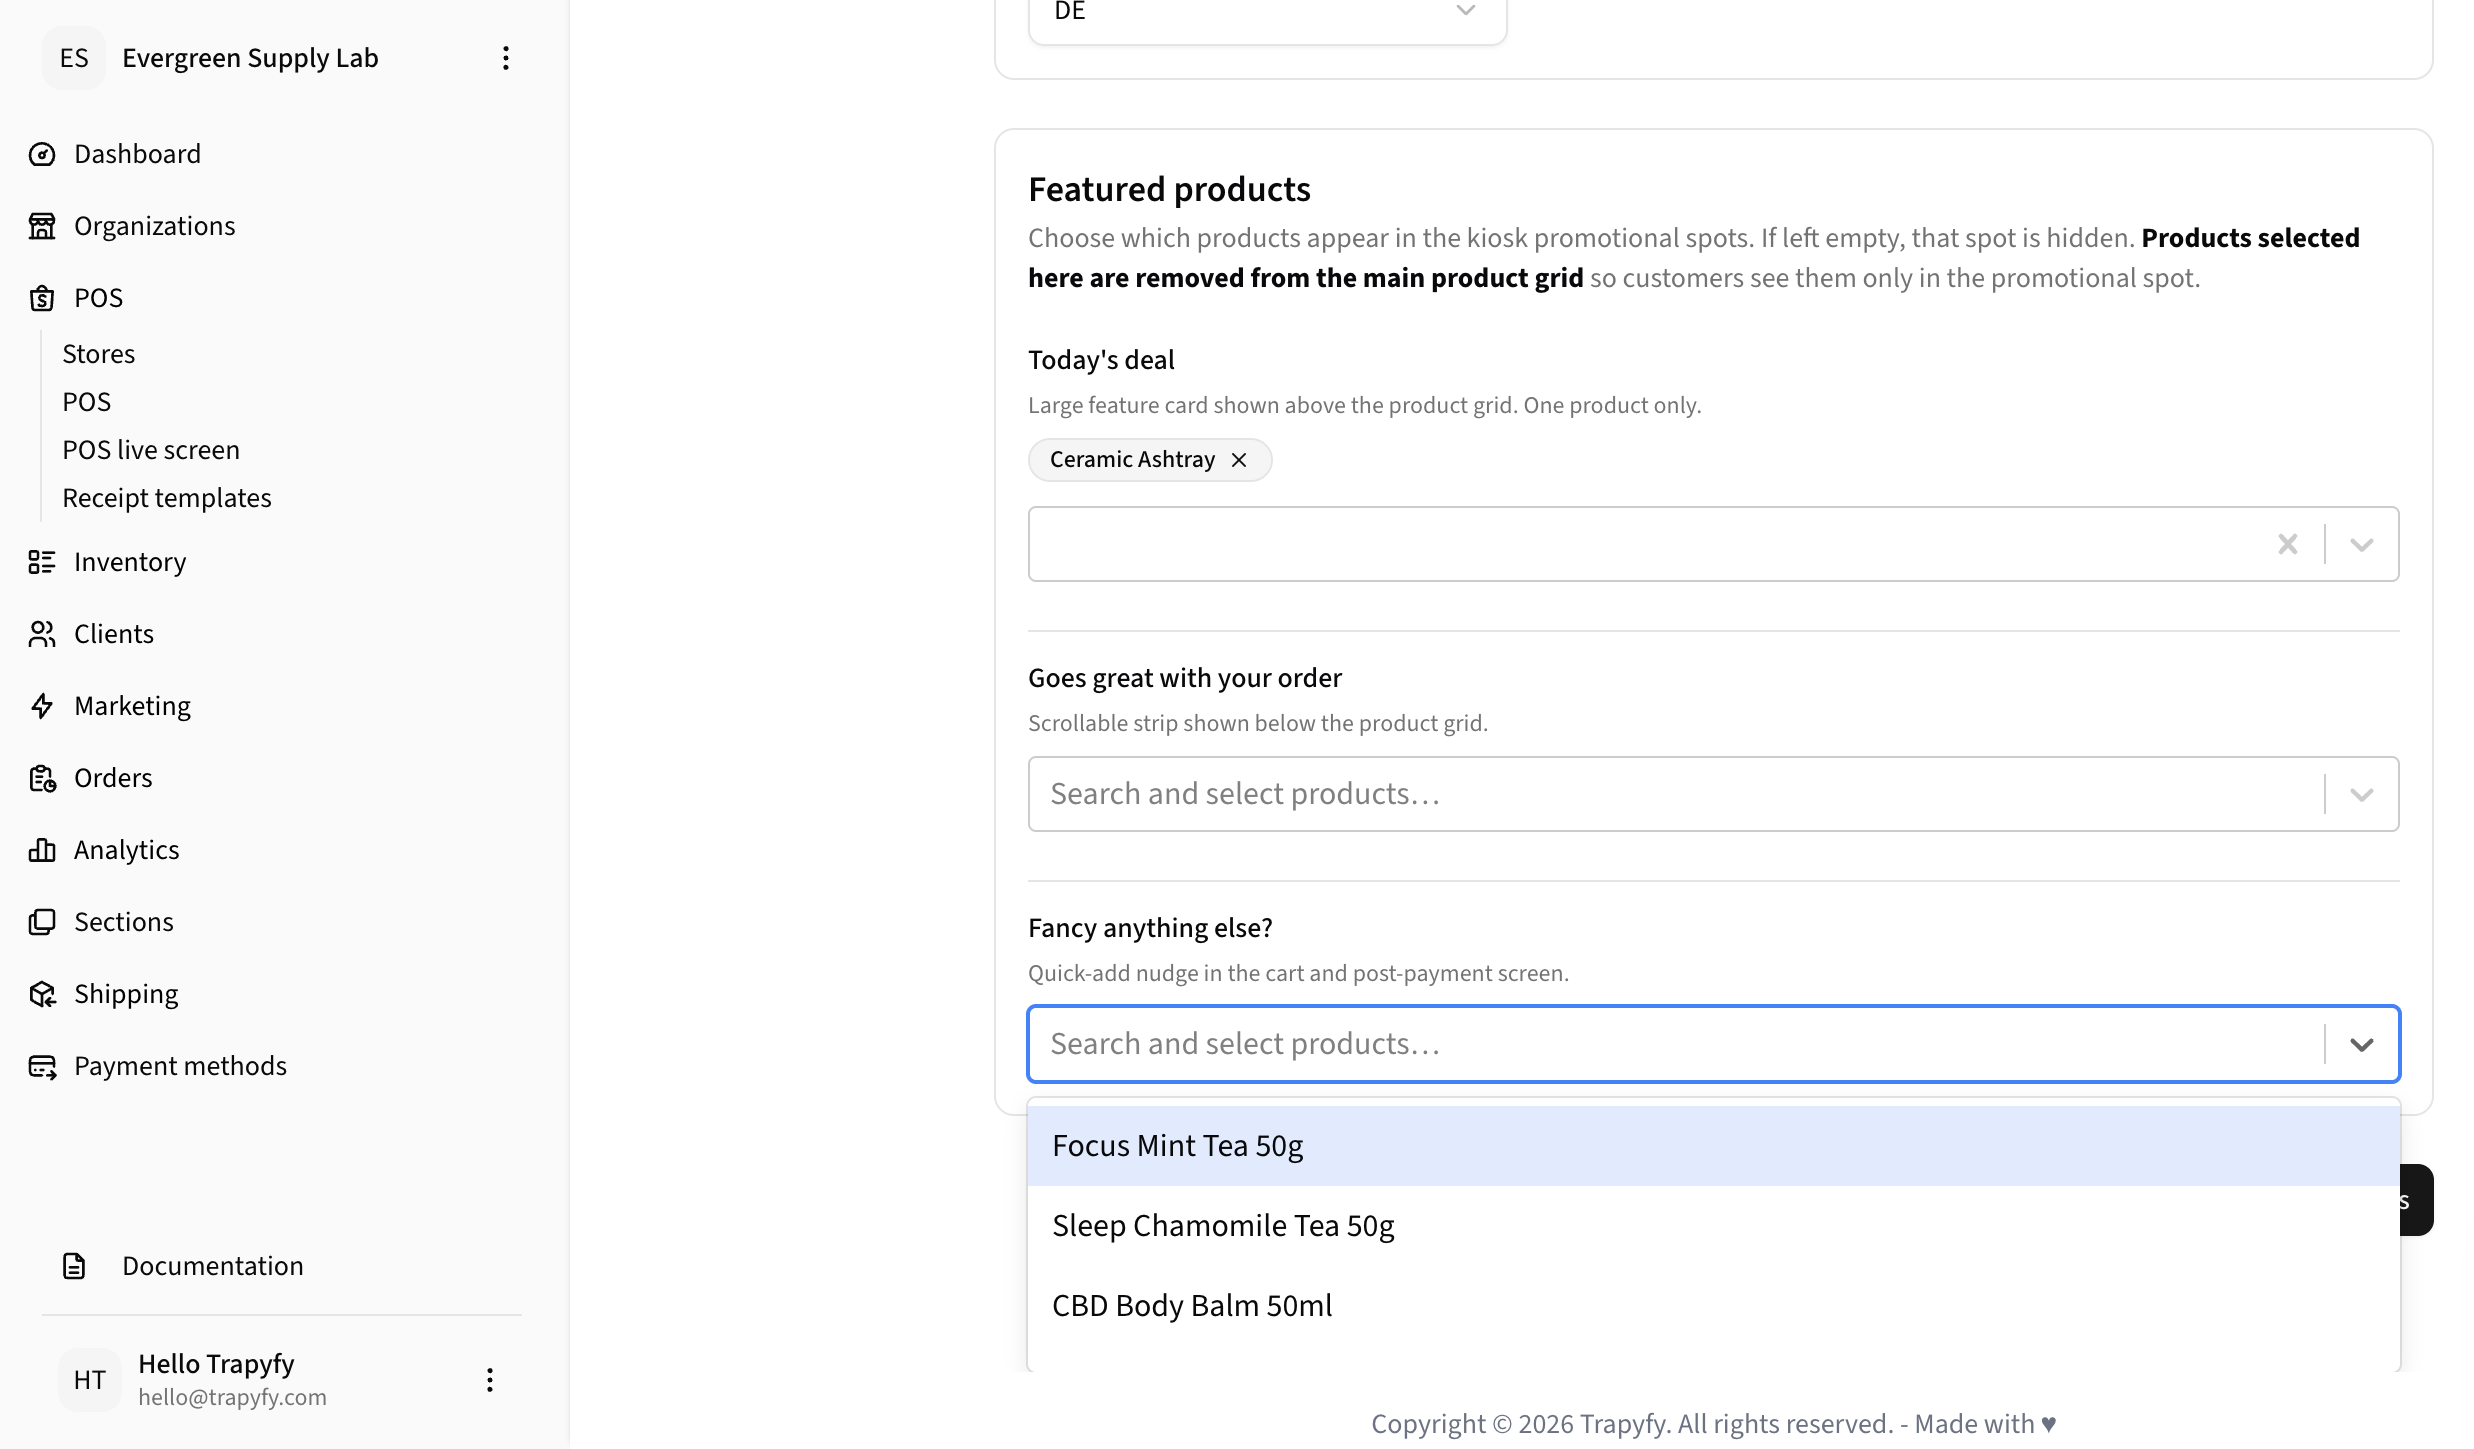
Featured products are removed from the main grid. If left empty, those spots are hidden.
Step 13 — Configure Email Discount Offer (Optional)
Offer a discount to customers who enter their email address at checkout — a great way to capture customer data for follow-up marketing.
- Inside Kiosk settings, scroll to Email discount offer
- Select Discount type: Percentage (%) or Fixed amount
- Enter the Percentage or Fixed amount
- Click Save
The discount is applied automatically at kiosk checkout when the customer enters their email.
Step 14 — Assign Products to Kiosks (Optional)
If you have multiple kiosks with different product assortments, you can assign specific products to each kiosk at the product level.
- Go to Products and open a product
- Scroll to the Kiosk assignment section (on the General or Inventory tab)
- Select which kiosks this product should appear on
- Click Save or Update Product
Select which warehouses and kiosks this product should appear on.
Step 15 — Test the Kiosk Experience
Run a complete end-to-end test before the event. Place an order, complete payment, and verify it appears in the backend.
- Open the Tablet URL on the tablet in a browser
- Click to start ordering and browse the product catalogue
- Add a product to the basket, review the order, and click "Checkout"
- The kiosk displays a payment QR code — scan it with your mobile phone
- Complete payment on the payment page (use a test card if available)
- Confirm the order appears in the merchant backend under Orders
- Verify the order status is Completed or Pending payment (depending on test card provider)
Device pairing status before going live.
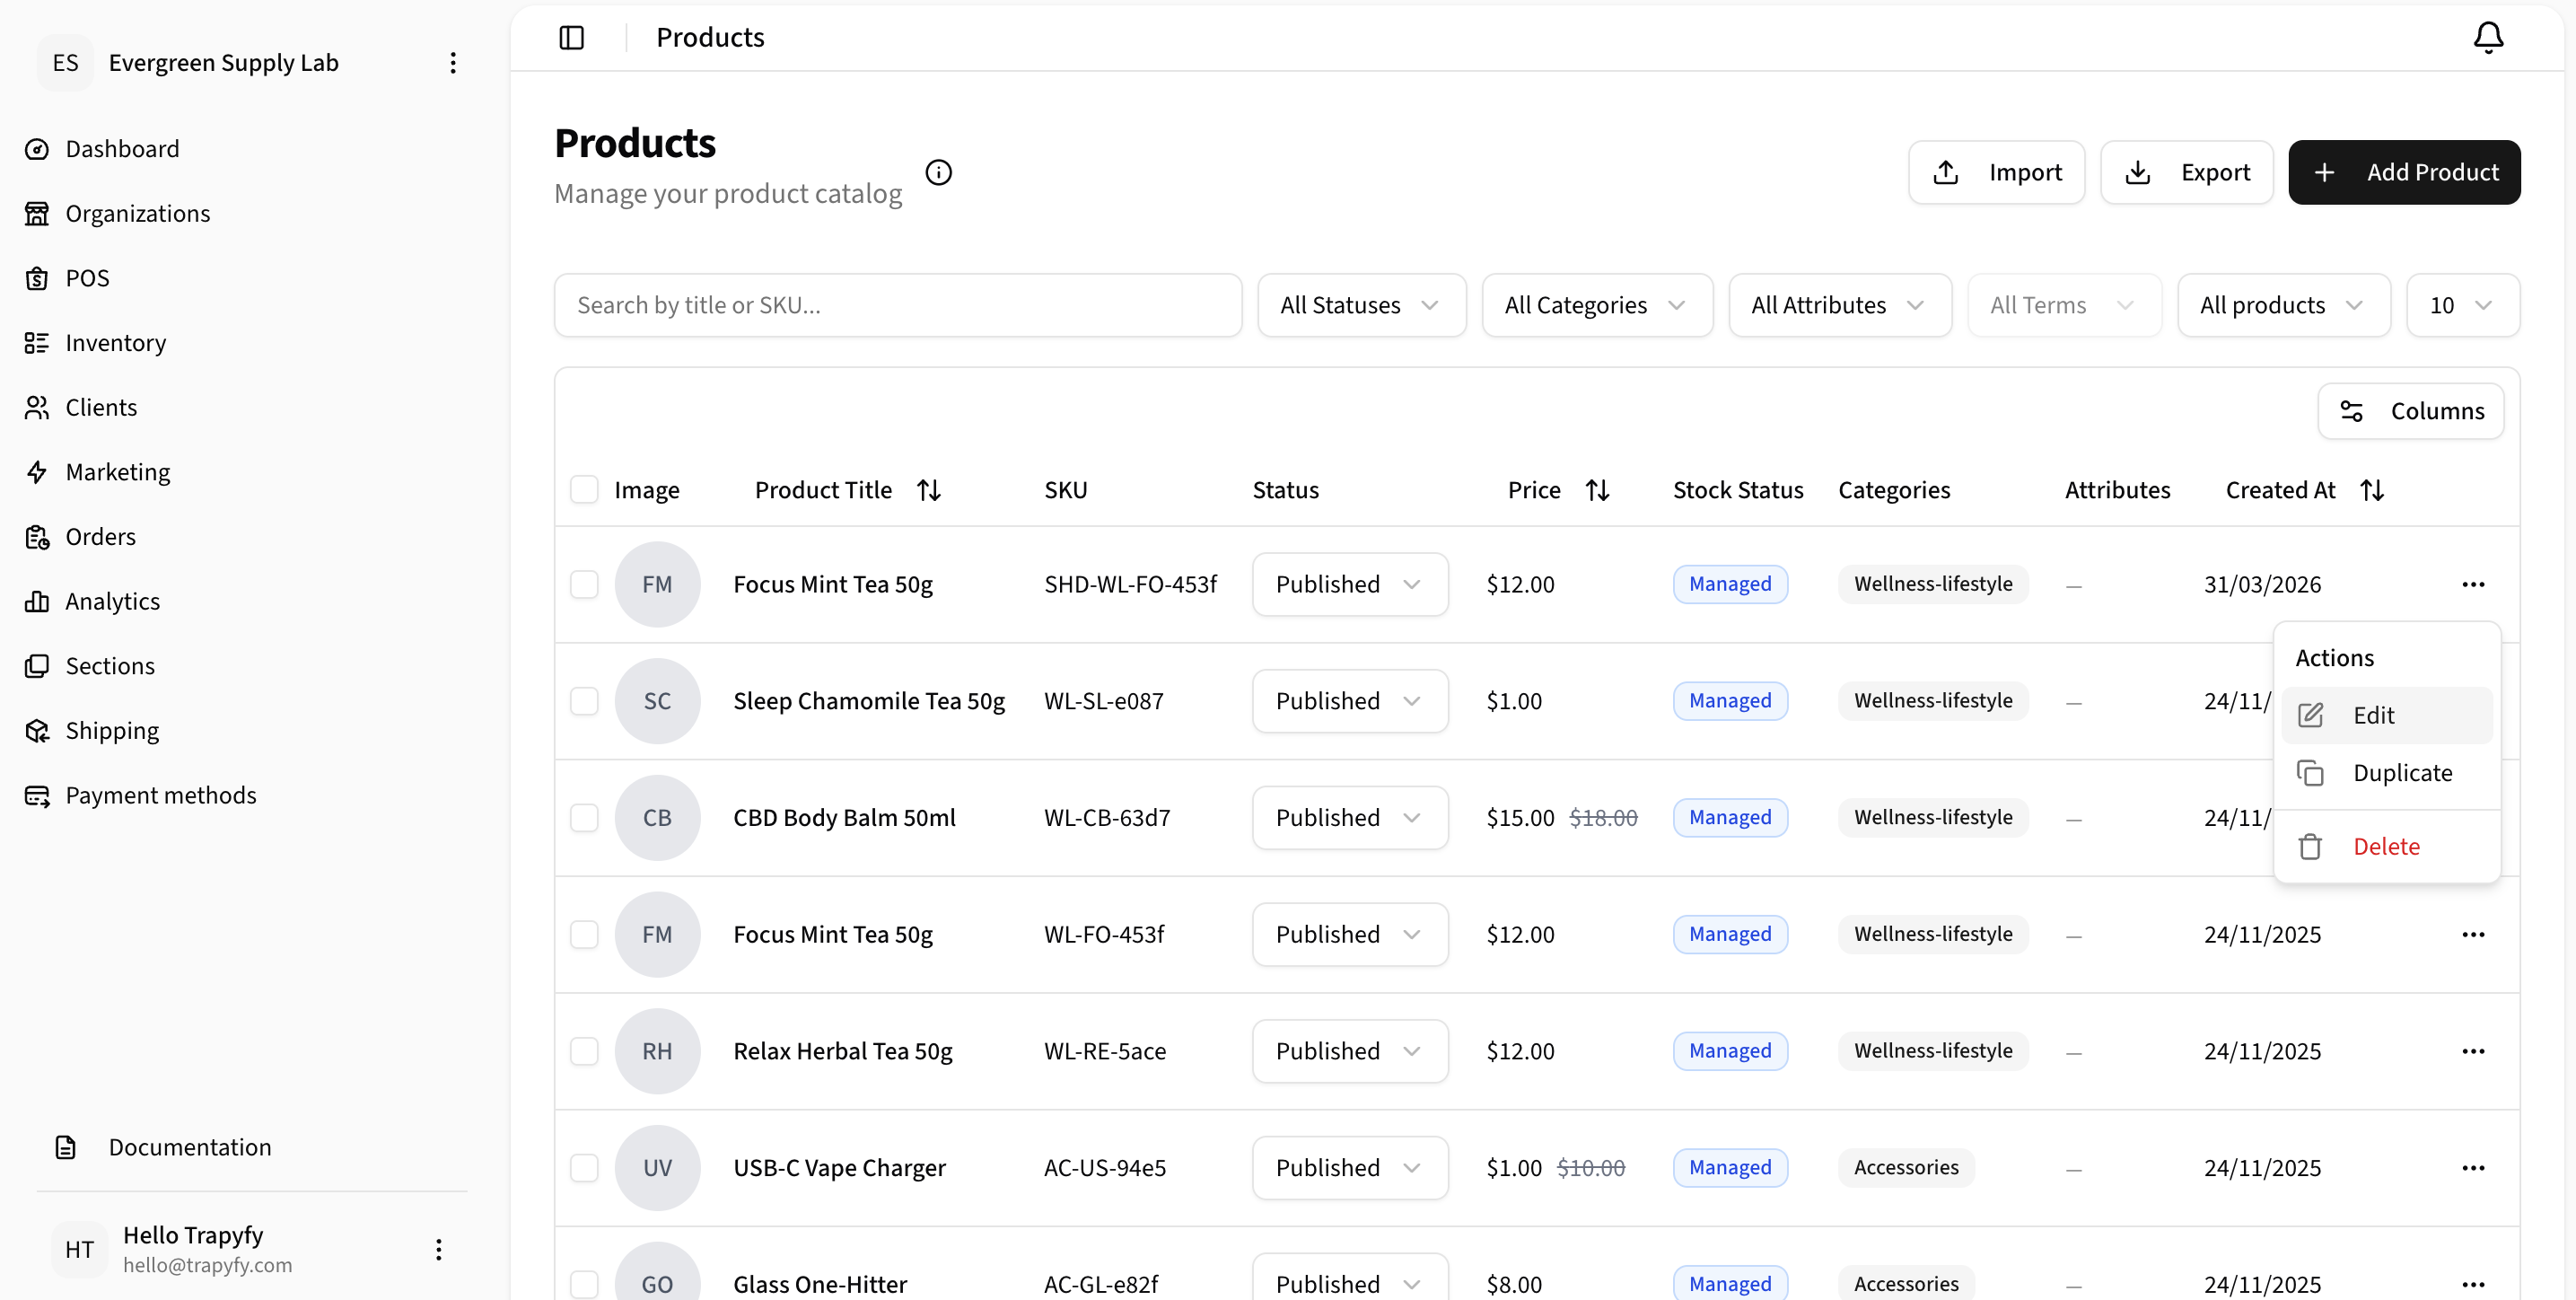
Products list — verify all products appear with correct pricing.
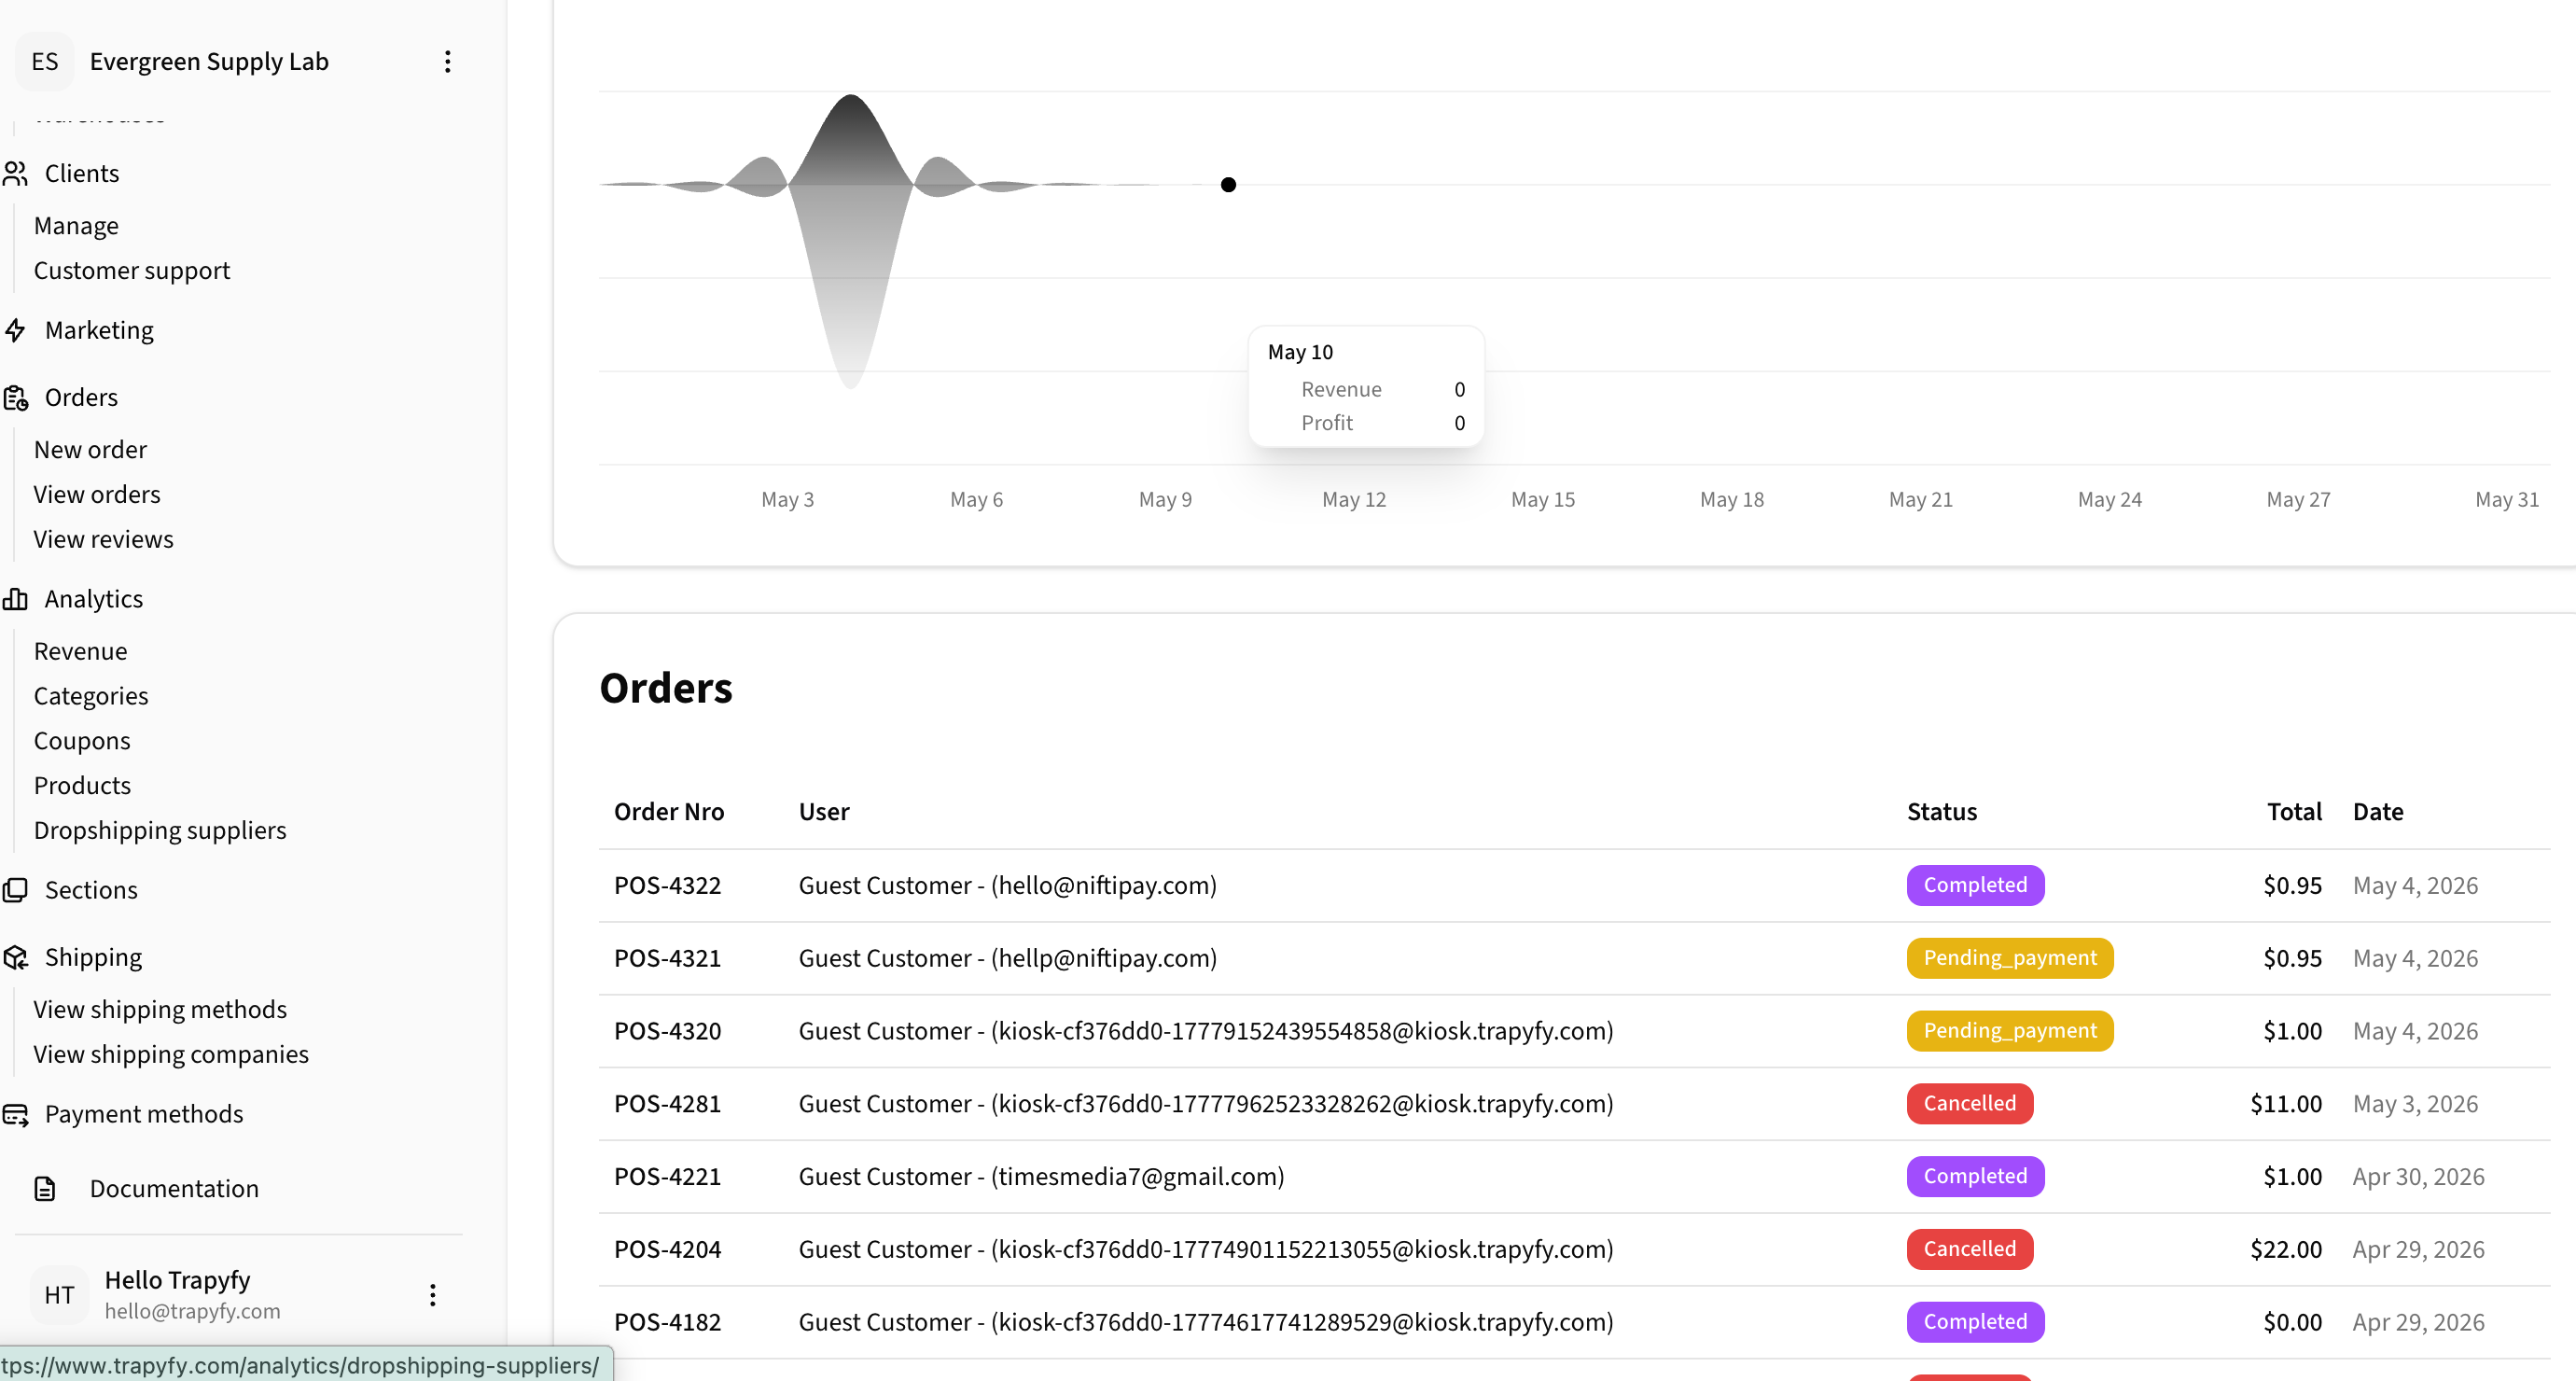
Test orders appear in the Orders table with statuses like Completed, Pending_payment, or Cancelled.
Product Management Reference
Quick reference for managing products in Inventory.
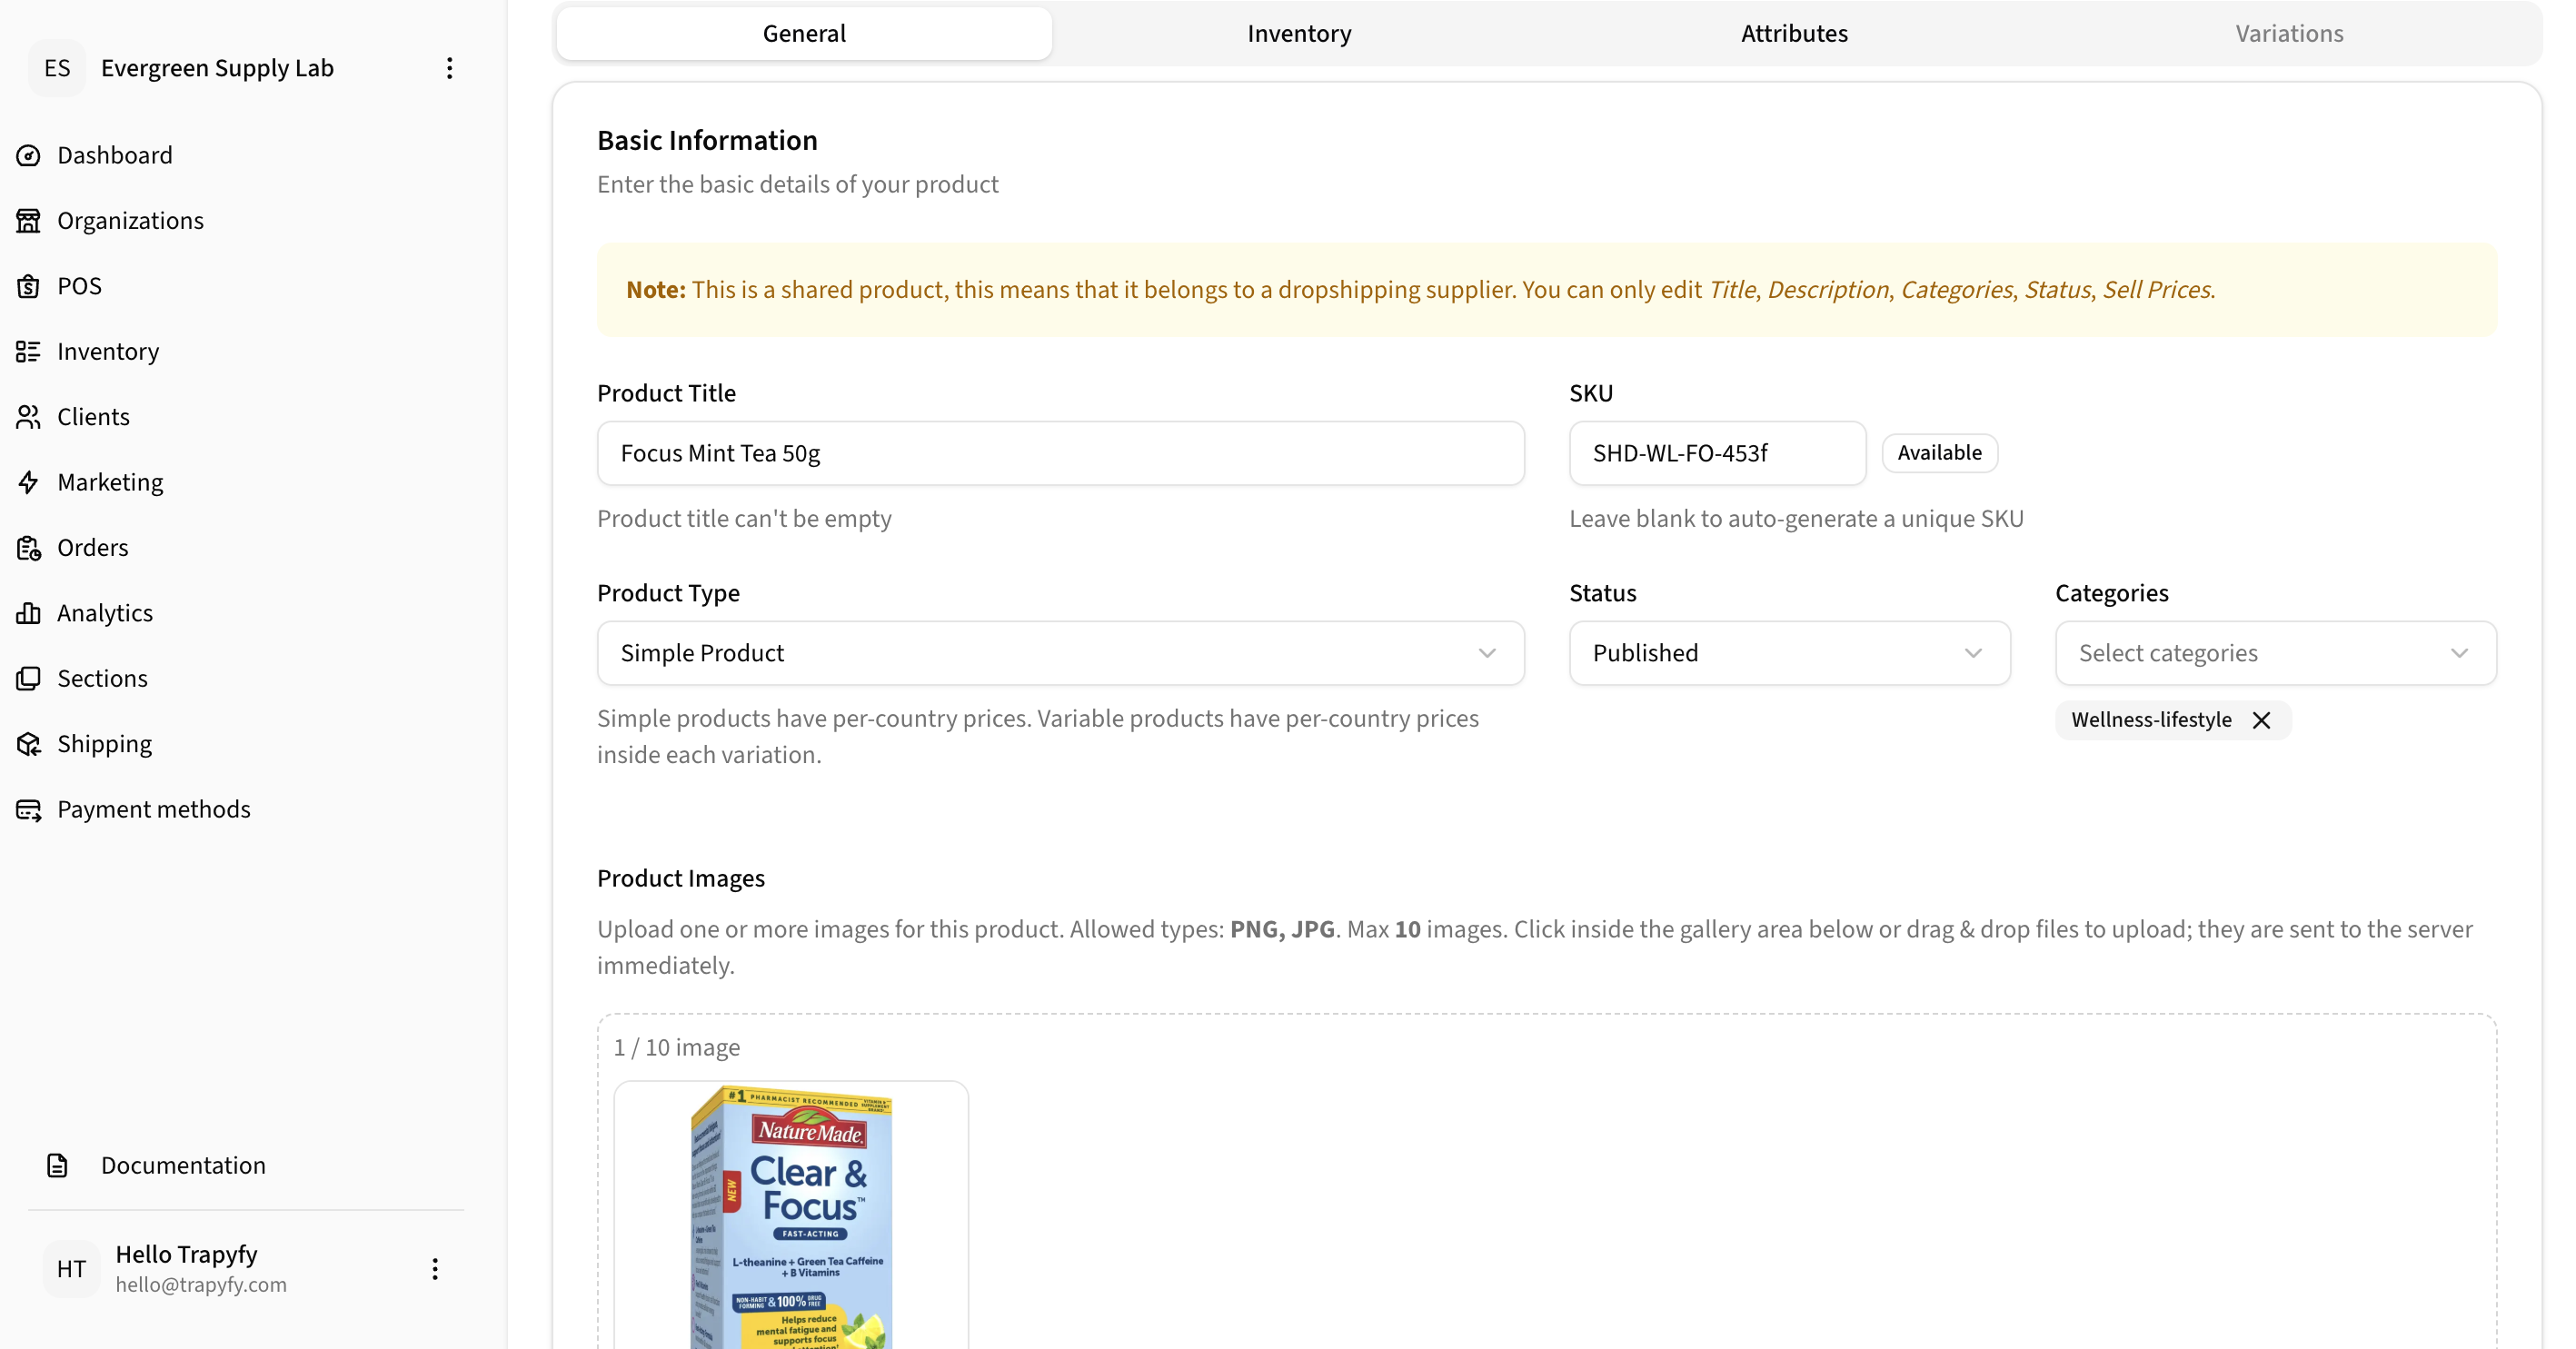
Edit Product — General Tab
General tab: Set product title, SKU, type, status, categories, and images.
Edit Product — Inventory Tab
Inventory tab: Set per-country pricing, manage stock, and configure warehouse assignments.
Products List
Products list: View all products with pricing, stock status, and categories. Click any product to edit.
Dashboard and Analytics Reference
Monitor kiosk performance and order data from the dashboard.
Key Metrics
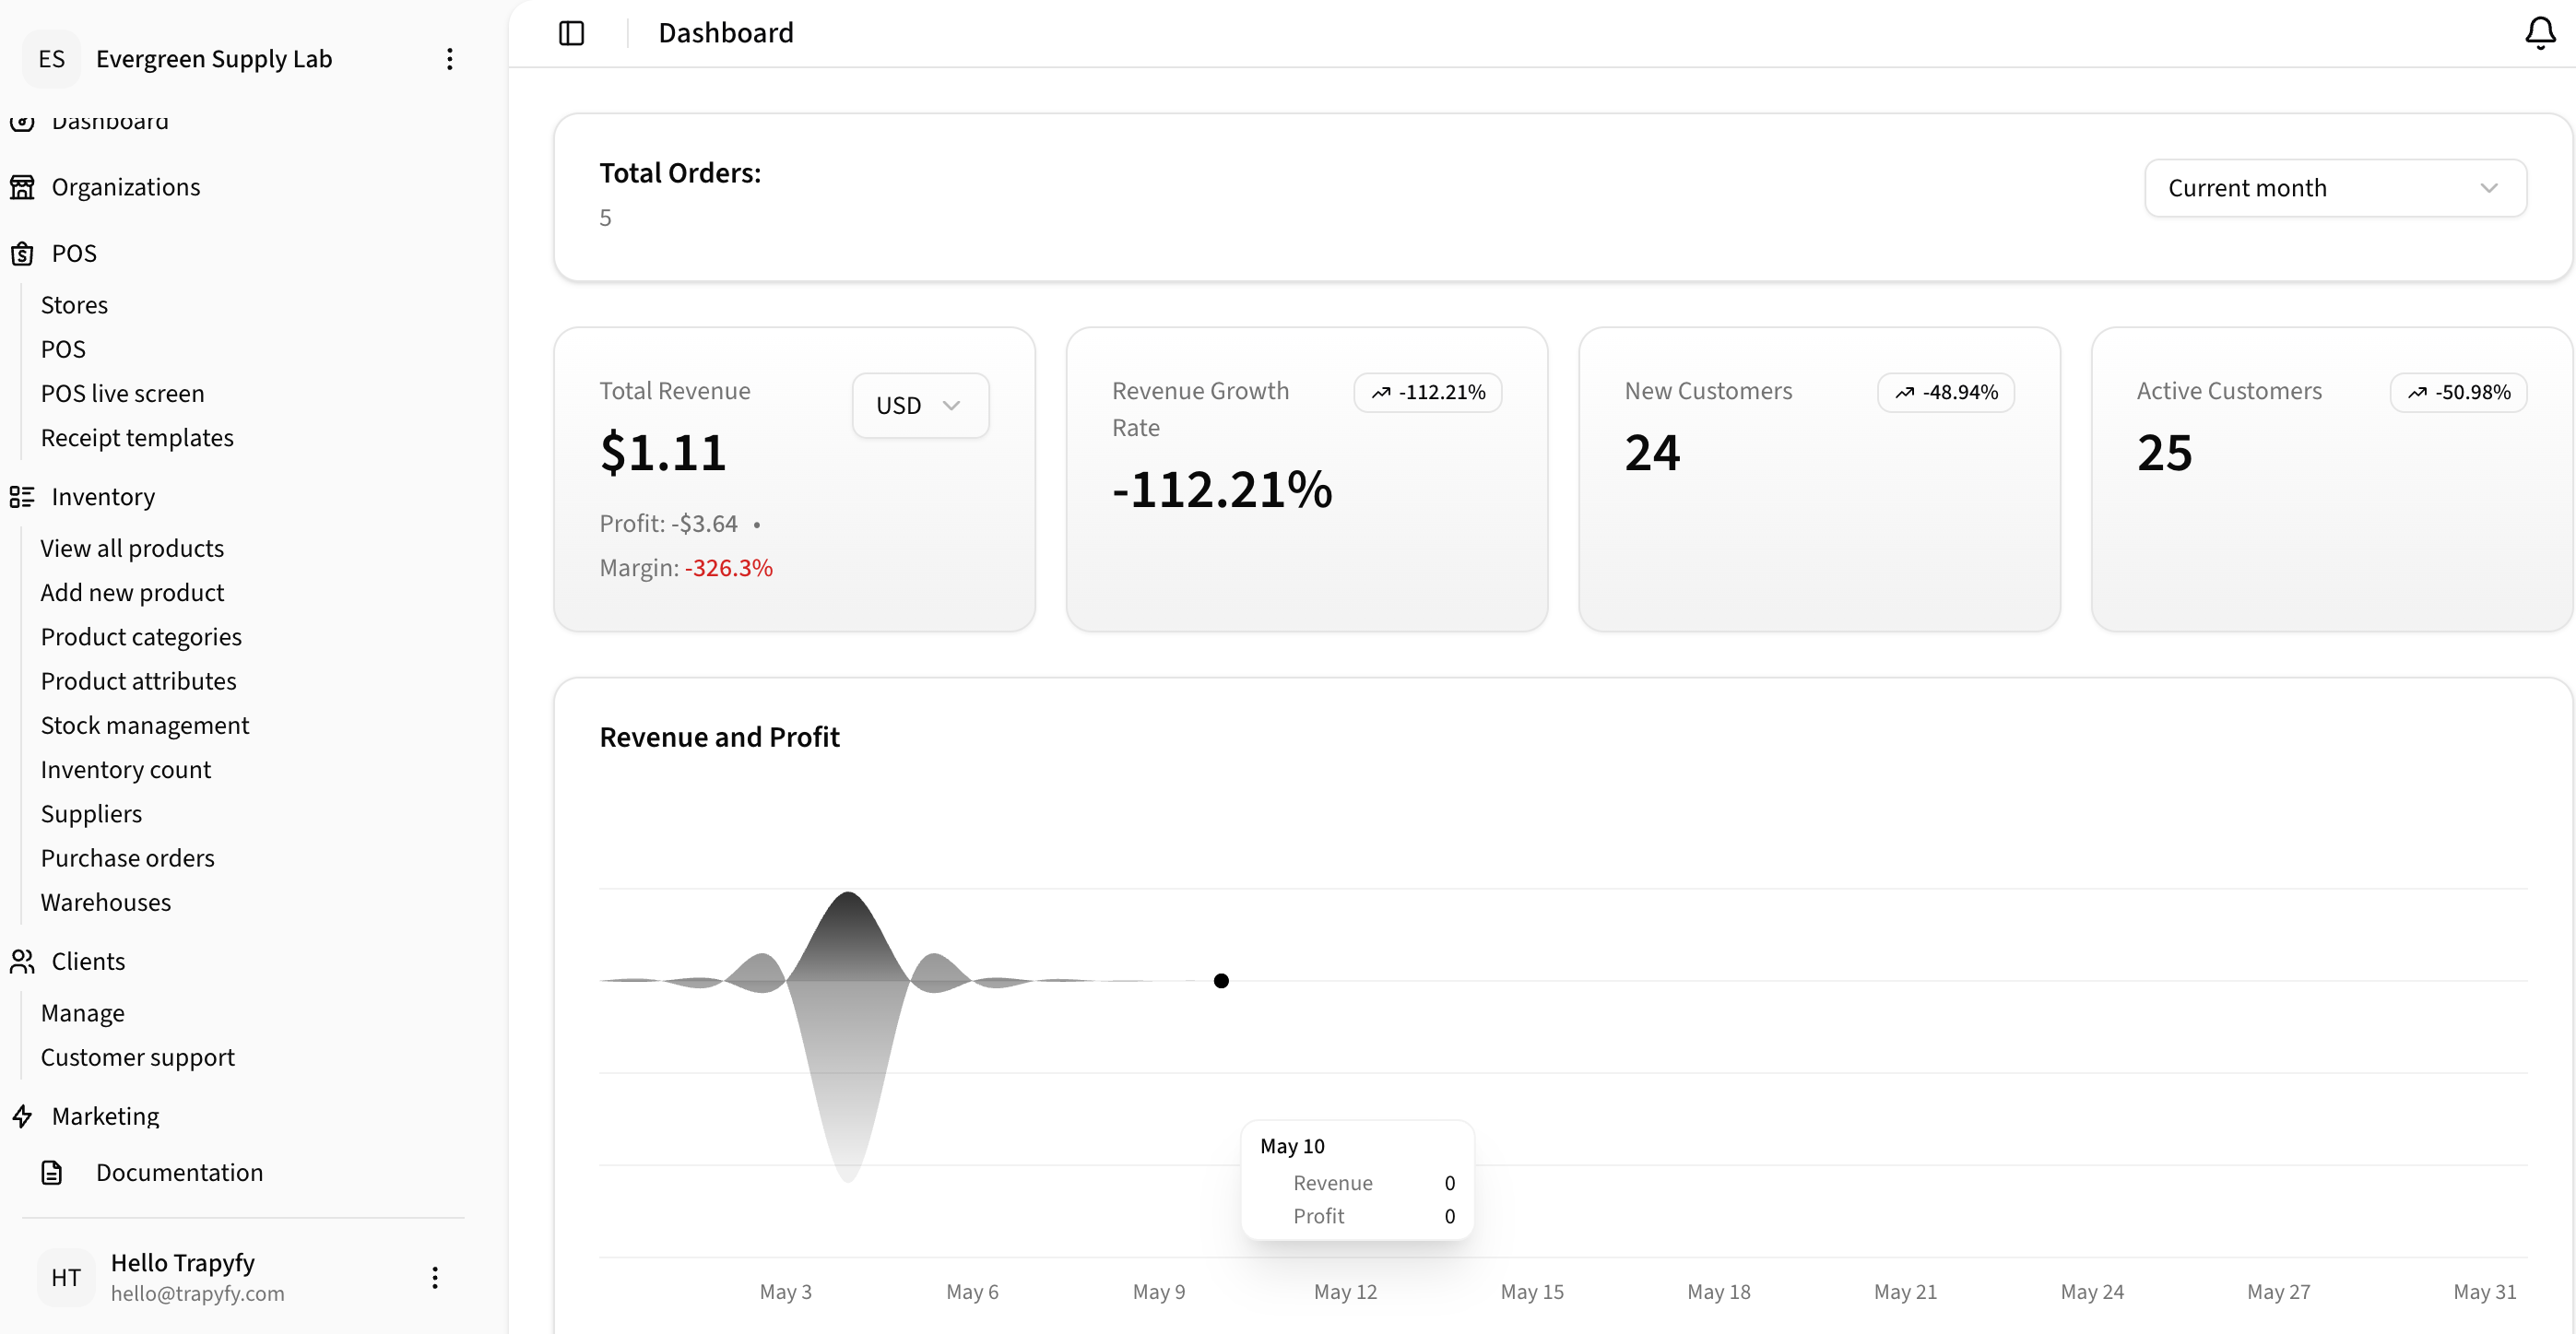
Dashboard displays key metrics: total orders, revenue, profit, customer counts, and historical trends.
Orders Table
Orders table: View all kiosk orders with status (Completed, Pending_payment, Cancelled), total amount, and date.
Recommended Hardware and Connectivity
For a smooth kiosk experience at events:
- Tablet: 10-inch or larger tablet (iPad, Android) with a recent OS version. Landscape orientation recommended for larger product displays.
- Internet: Stable Wi-Fi or mobile data connection. Test bandwidth before the event — recommend minimum 5 Mbps.
- Browser: Chrome, Safari, or Firefox. Test on the actual browser/device before going live.
- Printer (optional): Thermal receipt printer connected via USB or network for print-on-demand receipts.
- Backup device: Have a second tablet ready in case the primary one fails.
- Power: Keep the tablet on a stable power supply or have a fully charged portable charger.
- Network redundancy: If possible, connect to a backup network or have mobile data as a fallback.
Final Pre-Event Checklist
Run through this checklist 24 hours before the event:
- ☐ Trade show warehouse created with correct country
- ☐ All event products have pricing set for the event country
- ☐ All event products have stock assigned to the TRADE SHOW warehouse
- ☐ Store created with correct address and location
- ☐ Receipt template created and assigned to the store
- ☐ Kiosk mode enabled on the store
- ☐ All tablets are paired and show active status
- ☐ Kiosk branding (logo, colors) configured
- ☐ Guest Wi-Fi QR code configured and tested
- ☐ Inventory and Pricing configured (Warehouse: TRADE SHOW, Country: event country)
- ☐ Featured products configured
- ☐ End-to-end test completed: place order → pay → verify in backend
- ☐ Staff briefed on order fulfillment workflow
- ☐ Backup tablet charged and ready
Support and Troubleshooting
Kiosk not appearing/product missing
Check that the product has stock greater than 0 in the selected warehouse and pricing for the selected country.
Device won't pair
Ensure the tablet is on the same network and the pairing code hasn't expired (15-minute window). Generate a new code if needed.
Orders not appearing in backend
Verify payment was successful. Check the Orders page under Orders > View orders. If an order appears as Pending_payment, the customer scan may have failed — regenerate a payment QR.
Receipt printer not printing
Confirm the receipt template is assigned to the store and the printer is connected and online. Test from the backend.
Need help?
Contact the Trapyfy support team via the help centre or email [email protected].